Logging&monitoring: Difference between revisions
| (35 intermediate revisions by 3 users not shown) | |||
| Line 11: | Line 11: | ||
Page Created: 18 September 2016 | Page Created: 18 September 2016 | ||
Last modified: | Last modified: 05 October 2016 | ||
= | = Introduction = | ||
This article introduces the Logging and Monitoring application called '''Graylog'''. | |||
===Logging and monitoring=== | |||
* | Logging is the process of keeping a continuous record of an event. | ||
* | The general rule of logging is: Log everything which is not predictable. | ||
* | |||
Monitoring is the process of observing and checking the progress or quality of something over a period of time; keep under systematic review.<ref>[https://en.oxforddictionaries.com/definition/monitor]</ref> | |||
Monitoring cannot be achieved without logging. That is the reason integrated solutions combine the two processes. | |||
Monitoring is used to: | |||
*check performance | |||
*detect if something worth noticing happened | |||
*prevent something to happen | |||
*detect whether a system is under attack | |||
===The best solution: Graylog=== | |||
As of today, [https://www.graylog.org Graylog] is the most popular open-source solution (developed in Java) for logging and monitoring computer systems before [https://www.elastic.co/webinars/introduction-elk-stack ELK stack]. | |||
In the proprietary world, [https://www.splunk.com Splunk] is the leader. | |||
Graylog is made of three components: | |||
*[https://www.elastic.co/products/elasticsearch Elasticsearch] as the documents indexing engine | |||
*[https://www.mongodb.com Mongodb] for database | |||
*Graylog itself (server and web interface combined) to collect and view logs | |||
The main advantages of Graylog are: | |||
*Open-source | |||
*Works with unstructured logs and from any source | |||
*Good looking interface and dashboards | |||
*Supports user management (LDAP) | |||
Its disadvantages are: | |||
*Designed to work with Linux distributions (no good support for others operating systems) | |||
===Why monitor our servers=== | |||
There are many reasons why a system administrator would want to monitor its server(s). | |||
*Prevent undesired events to happen | |||
Without monitoring, a system administrator will react to a problem only when it has already occurred. Such issue can in the worst case cause a failure of the [http://whatis.techtarget.com/definition/Confidentiality-integrity-and-availability-CIA CIA triad]. It is of course wiser to anticipate such issues and solve the problem before they arise. | |||
The monitoring system sends alerts that help to identify potential sources of futures failures to avoid. | |||
*Understand what happened in case of failure | |||
In the event of a system failure, the monitoring system will give crucial information to determine where, when and how the problems occurred. | |||
This information makes the debugging process to be much faster and easier. | |||
In the end, monitoring a system can be seen as an insurance policy. It costs money and time, but the money and time it saves is worth it. | |||
===Securing during logging=== | |||
=Topology of the Elab system= | =Topology of the Elab system= | ||
| Line 36: | Line 75: | ||
'''IDS ip address 192.168.56.201''' | '''IDS ip address 192.168.56.201''' | ||
=Starting to update and upgrade for | =Starting to update and upgrade the OS= | ||
*First check your | ==== Check for current version ==== | ||
If your machine is running older version then 16.04 which is the latest long term supported version, please follow the following commands to upgrade your machine to the latest version. | |||
*First check your current Ubuntu version by running the following command: | |||
<code>lsb_release -a</code> | <code>lsb_release -a</code> | ||
If you | If you find that your machine is already running the following version or higher than: | ||
Description:Ubuntu 16.04.1 LTS | Description:Ubuntu 16.04.1 LTS | ||
Release:16.04 | Release:16.04 | ||
Then no need to | |||
Then there is no need to upgrade the OS | |||
==== Upgrade ==== | |||
*First become super user "root": | |||
*First | |||
<code>sudo -i</code> | <code>sudo -i</code> | ||
*Begin by updating the package list | *Begin by updating the package list: | ||
<code>apt-get update</code> | <code>apt-get update</code> | ||
*Upgrade installed packages to their latest available versions | *Upgrade installed packages to their latest available versions: | ||
<code>apt-get upgrade</code> | <code>apt-get upgrade</code> | ||
| Line 59: | Line 102: | ||
<code>apt-get dist-upgrade</code> | <code>apt-get dist-upgrade</code> | ||
*Now that you have an up-to-date installation of Ubuntu | *Now that you have an up-to-date installation of Ubuntu 16.04 LTS, you can use <code> do-release-upgrade</code> to upgrade to the Ubuntu 16.04 LTS release. | ||
= Setup of Graylog= | |||
==== Prerequisites ==== | ==== Prerequisites ==== | ||
Ubuntu Linux machine, sudo access and some Linux beginner skills are needed. | Ubuntu Linux machine, sudo access and some Linux beginner skills are needed. | ||
In this tutorial | In this tutorial, Ubuntu 16.04 64-bit distribution will be used since it is the latest LTS. | ||
Unfortunately, Graylog cannot be installed simply by using one command | |||
Unfortunately, Graylog cannot be installed simply by using one command, because there are some prerequisite applications needed for it to work. | |||
This tutorial describes the commands and configuration to make the services work together Graylog. | |||
Attention! All links and packages/versions are present to the time of writing this guide it might need to be updated later on. | Attention! All links and packages/versions are present to the time of writing this guide it might need to be updated later on. | ||
Remember that to modify a configuration file, you must [http://www.howtogeek.com/118389/how-to-comment-out-and-uncomment-lines-in-a-configuration-file uncomment/comment-out some lines]. | |||
=== Step by Step Installation tutorial on Ubuntu 16.04 Linux host machine === | === Step by Step Installation tutorial on Ubuntu 16.04 Linux host machine === | ||
'''1)''' It is important to have the latest package lists to update them to get info on the newst versions of packages and their dependencies. | '''1)''' It is important to have the latest package lists to update them to get info on the newst versions of packages and their dependencies. So we need to run the following command to update them: | ||
''Command:'' <code> sudo apt-get update</code> | ''Command:'' <code> sudo apt-get update</code> | ||
'''2)''' Now we can install the setup base packages: | '''2)''' Now we can install the setup base packages: | ||
''Command:'' <code> apt-get install apt-transport-https openjdk-8-jre-headless uuid-runtime pwgen </code> | ''Command:'' <code> apt-get install apt-transport-https openjdk-8-jre-headless uuid-runtime pwgen </code> | ||
'''3)''' '''MongoDB''' is a Free and open-source cross-platform document-oriented database program written in C++,C and JavaScript. Classified as a NoSQL database program in favor of JSON-like documents with dynamic schemas (format BSON) making the integration of data in certain types of applications like Graylog easier and faster. | '''3)''' '''MongoDB''' is a Free and open-source cross-platform document-oriented database program written in C++,C and JavaScript. Classified as a NoSQL database program in favor of JSON-like documents with dynamic schemas (format BSON) making the integration of data in certain types of applications like Graylog easier and faster. | ||
| Line 87: | Line 138: | ||
''Command:'' <code> apt-get install mongodb-server </code> | ''Command:'' <code> apt-get install mongodb-server </code> | ||
Elasticsearch is required for Graylog 2 and higher to work, so it is possible to see the complete installation instructions on the [https://www.elastic.co/guide/en/elasticsearch/reference/2.3/setup-repositories.html#_apt official page] | '''4)''' '''Elasticsearch''' is a search engine based on Lucene written in Java. It provides a distributed, multitenant-capable full-text search engine with an HTTP web interface and schema-free JSON documents. | ||
Elasticsearch is required for Graylog 2 and higher to work, so it is possible to see the complete installation instructions on the [https://www.elastic.co/guide/en/elasticsearch/reference/2.3/setup-repositories.html#_apt official page]. | |||
It is recommended to have at least 2Gb of RAM to run Elasticsearch. | |||
''Commands:'' | ''Commands:'' | ||
| Line 106: | Line 159: | ||
''Command:'' <code> nano /etc/elasticsearch/elasticsearch.yml</code> | ''Command:'' <code> nano /etc/elasticsearch/elasticsearch.yml</code> | ||
and change <code> cluster.name:elasticsearch</code> to <code> cluster.name: graylog</code> | and change <code> cluster.name:elasticsearch</code> to <code> cluster.name: graylog</code> | ||
'''6)''' After config was modified, we can now start Elasticsearch: | '''6)''' After config was modified, we can now start Elasticsearch: | ||
<code>sudo | <code>sudo systemctl daemon-reload</code> | ||
<code>sudo | <code>sudo systemctl enable elasticsearch.service</code> | ||
<code>sudo | <code>sudo systemctl restart elasticsearch.service</code> | ||
It is possible to check if the elasticsearch configured correctly by using the following command: | It is possible to check if the elasticsearch's name is configured correctly by using the following command: | ||
<code>curl -XGET http://localhost:9200</code> | <code>curl -XGET http://localhost:9200</code> | ||
Alternatively it is possible to use the following command which will also show the status of Elasticsearch (it must be "green"): | |||
<code>curl 'localhost:9200/_cat/health?v'</code> | |||
'''7)''' '''Graylog''' can now be installed if all the above steps were done successfully | '''7)''' '''Graylog''' can now be installed if all the above steps were done successfully | ||
| Line 132: | Line 190: | ||
'''8)''' After the Graylog has been installed it is needed to change the configuration | '''8)''' After the Graylog has been installed it is needed to change the configuration | ||
[[File:Screenshot from 2016-10-05 22-32-56.jpg|thumb|right|graylog web interface]] | |||
Think about the password (which would be used to login) and then use the command: | Think about the password (which would be used to login) and then use the command: | ||
<code>echo -n supersecretpassword123 | sha256sum</code> | <code>echo -n supersecretpassword123 | sha256sum</code> | ||
It will generate the sha256 hash of the password which would be needed to copy-pasted and add it to the <code>password_secret</code> and <code>root_password_sha2</code> in the graylog config (<code>/etc/graylog/server/server.conf</code>). This is mandatory to do! Without it Graylog will not start! | It will generate the sha256 hash of the password which would be needed to copy-pasted and add it to the <code>password_secret</code> and <code>root_password_sha2</code> in the graylog config (<code>/etc/graylog/server/server.conf</code>). This is mandatory to do! Without it Graylog will not start! | ||
'''9)''' In order to connect to Graylog web-interface it is needed to set <code>rest_listen_uri</code> and <code>web_listen_uri</code> to the public hostname or IP address of the machine. | '''9)''' In order to connect to Graylog web-interface it is needed to set <code>rest_listen_uri</code> and <code>web_listen_uri</code> to the public hostname or IP address of the machine. | ||
'''10)''' Last step is to enable Graylog during the system startup: | '''10)''' Last step is to enable Graylog during the system startup: | ||
| Line 148: | Line 209: | ||
=Summary= | =Summary= | ||
*After setting the graylog and the web interface is working follow the few steps to logging the system | |||
[[File:Screenshot from 2016-10-05 22-33-18.jpg|thumb|center|input]] | |||
[[File:Screenshot from 2016-10-05 22-34-25.jpg|thumb|center|Setting up the logging]] | |||
[[File:Screenshot from 2016-10-05 22-33-41.jpg|thumb|center|input]] | |||
=See also= | =See also= | ||
| Line 155: | Line 222: | ||
=References= | =References= | ||
1- https://www.graylog.org | |||
2- http://docs.graylog.org/en/2.1/ | |||
Latest revision as of 09:04, 13 October 2016
Logging and Monitoring - Logging Solution - Graylog
Team: Artur Ovtsinnikov, Mohanad Aly, Etienne Barrier, Meelis Hass
Group : Cyber Security Engineering (C21)
Page Created: 18 September 2016
Last modified: 05 October 2016
Introduction
This article introduces the Logging and Monitoring application called Graylog.
Logging and monitoring
Logging is the process of keeping a continuous record of an event. The general rule of logging is: Log everything which is not predictable.
Monitoring is the process of observing and checking the progress or quality of something over a period of time; keep under systematic review.[1] Monitoring cannot be achieved without logging. That is the reason integrated solutions combine the two processes. Monitoring is used to:
- check performance
- detect if something worth noticing happened
- prevent something to happen
- detect whether a system is under attack
The best solution: Graylog
As of today, Graylog is the most popular open-source solution (developed in Java) for logging and monitoring computer systems before ELK stack. In the proprietary world, Splunk is the leader.
Graylog is made of three components:
- Elasticsearch as the documents indexing engine
- Mongodb for database
- Graylog itself (server and web interface combined) to collect and view logs
The main advantages of Graylog are:
- Open-source
- Works with unstructured logs and from any source
- Good looking interface and dashboards
- Supports user management (LDAP)
Its disadvantages are:
- Designed to work with Linux distributions (no good support for others operating systems)
Why monitor our servers
There are many reasons why a system administrator would want to monitor its server(s).
- Prevent undesired events to happen
Without monitoring, a system administrator will react to a problem only when it has already occurred. Such issue can in the worst case cause a failure of the CIA triad. It is of course wiser to anticipate such issues and solve the problem before they arise. The monitoring system sends alerts that help to identify potential sources of futures failures to avoid.
- Understand what happened in case of failure
In the event of a system failure, the monitoring system will give crucial information to determine where, when and how the problems occurred. This information makes the debugging process to be much faster and easier.
In the end, monitoring a system can be seen as an insurance policy. It costs money and time, but the money and time it saves is worth it.
Securing during logging
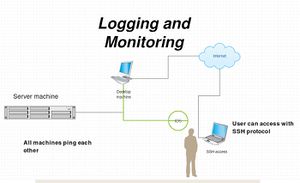
Topology of the Elab system
Desktop machine

Begin with the basic setup, network configuration and make the machine has internet access which the ip address of the machine is 192.168.56.100
Server machine ip address 192.168.56.200
- Can be connected over ssh with student@192.168.56.200
- Also can connect with other IP address ssh student@10.10.10.10
IDS ip address 192.168.56.201
Starting to update and upgrade the OS
Check for current version
If your machine is running older version then 16.04 which is the latest long term supported version, please follow the following commands to upgrade your machine to the latest version.
- First check your current Ubuntu version by running the following command:
lsb_release -a
If you find that your machine is already running the following version or higher than:
Description:Ubuntu 16.04.1 LTS Release:16.04
Then there is no need to upgrade the OS
Upgrade
- First become super user "root":
sudo -i
- Begin by updating the package list:
apt-get update
- Upgrade installed packages to their latest available versions:
apt-get upgrade
- Once upgrade finishes, use the dist-upgrade command, which will perform upgrades involving changing dependencies
apt-get dist-upgrade
- Now that you have an up-to-date installation of Ubuntu 16.04 LTS, you can use
do-release-upgradeto upgrade to the Ubuntu 16.04 LTS release.
Setup of Graylog
Prerequisites
Ubuntu Linux machine, sudo access and some Linux beginner skills are needed.
In this tutorial, Ubuntu 16.04 64-bit distribution will be used since it is the latest LTS.
Unfortunately, Graylog cannot be installed simply by using one command, because there are some prerequisite applications needed for it to work.
This tutorial describes the commands and configuration to make the services work together Graylog.
Attention! All links and packages/versions are present to the time of writing this guide it might need to be updated later on.
Remember that to modify a configuration file, you must uncomment/comment-out some lines.
Step by Step Installation tutorial on Ubuntu 16.04 Linux host machine
1) It is important to have the latest package lists to update them to get info on the newst versions of packages and their dependencies. So we need to run the following command to update them:
Command: sudo apt-get update
2) Now we can install the setup base packages:
Command: apt-get install apt-transport-https openjdk-8-jre-headless uuid-runtime pwgen
3) MongoDB is a Free and open-source cross-platform document-oriented database program written in C++,C and JavaScript. Classified as a NoSQL database program in favor of JSON-like documents with dynamic schemas (format BSON) making the integration of data in certain types of applications like Graylog easier and faster.
The version included in Ubuntu 16.04 LTS can be used together with Graylog 2 and higher, but it is also possible to check the official webpage and download the needed/latest version.
It can be installed by running the following command:
Command: apt-get install mongodb-server
4) Elasticsearch is a search engine based on Lucene written in Java. It provides a distributed, multitenant-capable full-text search engine with an HTTP web interface and schema-free JSON documents.
Elasticsearch is required for Graylog 2 and higher to work, so it is possible to see the complete installation instructions on the official page. It is recommended to have at least 2Gb of RAM to run Elasticsearch.
Commands:
wget -qO - https://packages.elastic.co/GPG-KEY-elasticsearch | sudo apt-key add -
echo "deb https://packages.elastic.co/elasticsearch/2.x/debian stable main" | sudo tee -a /etc/apt/sources.list.d/elasticsearch-2.x.list
sudo apt-get update
sudo apt-get install elasticsearch
5) Modifying the Elasticsearch configuration file and setting the cluster name to graylog so it will be visible and accessible by graylog.
Command: nano /etc/elasticsearch/elasticsearch.yml
and change cluster.name:elasticsearch to cluster.name: graylog
6) After config was modified, we can now start Elasticsearch:
sudo systemctl daemon-reload
sudo systemctl enable elasticsearch.service
sudo systemctl restart elasticsearch.service
It is possible to check if the elasticsearch's name is configured correctly by using the following command:
curl -XGET http://localhost:9200
Alternatively it is possible to use the following command which will also show the status of Elasticsearch (it must be "green"):
curl 'localhost:9200/_cat/health?v'
7) Graylog can now be installed if all the above steps were done successfully
First it is needed to install the Graylog repository using the following commands:
wget https://packages.graylog2.org/repo/packages/graylog-2.1-repository_latest.deb
sudo dpkg -i graylog-2.1-repository_latest.deb
sudo apt-get update
sudo apt-get install graylog-server
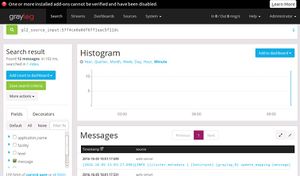
8) After the Graylog has been installed it is needed to change the configuration

Think about the password (which would be used to login) and then use the command:
echo -n supersecretpassword123 | sha256sum
It will generate the sha256 hash of the password which would be needed to copy-pasted and add it to the password_secret and root_password_sha2 in the graylog config (/etc/graylog/server/server.conf). This is mandatory to do! Without it Graylog will not start!
9) In order to connect to Graylog web-interface it is needed to set rest_listen_uri and web_listen_uri to the public hostname or IP address of the machine.
10) Last step is to enable Graylog during the system startup:
sudo systemctl daemon-reload
sudo systemctl enable graylog-server.service
sudo systemctl start graylog-server.service
Summary
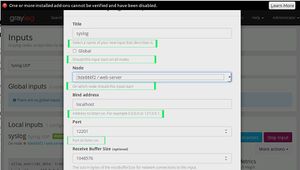
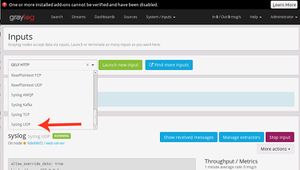
- After setting the graylog and the web interface is working follow the few steps to logging the system


See also
References
2- http://docs.graylog.org/en/2.1/