Category:I802 Firewalls and VPN IPSec: Difference between revisions
| (40 intermediate revisions by 6 users not shown) | |||
| Line 1: | Line 1: | ||
=Firewalls and VPN/IPSec= | =Firewalls and VPN/IPSec= | ||
Note: 2017 Fall semester materials are going to be [https://wiki.itcollege.ee/index.php/Category:I802_Firewalls_and_VPN_IPSec_(2017) here] | |||
==General information== | ==General information== | ||
| Line 79: | Line 81: | ||
cd /var/lib/libvirt/images/ | cd /var/lib/libvirt/images/ | ||
wget https://downloads.openwrt.org/chaos_calmer/15.05 | wget https://downloads.openwrt.org/chaos_calmer/15.05.1/x86/generic/openwrt-15.05.1-x86-generic-combined-ext4.img.gz | ||
gunzip openwrt-15.05.1-x86- | gunzip openwrt-15.05.1-x86-generic-combined-ext4.img.gz | ||
Add second network interface to your router's VM. | Add second network interface to your router's VM. | ||
| Line 90: | Line 92: | ||
To clarify: 'srv1.office' and 'srv2.office' are the Ubuntu 16.04 servers, you should have configured static IP addresses or set a static lease from the router. The 'router.office' refers to the OpenWrt router you just set up. The router serves IP addresses using DHCP to 'ubuntu-mate.office' Ubuntu MATE 16.04 workstation and 'windows.office' refers to Windows workstation. Your physical server 'host.office' can be accessed as well. The 'office' throughout the diagram refers to your domain name, use abbrevations such as hq, rnd, devops for that. | To clarify: 'srv1.office' and 'srv2.office' are the Ubuntu 16.04 servers, you should have configured static IP addresses or set a static lease from the router. The 'router.office' refers to the OpenWrt router you just set up. The router serves IP addresses using DHCP to 'ubuntu-mate.office' Ubuntu MATE 16.04 workstation and 'windows.office' refers to Windows workstation. Your physical server 'host.office' can be accessed as well. The 'office' throughout the diagram refers to your domain name, use abbrevations such as hq, rnd, devops for that. | ||
==Domain names== | ==Domain names== | ||
| Line 107: | Line 108: | ||
(Re)configure your services to make use of these DNS records. | (Re)configure your services to make use of these DNS records. | ||
It is also possible to access the services with the domain mareti.ee | |||
==Monitoring== | ==Monitoring== | ||
| Line 324: | Line 327: | ||
==Generating certificates== | ==Generating certificates== | ||
To generate key: | On your Ubuntu laptop install OpenVPN plugin for NetworkManager: | ||
sudo apt install network-manager-openvpn-gnome | |||
On Windows laptop install OpenVPN client and TAP driver from https://openvpn.net/index.php/download/community-downloads.html | |||
To generate key, use your computer hostname as filename. | |||
openssl genrsa -out lauri-acer-c720p.key 4096 | |||
To generate signing request, again use computer hostname as filename. | |||
openssl req -new -key lauri-acer-c720p.key -out lauri-acer-c720p.csr | |||
The command expects interactive input, set common name to your computer hostname again: | |||
lauri@lauri-c720p ~ $ openssl req -new -key lauri-acer-c720p.key -out lauri-acer-c720p.csr | |||
You are about to be asked to enter information that will be incorporated | |||
into your certificate request. | |||
What you are about to enter is what is called a Distinguished Name or a DN. | |||
There are quite a few fields but you can leave some blank | |||
For some fields there will be a default value, | |||
If you enter '.', the field will be left blank. | |||
----- | |||
Country Name (2 letter code) [AU]:EE | |||
State or Province Name (full name) [Some-State]:Harjumaa | |||
Locality Name (eg, city) []:Tallinn | |||
Organization Name (eg, company) [Internet Widgits Pty Ltd]:Wut Incorporated | |||
Organizational Unit Name (eg, section) []:Headquarters | |||
Common Name (e.g. server FQDN or YOUR name) []:lauri-acer-c720p | |||
Email Address []:lauri@biz.wut.ee | |||
Please enter the following 'extra' attributes | |||
to be sent with your certificate request | |||
A challenge password []: | |||
An optional company name []: | |||
Send lauri-acer-c720p.csr to Artur. Artur has to send you back three things: OpenVPN configuration file, signed certificate lauri-acer-c720p.crt and just in case: server.crt, ca.crt, ta.key | |||
To sign the request: | To sign the request: | ||
openssl ca -config | openssl ca -config /etc/openvpn/easy-rsa/openssl-1.0.cnf -in lauri-acer-c720p.csr -extensions client_cert -out lauri-acer-c720p.crt | ||
To dump certificate contents in human-readable format: | To dump certificate contents in human-readable format: | ||
openssl x509 -in lauri-c720p.crt -noout -text | openssl x509 -in lauri-acer-c720p.crt -noout -text | ||
To test web server's TLS configuration: | To test web server's TLS configuration: | ||
| Line 349: | Line 387: | ||
See here for more about Estonian ID-card certificates: https://www.sk.ee/en/repository/ldap/ldap-kataloogi-kasutamine/ | See here for more about Estonian ID-card certificates: https://www.sk.ee/en/repository/ldap/ldap-kataloogi-kasutamine/ | ||
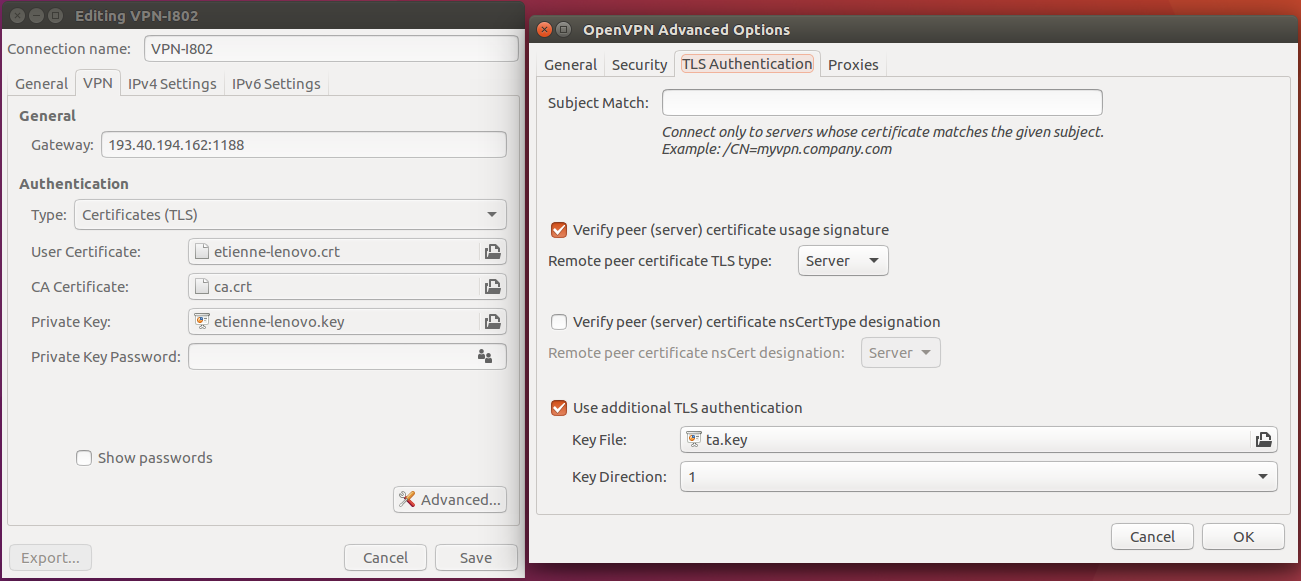
In Ubuntu, the configuration of the VPN goes as shown below. | |||
"User certificate" is the user's signing request signed by the CA (that CA gave to user after receiving the signing request). | |||
"CA certificate" is the CA public key. | |||
"Private Key" is the user's private key. | |||
You also probably need to add the CA's TLS public key. | |||
Go to ''Advanced > TLS Authentication'', check "Use additional TLS authentication" and upload the key. | |||
[[File:Vpn-config-ubuntu.png]] | |||
==Remote logging== | ==Remote logging== | ||
| Line 358: | Line 405: | ||
$ActionResumeRetryCount -1 | $ActionResumeRetryCount -1 | ||
$ActionQueueSaveOnShutdown on | $ActionQueueSaveOnShutdown on | ||
*.* @@ | *.* @@logging.office:1514 | ||
and then restart the service: | and then restart the service: | ||
| Line 366: | Line 413: | ||
==Internal DNS== | ==Internal DNS== | ||
All machines should have hostnames in accordance to this page, Keijo uses it to insert DNS entries for the DNS server that is accessible via VPN. | |||
When you reconfigure hostname on your Linux box: set /etc/hostname to the (short) hostname eg. 'monitoring' and set /etc/hosts line 127.0.1.1 to fully qualified hostname and (short) hostname '127.0.1.1 monitoring.office monitoring' | |||
Service: | |||
* http://dev.office.lan - 172.16.1.128 domain services | |||
* http://wiki.office.lan - 172.16.2.30 internal wiki | |||
* http://git.office.lan - 172.16.2.171 source code hosting | |||
* http://paste.office.lan - 172.16.2.20 code snippets | |||
* http://chat.office.lan - 172.16.3.202 rocket.chat server | |||
* http://mail.office.lan - 172.16.3.235 webmail | |||
* http://logging.office.lan - 172.16.3.228 Artur's graylog | |||
* http://monitoring.office.lan/nagios/ - 172.16.1.212 Mohanad's nagios | |||
* http://router-hq.office - 172.16.1.254 hq router | |||
* http://router-rnd.office - 172.16.2.254 rnd router | |||
* http://router-devops.office - 172.16.3.254 devops router | Other boxes: | ||
* | |||
* | * http://dc-hq.office.lan - 172.16.1.150 hq windows server and domain controller | ||
* | * http://router-hq.office.lan - 172.16.1.254 hq router | ||
* http://router-rnd.office.lan - 172.16.2.254 rnd router | |||
* http://router-devops.office.lan - 172.16.3.254 devops router | |||
* host-hq.office.lan - 172.16.1.1 hq host | |||
* host-rnd.office.lan - 172.16.2.1 rnd host | |||
* host-devops.office.lan - 172.16.3.1 devops host | |||
=Boring stuff= | =Boring stuff= | ||
| Line 403: | Line 458: | ||
[https://docs.google.com/presentation/d/1mt0g_BN-l_Jz6HQ1D52WJIdMjPtkTt95CPYFejjiikE/ Lecture slides] [https://echo360.e-ope.ee/ess/portal/section/0fa18d0e-f1b2-44b7-878b-5e4c66e6040e video recording] | [https://docs.google.com/presentation/d/1mt0g_BN-l_Jz6HQ1D52WJIdMjPtkTt95CPYFejjiikE/ Lecture slides] [https://echo360.e-ope.ee/ess/portal/section/0fa18d0e-f1b2-44b7-878b-5e4c66e6040e video recording] | ||
==October wrapup & X.509/TLS lecture== | |||
[https://docs.google.com/presentation/d/1kqTyhhUu5CfwODmOTIC7odhlYfeEeJALTd4RX7XhPLE/edit?usp=sharing Lecture slides] | |||
[https://echo360.e-ope.ee/ess/echo/presentation/3baf5fa7-71d7-40b7-8081-2dfb42b378a5?ec=true video recording #1] | |||
[https://echo360.e-ope.ee/ess/echo/presentation/5e722941-09ad-484c-a267-a51360f43fd5?ec=true video recording #2] | |||
==Hardening== | |||
Last sessions 7. december and 14. december, no session on Robotex week (30. november). | |||
Last steps to pass the course: | |||
* Make sure blah.office DNS records work and services are accessible on default ports, eg http://blah.office:9001 is not cool. If necessary set up proxying web server or use iptables DNAT rule to overwrite the port number. | |||
* Make sure your service is not running as root user or regular user. | |||
* Make sure services are being monitored by Nagios | |||
* Make sure service logs are forwarded to Graylog | |||
* Check port forward rules on the routers, make sure only necessary services are accessible from the Internet | |||
* Check listening services on each machine, make sure only necessary services are running using netstat -lntup if necessary not only stop the services but disable it as well so it's not started during next boot | |||
* If a service can't be disabled prevent access using iptables, to save firewall rules over reboots: apt install iptables-persistent | |||
* Make sure there are no user accounts with simple passwords | |||
* Make sure there are no random user accounts with passwords, to check: cat /etc/shadow | |||
* Preferrably use SSH public key authentication | |||
* Run port scans on the public and internal IP addresses using nmap | |||
* Make sure ~/.ssh/authorized_keys and /root/.ssh/authorized_keys does not contain any unrecognized keys, if necessary remove them | |||
* Prevent brute force SSH attacks using [http://www.fail2ban.org/wiki/index.php/Main_Page fail2ban] | |||
* Make sure [https://help.ubuntu.com/community/AutomaticSecurityUpdates security updates] are installed, make sure machine gets rebooted if kernel was upgraded and make sure service is restarted when service is upgraded. | |||
For mailserver: | |||
* Make sure it's not open relay, meaning that it won't accept mail for foreign domains | |||
For webservers, eg if your service has a web interface: | |||
* In your webserver check /etc/apache2/sites-enabled contents, make sure that only what's necessary is there. | |||
* Set up certificates if you haven't done so using [https://letsencrypt.org/ Let's Encrypt] | |||
* Make sure [https://en.wikipedia.org/wiki/HTTP_Strict_Transport_Security HSTS] is enabled | |||
* Make sure weak ciphers are disabled, use some [https://www.ssllabs.com/ssltest/ SSL test to check] | |||
By the last session on 14th of December prepare a comprehensive e-mail about the state of your service | |||
* How to administer the service if applicable - what is the administrator username and password | |||
* How to access the virtual machine - what DNS record or IP address should be used, what is the username and password. If public key authentication is used instead of passwords, figure out who will take over your service after this course and give him/her access to the machine. | |||
=Red team wrapup= | |||
Slides: https://docs.google.com/presentation/d/1rGO-L8-ji1NPrQIw4B9QjxMfw8m7LoCBR4up292iH-k/edit | |||
Video recoding https://echo360.e-ope.ee/ess/echo/presentation/d93da8ab-542a-40e5-9be9-8c6e44687a79?ec=true | |||
Latest revision as of 11:42, 11 September 2017
Firewalls and VPN/IPSec
Note: 2017 Fall semester materials are going to be here
General information
ECTS: 4
Lecturer: Lauri Võsandi
Scenario
In this course we will attempt to set up a network similar to a corporate network with multiple offices, eg http://docplayer.it/docs-images/20/596222/images/25-0.png
We will use VPN software to connect subnets to each other and we will use VPN software to connect our personal computers to the intranet.
Setting up virtual machine hosts
For this course we have 3 Sun servers, each with 16GB of RAM. In each server we should be able to create 3 or more virtual machines. As host operating system we will install Ubuntu 16.04 server. On disks set up ext4 on mdraid set up in RAID1 configuration.
For virtualization let's use libvirt and virt-manager on your Ubuntu laptops, for Windows and Mac unfortunately there is no decent UI available instead installing web interface such as Kimchi is recommended.
To install libvirt on the server:
apt install libvirt-bin qemu-kvm
Also add the primary user to the libvirt group:
sudo gpasswd -a $USER libvirt
On your laptop first set up SSH keys between the laptop and server with ssh-keygen and ssh-copy-id. And then you can install virt-manager with:
sudo apt install virt-manager
Copy CD ISO files into /var/lib/libvirt/images using scp or FileZilla.
Continue with creating a virtual machine for each service. For Windows 2012 server virtual machines use 2G of RAM and 50G of storage. For Ubuntu 16.04 server installations use 1G of memory and 50G storage. For Ubuntu 16.04 MATE desktop installations use 2G of RAM.
In order to set up virtual switch inside the server use Linux's built-in bridges, start with installing bridge-utils:
apt install bridge-utils
Reconfigure your server's /etc/network/interfaces, replace X with number relevant to your server. Also replace eth0, eth1 and eth2 with the network interfaces available in your machine:
 # The loopback network interface
 auto lo
 iface lo inet loopback

 # Wide area network interface
 auto br-wan
 iface br-wan inet dhcp
   # Until we set up router in a VM we will use DHCP so we can have internet access in 417
   bridge_ports eth0

 # Local area network interface
 auto br-lan
 iface br-lan inet static
   address 172.16.X.1
   netmask 255.255.255.0
   bridge_ports eth1

 # Management interface
 auto eth2
 iface eth2 inet static
   address 192.168.12.1X
   netmask 255.255.255.0
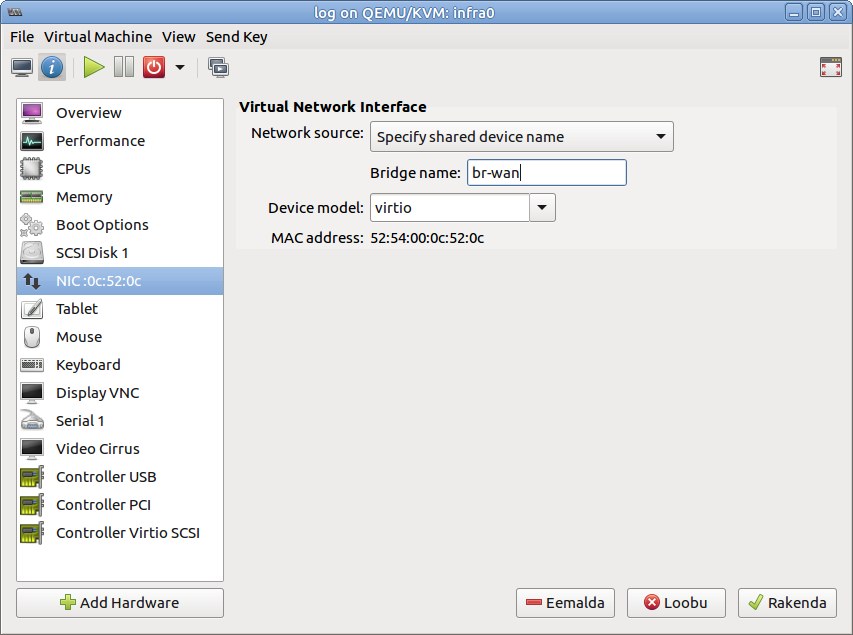
When creating virtual machines, configure network as shown in the screenshot below:
This way your VM-s should be able to access the Internet as the physical machine can
Setting up router
On Wednesday 14. September we will configure OpenWrt as a router in a virtual machine. Download the OpenWrt image and uncompress it:
 cd /var/lib/libvirt/images/
 wget https://downloads.openwrt.org/chaos_calmer/15.05.1/x86/generic/openwrt-15.05.1-x86-generic-combined-ext4.img.gz
 gunzip openwrt-15.05.1-x86-generic-combined-ext4.img.gz
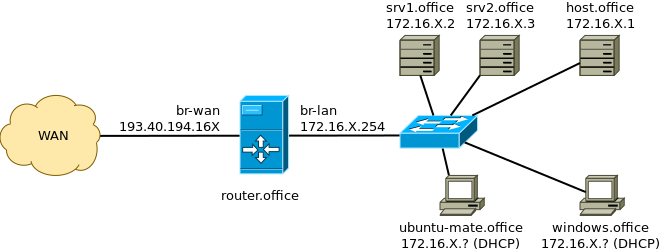
Add second network interface to your router's VM. Configure first NIC as connected to br-wan and second one connected to br-lan.
After that you should end up with topology similar to this:
To clarify: 'srv1.office' and 'srv2.office' are the Ubuntu 16.04 servers, you should have configured static IP addresses or set a static lease from the router. The 'router.office' refers to the OpenWrt router you just set up. The router serves IP addresses using DHCP to 'ubuntu-mate.office' Ubuntu MATE 16.04 workstation and 'windows.office' refers to Windows workstation. Your physical server 'host.office' can be accessed as well. The 'office' throughout the diagram refers to your domain name, use abbrevations such as hq, rnd, devops for that.
Domain names
Arti will be your DNS registrar (like Godaddy or Zone.ee). Currently added DNS records:
- http://www.biz.wut.ee - 193.40.194.160 for Wut Incorporated website
- http://gw.biz.wut.ee - 193.40.194.160 for OpenVPN gateway
- http://wiki.biz.wut.ee - 193.40.194.161 for Wut Inc internal wiki
- http://git.biz.wut.ee - 193.40.194.161 for Wut Inc source code hosting
- http://paste.biz.wut.ee - 193.40.194.161 for Wut Inc code snippets
- http://chat.biz.wut.ee - 193.40.194.162 for Wut Inc IRC chatroom
- http://pad.biz.wut.ee - 193.40.194.162 for Wut Inc etherpad
- http://ca.biz.wut.ee - 193.40.194.162 for Wut Inc certificate authority web endpoint
- http://mail.biz.wut.ee - 193.40.194.162 for MX entry of biz.wut.ee
(Re)configure your services to make use of these DNS records.
It is also possible to access the services with the domain mareti.ee
Monitoring
Use this **only** on the physical hosts.
You can (ab)use Lauri's collectd at http://log.koodur.com/cgp
Install packages:
apt install collectd
Reconfigure service in /etc/collectd/collectd.conf:
 FQDNLookup true
 LoadPlugin syslog
 LoadPlugin cpu
 LoadPlugin df
 LoadPlugin disk
 LoadPlugin interface
 LoadPlugin load
 LoadPlugin memory
 LoadPlugin network
 LoadPlugin processes
 LoadPlugin swap
 LoadPlugin uptime
 LoadPlugin users
 LoadPlugin dns
 LoadPlugin ping
 LoadPlugin sensors

 <Plugin df>
 	FSType rootfs
 	FSType sysfs
 	FSType proc
 	FSType devtmpfs
 	FSType devpts
 	FSType tmpfs
 	FSType fusectl
 	FSType cgroup
 	IgnoreSelected true
 </Plugin>

 <Plugin disk>
 	Disk "/[sv]d[a-z]/"
 </Plugin>

 <Include "/etc/collectd/collectd.conf.d">
 	Filter "*.conf"
 </Include>

 <Plugin network>
   Server "185.94.112.74"
 </Plugin>
Teams
Headquarters
Gateway: 193.40.194.220
DNS: 193.40.0.12, 193.40.56.245
Public IP address (port no 0 = enp6s4f0): 193.40.194.160/24
Management network IP address (port no 1 = enp6s4f1), accessible from robotics club: 192.168.12.10
Internal IP address of the physical server (port no 2 = enp0s9): 172.16.1.1/24
Services:
- Hypervisor, access to physical box - (Mohanad)
- BIND9 as public DNS server, also figure out what domain name we should/can use (Arti)
- domain controller, at this point primarily for user accounts (Keijo)
- nginx web server, for company's homepage (Etienne)
- SMB/CIFS fileserver, join to domain (Etienne)
- VPN server for other subnets, presumably OpenVPN (Mohanad Aly)
Research & development
Gateway: 193.40.194.220
DNS: 193.40.0.12, 193.40.56.245
Public IP address (port no 0 = enp6s4f0): 193.40.194.161/24
Management network IP address (port no 1 = enp6s4f1), accessible from robotics club: 192.168.12.11
Internal IP address of the physical server (port no 2 = enp0s9): 172.16.2.1/24
Team members: Marvin, Madis, Taavi, Berit, Joosep
Services:
- Hypervisor, access to physical box - Marvin
- Git hosting, for sharing scripts, set up LDAP to authenticate with domain controller (Madis)
- Wiki, for exchanging information, set up LDAP to authenticate with domain controller and later possibly configure web server to authenticate with Kerberos (Taavi)
- Windows XP workstation, join to domain
- Ubuntu 16.04 MATE workstation, join to domain.
- LTSP server (Joosep)
- OpenVPN connection to headquarters, use shared secret at first, later X509 certificates
- Pastebin, possibly later implement Kerberos support (Berit)
Examples
Port forwarding example, we have 2 linux virtual machines, one forwarding to host local ip.

Network interface example file:
 auto lo
 iface lo inet loopback

 # Wide area network interface (port 0)
 auto br-wan
 iface br-wan inet manual
   bridge_ports enp6s4f0

 # Local area network interface (port 3)
 auto br-lan
 iface br-lan inet static
   address 172.16.2.1
   gateway 172.16.2.254
   dns-nameserver 172.16.2.254
   netmask 255.255.255.0
   bridge_ports enp0s8

 # Management interface (port 1)
 auto enp6s4f1
 iface enp6s4f1 inet static
   address 192.168.12.11
   netmask 255.255.255.0
Openwrt interface file working example /etc/config/network:
 config interface 'lan'
       option ifname 'eth0'
       option type 'bridge'
       option proto 'static'
       option netmask '255.255.255.0'
       option ip6assign '60'
       option ipaddr '172.16.2.254'

 config interface 'wan'
       option ifname 'eth1'
       option proto 'static'
       option ipaddr '193.40.194.161'
       option gateway '193.40.194.220'
       option netmask '255.255.255.0'
       option dns '192.40.0.12 193.40.56.245'
To create poor man's vpn. Install on your computer
apt install sshuttle
and connection.
sshuttle --dns -HNvr username@server:port
no you should be able to connect local network computers and services. NB! ping is not working with sshuttle you can read more here http://teohm.com/blog/using-sshuttle-in-daily-work/
TODO
Devops
Gateway: 193.40.194.220
DNS: 193.40.0.12, 193.40.56.245
Public IP address (port no 0 = enp6s4f0): 193.40.194.162/24
Management network IP address (port no 1 = enp6s4f1), accessible from robotics club: 192.168.12.12
Internal IP address of the physical server (port no 2 = enp0s9): 172.16.3.1/24
Services:
- Hypervisor, access to physical box - Artur O
- IRC, for chatting (Meelis Hass)
- Etherpad for collaborating (Sheela)
- Certificate management for roadwarriors, usecase number #1 (Artur O)
- Monitoring software of your choice to make sure that services are up and running, possibly use LDAP for authentication (Artur O)
- E-mail for sending notifications from monitoring software at first (Ilja), this needs MX records in DNS (Ilja, Mohanad helps)
- Later, in the beginning just monitor public services: OpenVPN connection to headquarters
Pentest
Find security issues in the deployed services, attempt to plant backdoors, malware etc.
Team members: Kustas, Ender
Point-to-point tunnels between routers
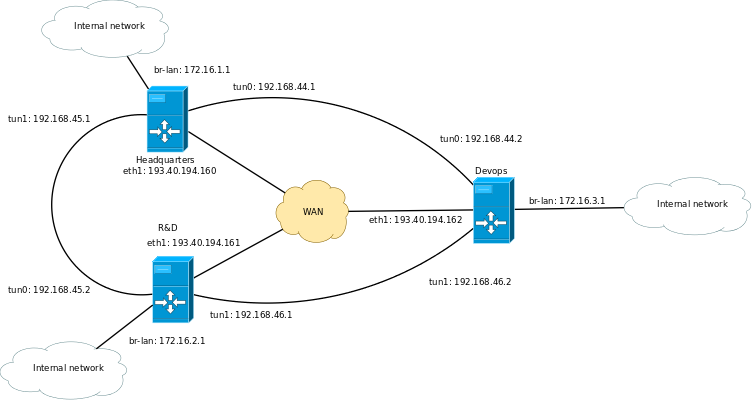
Since routers are the default route for all the internal machines the easiest way to set up routing between internal networks is to set up OpenVPN instances on each router.
In router install OpenVPN module for OpenWrt:
 opkg update
 opkg install luci-app-openvpn openvpn-openssl
In the OpenWrt web interface there should pop up Services section with OpenVPN underneath it.
The topology for routers:
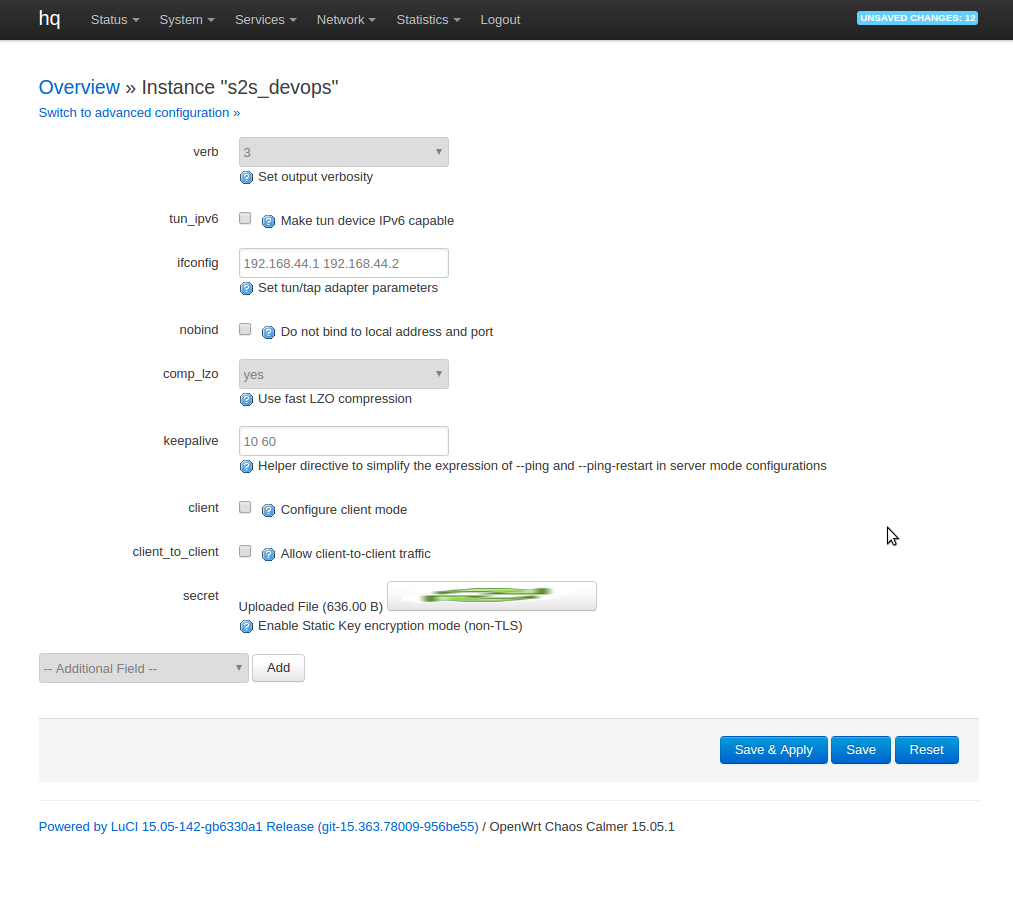
For each tunnel configure on one end "Simple server configuration for a routed point-to-point VPN" and on the other end "Simple client configuration for a routed point-to-point VPN" the configuration for connection on hq could look something like this:
To upload secret select secret under --Additional fields-- and hit add. To generate secret use following command on your laptop:
openvpn --genkey --secret static.key
Under Switch to advanced configuration --> Networking add route field for each subnet you want to make accessible via that tunnel. For each tunnel a new interface pops up under Interfaces section. Assign firewall rules as appropriate. To test I guess you can just insert the interface into LAN zone.
Generating certificates
On your Ubuntu laptop install OpenVPN plugin for NetworkManager:
sudo apt install network-manager-openvpn-gnome
On Windows laptop install OpenVPN client and TAP driver from https://openvpn.net/index.php/download/community-downloads.html
To generate key, use your computer hostname as filename.
openssl genrsa -out lauri-acer-c720p.key 4096
To generate signing request, again use computer hostname as filename.
openssl req -new -key lauri-acer-c720p.key -out lauri-acer-c720p.csr
The command expects interactive input, set common name to your computer hostname again:
 lauri@lauri-c720p ~ $  openssl req -new -key lauri-acer-c720p.key -out lauri-acer-c720p.csr
 You are about to be asked to enter information that will be incorporated
 into your certificate request.
 What you are about to enter is what is called a Distinguished Name or a DN.
 There are quite a few fields but you can leave some blank
 For some fields there will be a default value,
 If you enter '.', the field will be left blank.
 -----
 Country Name (2 letter code) [AU]:EE
 State or Province Name (full name) [Some-State]:Harjumaa
 Locality Name (eg, city) []:Tallinn
 Organization Name (eg, company) [Internet Widgits Pty Ltd]:Wut Incorporated
 Organizational Unit Name (eg, section) []:Headquarters
 Common Name (e.g. server FQDN or YOUR name) []:lauri-acer-c720p
 Email Address []:lauri@biz.wut.ee

 Please enter the following 'extra' attributes
 to be sent with your certificate request
 A challenge password []:
 An optional company name []:
Send lauri-acer-c720p.csr to Artur. Artur has to send you back three things: OpenVPN configuration file, signed certificate lauri-acer-c720p.crt and just in case: server.crt, ca.crt, ta.key
To sign the request:
openssl ca -config /etc/openvpn/easy-rsa/openssl-1.0.cnf -in lauri-acer-c720p.csr -extensions client_cert -out lauri-acer-c720p.crt
To dump certificate contents in human-readable format:
openssl x509 -in lauri-acer-c720p.crt -noout -text
To test web server's TLS configuration:
openssl s_client -connect www.koodur.com:443
To make a HTTP request as well:
(echo -en "GET / HTTP/1.0\n\n"; sleep 1) | openssl s_client -connect www.koodur.com:443
See here for more about Estonian ID-card certificates: https://www.sk.ee/en/repository/ldap/ldap-kataloogi-kasutamine/
In Ubuntu, the configuration of the VPN goes as shown below. "User certificate" is the user's signing request signed by the CA (that CA gave to user after receiving the signing request). "CA certificate" is the CA public key. "Private Key" is the user's private key.
You also probably need to add the CA's TLS public key.
Go to Advanced > TLS Authentication, check "Use additional TLS authentication" and upload the key.
Remote logging
In order to send logs to Graylog server, put those lines into new file: /etc/rsyslog.d/client.conf
 $ActionQueueType LinkedList
 $ActionQueueFileName srvrfwd
 $ActionResumeRetryCount -1
 $ActionQueueSaveOnShutdown on
 *.* @@logging.office:1514
and then restart the service:
sudo service rsyslog restart
Internal DNS
All machines should have hostnames in accordance to this page, Keijo uses it to insert DNS entries for the DNS server that is accessible via VPN.
When you reconfigure hostname on your Linux box: set /etc/hostname to the (short) hostname eg. 'monitoring' and set /etc/hosts line 127.0.1.1 to fully qualified hostname and (short) hostname '127.0.1.1 monitoring.office monitoring'
Service:
- http://dev.office.lan - 172.16.1.128 domain services
- http://wiki.office.lan - 172.16.2.30 internal wiki
- http://git.office.lan - 172.16.2.171 source code hosting
- http://paste.office.lan - 172.16.2.20 code snippets
- http://chat.office.lan - 172.16.3.202 rocket.chat server
- http://mail.office.lan - 172.16.3.235 webmail
- http://logging.office.lan - 172.16.3.228 Artur's graylog
- http://monitoring.office.lan/nagios/ - 172.16.1.212 Mohanad's nagios
Other boxes:
- http://dc-hq.office.lan - 172.16.1.150 hq windows server and domain controller
- http://router-hq.office.lan - 172.16.1.254 hq router
- http://router-rnd.office.lan - 172.16.2.254 rnd router
- http://router-devops.office.lan - 172.16.3.254 devops router
- host-hq.office.lan - 172.16.1.1 hq host
- host-rnd.office.lan - 172.16.2.1 rnd host
- host-devops.office.lan - 172.16.3.1 devops host
Boring stuff
Report template
Send report as a plaintext e-mail to Lauri, in the title include: Report #number - your name - your team
In the content make sure you specify the timespan you're talking about (September of 2016, first half of October 2016 etc)
The content, no need for formal speech:
- What have been done so far by the team (eg. server hardware setup, virtual machine setup, service setup)
- What was your role for this timespan, note that we will shuffle the teams now and then
- What was your contribution, or in other words what did you do during this timespan
- What (security) incidents happened - red team found messing around with the servers, passwords changed, backdoor found etc.
September wrapup & iptables lecture
Lecture slides video recording
October wrapup & X.509/TLS lecture
Lecture slides video recording #1 video recording #2
Hardening
Last sessions 7. december and 14. december, no session on Robotex week (30. november).
Last steps to pass the course:
- Make sure blah.office DNS records work and services are accessible on default ports, eg http://blah.office:9001 is not cool. If necessary set up proxying web server or use iptables DNAT rule to overwrite the port number.
- Make sure your service is not running as root user or regular user.
- Make sure services are being monitored by Nagios
- Make sure service logs are forwarded to Graylog
- Check port forward rules on the routers, make sure only necessary services are accessible from the Internet
- Check listening services on each machine, make sure only necessary services are running using netstat -lntup if necessary not only stop the services but disable it as well so it's not started during next boot
- If a service can't be disabled prevent access using iptables, to save firewall rules over reboots: apt install iptables-persistent
- Make sure there are no user accounts with simple passwords
- Make sure there are no random user accounts with passwords, to check: cat /etc/shadow
- Preferrably use SSH public key authentication
- Run port scans on the public and internal IP addresses using nmap
- Make sure ~/.ssh/authorized_keys and /root/.ssh/authorized_keys does not contain any unrecognized keys, if necessary remove them
- Prevent brute force SSH attacks using fail2ban
- Make sure security updates are installed, make sure machine gets rebooted if kernel was upgraded and make sure service is restarted when service is upgraded.
For mailserver:
- Make sure it's not open relay, meaning that it won't accept mail for foreign domains
For webservers, eg if your service has a web interface:
- In your webserver check /etc/apache2/sites-enabled contents, make sure that only what's necessary is there.
- Set up certificates if you haven't done so using Let's Encrypt
- Make sure HSTS is enabled
- Make sure weak ciphers are disabled, use some SSL test to check
By the last session on 14th of December prepare a comprehensive e-mail about the state of your service
- How to administer the service if applicable - what is the administrator username and password
- How to access the virtual machine - what DNS record or IP address should be used, what is the username and password. If public key authentication is used instead of passwords, figure out who will take over your service after this course and give him/her access to the machine.
Red team wrapup
Slides: https://docs.google.com/presentation/d/1rGO-L8-ji1NPrQIw4B9QjxMfw8m7LoCBR4up292iH-k/edit
Video recoding https://echo360.e-ope.ee/ess/echo/presentation/d93da8ab-542a-40e5-9be9-8c6e44687a79?ec=true
This category currently contains no pages or media.
