Mail Server (SquirrelMail) on ubuntu: Difference between revisions
No edit summary |
No edit summary |
||
| (7 intermediate revisions by the same user not shown) | |||
| Line 249: | Line 249: | ||
[[File:Netstat.png|thumb|center|Netstat command example]] | [[File:Netstat.png|thumb|center|Netstat command example]] | ||
Now the dovecot configuration is over, continue for squirrelmail installation. | |||
===Create user and password=== | |||
'''Step 19 »''' Create some users and check using mail clients like thunderbird or outlook. | |||
Use the below commands to create user and password. | |||
To create user: <code>sudo useradd -m bobby -s /sbin/nologin</code> | |||
to create password: <code>sudo passwd bobby</code> | |||
Now the dovecot configuration is over andthe mail server is ready, you can send and receive mail using the server.., continue for squirrelmail configuration & installation. | |||
=== Installing and configuring squirrelmail=== | |||
'''Step 20 »''' Install squirrelmail. | |||
Install squirrelmail using the below command. | |||
<code>sudo apt-get install squirrelmail</code> | |||
The above command will install apache and PHP packages as well. | |||
If not, use the below command to install apache and PHP packages. | |||
<code>sudo apt-get install apache2 php5</code> | |||
'''Step 21 »''' Configure squirrelmail | |||
Configure squirrelmail using below command. | |||
<code>sudo squirrelmail-configure</code> | |||
Once you have entered the above command it will prompt you a window, there you can configure it as you want. | |||
[[File:Squirrelmail_config.png|thumb|center|Squirrelmail configuration windows]] | |||
once you have configured save your configuration and quit the prompt. | |||
'''Step 22 »''' Now configure apache to enable squirrelmail. | |||
SquirrelMail provides a default configuration file for Apache in <code>nano /etc/squirrelmail/apache.conf</code>. | |||
Copy this configuration file into your <code>sites-available</code> folder with the below command. | |||
<code>sudo cp /etc/squirrelmail/apache.conf /etc/apache2/sites-available/squirrelmail.conf</code>. | |||
'''Step 23 »''' Edit the configuration file. | |||
Now edit the configuration file to uncomment the <code><VirtualHost 1.2.3.4:80></code> block by removing the pound symbol (#). | |||
Edit the IP and ServerName to match your domain settings. | |||
Below picture is the example of file:<code>nano /etc/apache2/sites-available/squirrelmail</code>. | |||
[[File:Squirrelmail_config_file.png|thumb|center|Configuration file Example]] | |||
'''Step 24 »'''Enable the new virtual host. | |||
Now enable the virtual host by the following command. | |||
<code>sudo a2ensite squirrelmail.conf</code> | |||
'''Step 25 »''' Restart or Reload Apache service | |||
Restart the Apache service using below command. | |||
<code>sudo service apache2 restart</code> | |||
Or reload the Apache service using below command. | |||
<code>sudo systemctl reload apache2.service</code> | |||
'''Step 26 »''' SquirrelMail's default login page. | |||
Now You should now be able to see SquirrelMail’s default login page in your browser after navigating to your IP address or domain. | |||
and you can login with the same username and password which you have created before. | |||
Below picture is the example of SquirrelMail’s default login page. | |||
[[File:Login-Squirrelmail.png |thumb|center|Squirrelmail login page]] | |||
And its done.. | |||
=Reference= | |||
1- [http://www.krizna.com/ubuntu/setup-mail-server-ubuntu-14-04/#squirrelmail/ Setting up mail server on ubuntu] | |||
2- [https://www.linode.com/docs/email/clients/install-squirrelmail-on-ubuntu-16-04-or-debian-8/ Install squirrelmail on ubuntu] | |||
3- [https://www.digitalocean.com/community/tutorials/how-to-set-up-a-postfix-e-mail-server-with-dovecot/ set up a postfix e-mail server with dovecot] | |||
4- [http://squirrelmail.org/documentation/ SquirrelMail Documentation] | |||
5- [https://www.1and1.ca/cloud-community/learn/application/e-mail/set-up-a-postfix-mail-server-with-dovecot-and-squirrelmail-on-ubuntu-1604/ set up a postfix mail server with dovecot and squirrelmail on ubuntu 1604] | |||
= Also see= | |||
1- [https://www.exratione.com/2016/05/a-mailserver-on-ubuntu-16-04-postfix-dovecot-mysql/ A mail server on ubuntu 16] | |||
2- [http://www.krizna.com/centos/setup-mail-server-in-centos-6/ mail server on Centos 6] | |||
3- [http://www.krizna.com/centos/setup-mail-server-centos-7/ mail server on Centos 7] | |||
4- [https://squirrelmail.org/plugins.php/ SquirrelMail Plugins] | |||
5- [http://www.techrepublic.com/blog/linux-and-open-source/three-great-little-squirrelmail-plugins-and-how-to-install-them/ Three great little squirrelmail plugins and how to install them] | |||
Latest revision as of 15:09, 16 April 2017
Sheela Raj
Group : Cyber Security Engineering (C21)
Subject : Authentication & Authorization.
Introduction
In this article, we will cover how to setup mail server on Ubuntu using postfix, dovecot and squirrelmail.
» Postfix (for sending)
» Dovecot (for receiving)
» Squirrelmail (for web mail access)
Mail Server
- A mail server or e-mail server is a server that handles and delivers e-mail over a network, usually over the Internet.
- It receive e-mails from client computers and deliver them to other mail servers.
Types of Mail Servers
- Mail servers can be broken down into two main categories: outgoing mail servers and incoming mail servers.
- Outgoing mail servers.
- SMTP, or Simple Mail Transfer Protocol, servers.
- When you press the "Send" button in your e-mail program, the program will connect to a server on the network/ Internet that is called an SMTP server.
- This protocol is used when e-mails are delivered from clients to servers and vice versa.
- Incoming mail servers come in two main varieties.
- POP3, or Post Office Protocol, version.
- POP3 servers are known for storing sent and received messages on PCs' local hard drives.
- When you download e-mails to your e-mail program, the program will connect to a server on the net that is known as a POP3 server.
- IMAP, or Internet Message Access Protocol.
- IMAP,servers always store copies of messages on server.
- It is used to retrieve e-mail messages from a mail server over a TCP/IP connection.
The Process of Sending an Email
Now that you know the basics about incoming and outgoing mail servers, it will be easier to understand the role that they play in the emailing process. The basic steps of this process are outlined below.
Step #1: After composing a message and hitting send, your email client - whether it's Outlook Express or Gmail - connects to your domain's SMTP server. This server can be named many things; a standard example would be smtp.example.com.
Step #2: Your email client communicates with the SMTP server, giving it your email address, the recipient's email address, the message body and any attachments.
Step #3: The SMTP server processes the recipient's email address - especially its domain. If the domain name is the same as the sender's, the message is routed directly over to the domain's POP3 or IMAP server - no routing between servers is needed. If the domain is different, though, the SMTP server will have to communicate with the other domain's server.
Step #4: In order to find the recipient's server, the sender's SMTP server has to communicate with the DNS, or Domain Name Server. The DNS takes the recipient's email domain name and translates it into an IP address. The sender's SMTP server cannot route an email properly with a domain name alone; an IP address is a unique number that is assigned to every computer that is connected to the Internet. By knowing this information, an outgoing mail server can perform its work more efficiently.
Step #5: Now that the SMTP server has the recipient's IP address, it can connect to its SMTP server. This isn't usually done directly, though; instead, the message is routed along a series of unrelated SMTP servers until it arrives at its destination.
Step #6: The recipient's SMTP server scans the incoming message. If it recognizes the domain and the user name, it forwards the message along to the domain's POP3 or IMAP server. From there, it is placed in a sendmail queue until the recipient's email client allows it to be downloaded.
At that point, the message can be read by the recipient.

Before You Begin
Check your current Ubuntu version & Upgrade
You can check your current ubuntu version by the following command:
lsb_release -a
If your machine is already running Ubuntu 16.04.1 LTS or higher than that, There is no need for you to upgrade the OS.
Otherwise you need to upgrade the OS by the following command:
sudo apt-get update && sudo apt-get upgrade
Note:
This article is written for a non-root user. Commands that require elevated privileges are prefixed with sudo. If you’re not familiar with the sudo command, you can check the Users and Groups guide.
Lets get Start
Installing and configuring postfix
Here i have used mail.example.com for hostname and example.com for Domain. Replace with your host and domain.
You can use nano or vim to edit the files. In this article i have used nano to edit the files.
Step 1 » Assign static IP and hostname and add a host entry for the host name.
- Assign hostname in
nano /etc/hostname
mail.example.com
- Add a host entry in
nano /etc/hosts
mail.example.com
Step 2 » Update the repositories.
sudo apt-get update
Step 3 » Install postfix and dependencies.
- Install postfix by
sudo apt-get install postfix
During installation you will be prompted for set of details . So set it as you wish to configure.
- You can also use the command
dpkg-reconfigure postfixto re-configure it.
Step 4 » Edit and save nano /etc/postfix/main.cf by adding the following lines to configure Postfix for SMTP-AUTH using Dovecot SASL
home_mailbox = Maildir/
smtpd_sasl_type = dovecot
smtpd_sasl_path = private/auth
smtpd_sasl_local_domain =
smtpd_sasl_security_options = noanonymous
broken_sasl_auth_clients = yes
smtpd_sasl_auth_enable = yes
smtpd_recipient_restrictions = permit_sasl_authenticated,permit_mynetworks,reject_unauth_destination
smtp_tls_security_level = may
smtpd_tls_security_level = may
smtp_tls_note_starttls_offer = yes
smtpd_tls_loglevel = 1
smtpd_tls_received_header = yes
and also add the below 3 lines to disable the weak chippers in postfix.
smtpd_tls_ciphers = high
smtpd_tls_protocols = TLSv1,!SSLv2,!SSLv3
smtpd_tls_exclude_ciphers = aNULL, DES, 3DES, MD5, DES+MD5, RC4
Step 5 » Now generate a digital certificate for tls. Issue the commands one by one and provide details as per your domain.
openssl genrsa -des3 -out server.key 2048
openssl rsa -in server.key -out server.key.insecure
mv server.key server.key.secure
mv server.key.insecure server.key
openssl req -new -key server.key -out server.csr
openssl x509 -req -days 365 -in server.csr -signkey server.key -out server.crt
sudo cp server.crt /etc/ssl/certs
sudo cp server.key /etc/ssl/private
Step 6 »Now configure certificate path.
sudo postconf -e 'smtpd_tls_key_file = /etc/ssl/private/server.key'
sudo postconf -e 'smtpd_tls_cert_file = /etc/ssl/certs/server.crt'
Step 7 » Open nano /etc/postfix/master.cf file and uncomment the below lines to enable smtps and submission.
Step 8 » Now install Dovecot SASL by typing the below command.
sudo apt-get install dovecot-common
Step 9 » Now Open nano /etc/dovecot/conf.d/10-master.conf file and find # Postfix smtp-auth line and add the below lines.
# Postfix smtp-auth
unix_listener /var/spool/postfix/private/auth {
mode = 0660
user = postfix
group = postfix
}
Step 10 » Change the Auth mechanisms.
- The AUTH command is an ESMTP command (SMTP service extension) that is used to authenticate the client to the server.
- The AUTH command sends the clients username and password to the e-mail server.
- AUTH can be combined with some other keywords as PLAIN, LOGIN, CRAM-MD5 and DIGEST-MD5 (e.g. AUTH LOGIN) to choose an authentication mechanism.
- The authentication mechanism chooses how to login and which level of security that should be used.
If you are not familiar with AUTH, you can check this link AUTH guide.
- Their is a drawback of using the PLAIN and LOGIN authentication mechanisms is that the username and password can be decoded quite easy if somebody monitor the SMTP communication.
- To obtain higher security an authentication mechanism with the name CRAM-MD5 can be used instead.
- CRAM-MD5 combines a challenge-response authentication mechanism to exchange information and a cryptographic Message Digest 5 algorithm to encrypt important information.
Here I have used CRAM-MD5 to obtain more security.
- To set Open
nano /etc/dovecot/conf.d/10-auth.conffile. - Find the auth_mechanisms = plain and replace it with auth_mechanisms = cram-md5
Step 11 » Restart postfix and dovecot services.
sudo service postfix restart
sudo service dovecot restart
Step 12 » Now test SMTP-AUTH and smtp/pop3 port access.
Use this code telnet mail.example.com smtp and you should get below response.
Trying 127.0.0.1...
Connected to localhost.
Escape character is '^]'.
220 mail.example.com ESMTP Postfix (Ubuntu)
now type ehlo mail.example.com and should get below response, please make sure you get those bolded lines.
ehlo mail.example.com
250-mail.example.com
--------
250-STARTTLS
250-AUTH PLAIN LOGIN
250-AUTH=PLAIN LOGIN
---------
250 DSN
and also try the same with other port.
Now the Postfix configuration is over, continue for dovecot installation.
Installing and configuring dovecot
Step 13 » Install dovecot.
Now Install dovecot using the command sudo apt-get install dovecot-imapd dovecot-pop3d.
Step 14 » Now configure mailbox.
Open nano /etc/dovecot/conf.d/10-mail.conf file.
Find mail_location = mbox:~/mail:INBOX=/var/mail/%u.
Replace with mail_location = maildir:~/Maildir.
Step 15 » Now change pop3_uidl_format.
Open nano /etc/dovecot/conf.d/20-pop3.conf file.
And find and uncomment the below line
pop3_uidl_format = %08Xu%08Xv
Step 16 » Now enable SSL.
Open nano /etc/dovecot/conf.d/10-ssl.conf file.
And find and uncomment the below line.
ssl = yes.
Step 17 » Restart dovecot service.
sudo service dovecot restart.
Step 18 » Now test pop3 and imap port access using the telnet command.
Replace the port number with your port.
telnet mail.example.com 110.
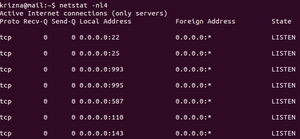
OR check for listening ports using netstat command netstat -nl4.
you should get the result like below image.

Create user and password
Step 19 » Create some users and check using mail clients like thunderbird or outlook.
Use the below commands to create user and password.
To create user: sudo useradd -m bobby -s /sbin/nologin
to create password: sudo passwd bobby
Now the dovecot configuration is over andthe mail server is ready, you can send and receive mail using the server.., continue for squirrelmail configuration & installation.
Installing and configuring squirrelmail
Step 20 » Install squirrelmail.
Install squirrelmail using the below command.
sudo apt-get install squirrelmail
The above command will install apache and PHP packages as well.
If not, use the below command to install apache and PHP packages.
sudo apt-get install apache2 php5
Step 21 » Configure squirrelmail
Configure squirrelmail using below command.
sudo squirrelmail-configure
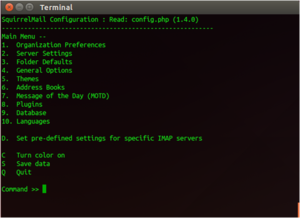
Once you have entered the above command it will prompt you a window, there you can configure it as you want.

once you have configured save your configuration and quit the prompt.
Step 22 » Now configure apache to enable squirrelmail.
SquirrelMail provides a default configuration file for Apache in nano /etc/squirrelmail/apache.conf.
Copy this configuration file into your sites-available folder with the below command.
sudo cp /etc/squirrelmail/apache.conf /etc/apache2/sites-available/squirrelmail.conf.
Step 23 » Edit the configuration file.
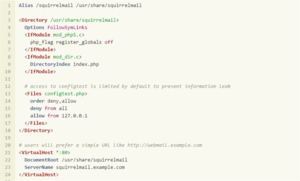
Now edit the configuration file to uncomment the <VirtualHost 1.2.3.4:80> block by removing the pound symbol (#).
Edit the IP and ServerName to match your domain settings.
Below picture is the example of file:nano /etc/apache2/sites-available/squirrelmail.

Step 24 »Enable the new virtual host.
Now enable the virtual host by the following command.
sudo a2ensite squirrelmail.conf
Step 25 » Restart or Reload Apache service
Restart the Apache service using below command.
sudo service apache2 restart
Or reload the Apache service using below command.
sudo systemctl reload apache2.service
Step 26 » SquirrelMail's default login page.
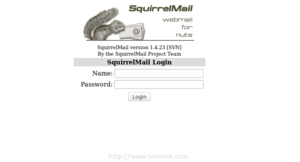
Now You should now be able to see SquirrelMail’s default login page in your browser after navigating to your IP address or domain.
and you can login with the same username and password which you have created before.
Below picture is the example of SquirrelMail’s default login page.

And its done..
Reference
1- Setting up mail server on ubuntu
2- Install squirrelmail on ubuntu
3- set up a postfix e-mail server with dovecot
5- set up a postfix mail server with dovecot and squirrelmail on ubuntu 1604
Also see
5- Three great little squirrelmail plugins and how to install them