Install Icinga2 on Ubuntu 16.04: Difference between revisions
No edit summary |
No edit summary |
||
| Line 380: | Line 380: | ||
[[File:Icinga2 18 login.png|border|300px|center]] | [[File:Icinga2 18 login.png|border|300px|center]] | ||
==Add nodes to Icinga 2== | |||
===The server node=== | |||
In order to be able to add hosts securely, we have to go to the server and run the following command: | |||
<pre>$ sudo icinga2 node wizard</pre> | |||
This will start a wizard which will first ask you whether this is a satellite setup or not. Since this is the server or master you have to say ‘No’ here, to input an ‘n’: | |||
Please specify if this is a satellite setup (‘n’ installs a master setup) [Y/n]: n | |||
It then starts generating keys are certificates required for secured TLS communication. In addition to that, it adds these to the configuration, plus it ensures this server is listed as the master: | |||
<pre>information/base: Writing private key to ‘/var/lib/icinga2/ca/ca.key’. | |||
information/base: Writing X509 certificate to ‘/var/lib/icinga2/ca/ca.crt’. | |||
information/cli: Initializing serial file in ‘/var/lib/icinga2/ca/serial.txt’. | |||
information/cli: Generating new CSR in ‘/etc/icinga2/pki/icinga-server.csr’. | |||
information/base: Writing private key to ‘/etc/icinga2/pki/icinga-server.key’. | |||
information/base: Writing certificate signing request to ‘/etc/icinga2/pki/icinga-server.csr’. | |||
information/base: Writing private key to ‘/etc/icinga2/pki/icinga-server.key’. | |||
information/base: Writing certificate signing request to ‘/etc/icinga2/pki/icinga-server.csr’. | |||
information/cli: Signing CSR with CA and writing certificate to ‘/etc/icinga2/pki/icinga-server.crt’. | |||
information/cli: Copying CA certificate to ‘/etc/icinga2/pki/ca.crt’. | |||
information/cli: Dumping config items to file ‘/etc/icinga2/zones.conf’. | |||
information/cli: Created backup file ‘/etc/icinga2/zones.conf.orig’.</pre> | |||
It then asks you for the host and port for the API. We have no reason to change these, so leave these empty: | |||
<pre>Please specify the API bind host/port (optional): | |||
Bind Host []: | |||
Bind Port []:</pre> | |||
It then finalizes setting up this server as a master my editing some more configuration files: | |||
<pre>information/cli: Enabling the APIlistener feature. | |||
Enabling feature api. Make sure to restart Icinga 2 for these changes to take effect. | |||
information/cli: Created backup file ‘/etc/icinga2/features-available/api.conf.orig’. | |||
information/cli: Updating constants.conf. | |||
information/cli: Created backup file ‘/etc/icinga2/constants.conf.orig’. | |||
information/cli: Updating constants file ‘/etc/icinga2/constants.conf’. | |||
information/cli: Updating constants file ‘/etc/icinga2/constants.conf’. | |||
Done.</pre> | |||
Now restart your Icinga 2 daemon to finish the installation! | |||
With that done, restart Icinga 2 in order to use the new settings: | |||
<pre>$ sudo service icinga2 restart</pre> | |||
And the master is good for now. Let’s move on to the host node! | |||
===The host node=== | |||
On the host node, we’re first going to have to ensure the Icinga 2 repository is present: | |||
<pre>$ add-apt-repository ppa:formorer/icinga</pre> | |||
Press ENTER when it asks you to. | |||
Note: If this command gives you an error, run ‘sudo apt-get install software-properties-common’ to get the ‘add-apt-repository’ command! | |||
Once the repository has been added, update apt: | |||
<pre>$ sudo apt-get update</pre> | |||
And install Icinga 2: | |||
<pre>$ sudo apt-get install icinga2</pre> | |||
With that out of the way, we can initiate the same wizard as we did on the master: | |||
<pre>$ sudo icinga2 node wizard</pre> | |||
This time we answer ‘Yes’ when it asks us if this is a satellite setup by just hitting ENTER: | |||
<pre>Please specify if this is a satellite setup (‘n’ installs a master setup) [Y/n]:</pre> | |||
After which is starts a different wizard: | |||
<pre>Starting the Node setup routine… | |||
Please specifiy the common name (CN) [icinga-node]: | |||
Please specifiy the local zone name [icinga-node]:</pre> | |||
It asks you for the common name and the local zone name for this server. These default to the system’s hostname in fully qualified domain name format. These master uses the common name to connect to the server and the local zone name to identify it in configuration files. I just let these be. | |||
It then goes on to ask you about your master node: | |||
<pre>Please specify the master endpoint(s) this node should connect to: | |||
Master Common Name (CN from your master setup): icinga-server | |||
Do you want to establish a connection to the master from this node? [Y/n]:</pre> | |||
Please enter the Common Name of your master node (in my case ‘icinga-server’). This is usually the hostname unless you’ve changed it. Then press ENTER when asked if you want to establish a connection to the master from this node. This triggers the next question: | |||
<pre>Please fill out the master connection information: | |||
Master endpoint host (Your master’s IP address or FQDN): icinga-server | |||
Master endpoint port [5665]: | |||
Add more master endpoints? [y/N]:</pre> | |||
Enter the master’s IP address or Fully Qualified Domain Name (FQDN) here and accept the default port. Also press ENTER in order to not add more endpoints: we’re just working with one master right now. | |||
Then it’s on to the connection for CSR auto-signing, the bit of magic that makes setting up a secure connection a bit easier for you: | |||
<pre>Please specify the master connection for CSR auto-signing (defaults to master endpoint host): | |||
Host [icinga-server]: | |||
Port [5665]:</pre> | |||
Accept the defaults here as well, because the master we have entered before is also our server for CSR auto-signing. | |||
After this, Icinga 2 is going to save some configuration on the host node and start the setup of a secure connection. As part of this process the master is contacted: | |||
<pre>information/base: Writing private key to ‘/etc/icinga2/pki/icinga-node.key’. | |||
information/base: Writing X509 certificate to ‘/etc/icinga2/pki/icinga-node.crt’. | |||
information/cli: Generating self-signed certifiate: | |||
information/cli: Fetching public certificate from master (icinga-server, 5665): | |||
information/cli: Writing trusted certificate to file ‘/etc/icinga2/pki/trusted-master.crt’. | |||
information/cli: Stored trusted master certificate in ‘/etc/icinga2/pki/trusted-master.crt’.</pre> | |||
The certificate that has been set up needs to be signed in order to prove that you’re actually in command of both servers and approve of this secure communication: | |||
<pre>Please specify the request ticket generated on your Icinga 2 master. | |||
(Hint: # icinga2 pki ticket –cn ‘icinga-node’):</pre> | |||
This means you need to run the following command on the master: | |||
<pre>$ sudo icinga2 pki ticket –cn ‘icinga-node’</pre> | |||
And copy the output from that command, which looks like ‘ff84267fca3b0b29c4c88d94706c76f4247cac34’ to the host node. | |||
<pre>information/cli: Processing self-signed certificate request. Ticket ‘ff84267fca3b0b29c4c88d94706c76f4247cac34’. | |||
information/cli: Created backup file ‘/etc/icinga2/pki/icinga-node.crt.orig’. | |||
information/cli: Writing signed certificate to file ‘/etc/icinga2/pki/icinga-node.crt’. | |||
information/cli: Writing CA certificate to file ‘/etc/icinga2/pki/ca.crt’.</pre> | |||
With all certificates signed and in place, we’re asked about the API again: | |||
<pre>Please specify the API bind host/port (optional): | |||
Bind Host []: | |||
Bind Port []:</pre> | |||
Just like at the master, we’re not going to touch these here. | |||
The wizard now asks you whether to accept the configuration and commands from the master: | |||
<pre>Accept config from master? [y/N]: y | |||
Accept commands from master? [y/N]: y</pre> | |||
Select ‘Yes’ for both. Unfortunately, the Icinga 2 documentation is a bit fuzzy on this part. There are several ways to setup up a client, for example with a local configuration or as an execution bridge. I’m aiming for the latter of the two here: the master is in control and sends commands, the host node just executes them and returns the results. This is closest to what NRPE does and should keep all the data on the master. | |||
With this done, everything is being put in place to make this work: | |||
<pre>information/cli: Disabling the Notification feature. | |||
Disabling feature notification. Make sure to restart Icinga 2 for these changes to take effect. | |||
information/cli: Enabling the Apilistener feature. | |||
Enabling feature api. Make sure to restart Icinga 2 for these changes to take effect. | |||
information/cli: Created backup file ‘/etc/icinga2/features-available/api.conf.orig’. | |||
information/cli: Generating local zones.conf. | |||
information/cli: Dumping config items to file ‘/etc/icinga2/zones.conf’. | |||
information/cli: Created backup file ‘/etc/icinga2/zones.conf.orig’. | |||
information/cli: Updating constants.conf. | |||
information/cli: Created backup file ‘/etc/icinga2/constants.conf.orig’. | |||
information/cli: Updating constants file ‘/etc/icinga2/constants.conf’. | |||
information/cli: Updating constants file ‘/etc/icinga2/constants.conf’. | |||
Done. | |||
Now restart your Icinga 2 daemon to finish the installation! | |||
</pre> | |||
After which you need to restart Icinga 2 on the host node: | |||
<pre>$ sudo service icinga2 restart</pre> | |||
And it’s back to the master. | |||
Back to the server node (the master) | |||
With the host node set up properly, only a few things remain on the master to be set up. First of all, we want to list the nodes on the master to see if our new host node is in there: | |||
<pre>$ sudo icinga2 node list</pre> | |||
The output should include the node you’ve just added. | |||
Then, we update the configuration on the master so the host node is being included in checks, or in other words is being added to the master: | |||
<pre>$ sudo icinga2 node update-config</pre> | |||
If it did not work first time try changing permission of icinga2 directory to 755 ( with -R ). | |||
The only thing that remains right now is to reload Icinga 2: | |||
<pre>$ sudo service icinga2 reload</pre> | |||
==Summary from the author== | ==Summary from the author== | ||
Revision as of 12:42, 4 January 2017
Author: Etienne Barrier
Last modified: 17.11.2016
Preliminary notes
This tutorial shows how to install Icinga 2 on Ubuntu 16.04 LTS, using PostgreSQL (as for database) and Apache 2 (as for webserver).
This tutorial does NOT show:
- how to install Icinga version 1
- how to install/configure databses other than PostgreSQL (for example MySQL, MariaDB, etc.)
- how to install/configure webservers other than Apache2 (for example Nginx)
- how to use Icinga2
It is assumed that you are already familiar with the basics of Linux command line terminal commands. But this tutorial is made so that you can copy paste the commands to your terminal.
Versions used in this tutorial:
- Icinga 2 (version: r2.5.4-1)
- Ubuntu 16.04.1 LTS (Xenial)
- PostgreSQL (version: 9.5.2)
- Apache 2 (version: 2.4.18)
- Php (version 7.0)
Depending on the versions you use, the commands and/or the path shown in this tutorial might be different.
All commands in this tutorial are made as root. You must be root or be able to use "sudo" command to install and configure Icinga.
The version of Icinga used (version 2) is referred sometimes as “Icinga” or “Icinga 2” accross the tutorial.
This tutorial is based on the following tutorials:
- Official Icinga 2 documentation
- Official Icinga Web 2 installation documentation
- Linoxide "how to"
- Lowendbox blog post
For any comments, please write to ebarrier{at]itcollege[dot)ee.
What is Icinga?
Icinga 2 is an open source monitoring system which checks the availability of your network resources, notifies users of outages, and generates performance data for reporting.[1]
Icinga started as a Nagios fork and did quite well, mostly considering Icinga Web which was better than Nagios’ web interface. Icinga 2 is a complete rewrite and even adds a fancy new (optional) web interface which is responsive and customizable. On top of that, the communication between the monitoring server and the nodes it monitors has become more secure as NRPE has been ditched (it’s still available, just not prefered).[2]
Icinga is made of two parts - Icinga 2 and Icinga Web 2. The first one is the core of the software and the second is a web interface.
Install Icinga 2 core
Add Icinga's repository to the package management configuration.
$ add-apt-repository ppa:formorer/icinga
$ apt update
Install Icinga 2 package.
$ apt install icinga2
Check that Icinga is up and running
$ service icinga2 status
If it is not running, start it.
$ service icinga2 start
Make sure Icinga will start automatically on startup.
$ systemctl enable icinga2.service
Install plugins
Nagios plugins
To be able to check external services, Icinga needs monitoring plugins to know about them and to make sure they work properly. Available monitoring plugins are available on the Monitoring Plugins Project website.
We install the main set of plugins that come from Nagios monitoring solution.
Note that Icinga service runs as user and group called "Nagios" (for historical reasons).
$ apt install nagios-plugins
Vim and Nano configuration syntax highlighting
Icinga provides packages to highlight its configuration files using Nano and Vim utilities.
The package for Nano is included by default when installinIcinga2.
For Vim, do:
$ apt install vim-icinga2 vim-addon-manager</code>
$ vim-addon-manager -w install icinga2
Install Apache web server
Install Apache 2. Apache is a web server system that allows to access Icinga web interface.
$ apt install apache2
Apply a firewall rule to accept incoming tcp packets with destination port 80 (http). You may ignore this point if you have your own set of rules that you manage.
$ iptables -A INPUT -p tcp -m tcp --dport 80 -j ACCEPT
$ iptables-save
Install Icinga Web 2
To install Icinga Web 2 package,add its repository to the package management system.
For other Ubuntu versions than Xenial, just replace “xenial” below with the desired distribution's code name (see the packages list).
$ wget -O - http://packages.icinga.org/icinga.key | apt-key add -
$ add-apt-repository 'deb http://packages.icinga.org/ubuntu icinga-xenial main'
$ apt update
Install Icinga Web 2.
$ apt install icingaweb2
Install and configure PostgreSQL databases
Icinga needs two databases to work: one main to store monitoring information (DB IDO: Database Icinga Data Output) and one to store Icinga users and groups information for its web interface. We will install both of them manually.
Install PostgreSQL
Install PostgreSQL database system.
$ apt install postgresql
Install IDO module for PostgreSQL
Install Icinga IDO module for PostgreSQL. It installs files and directories to enable the export and storage of monitoring information into a database. We will install the database manually in our tutorial.
$ apt install icinga2-ido-pgsql
A wizard will start.
Say "No" to enable the IDO module for PostgreSQL, we do it manually later.
The wizard proposes to create and configure the database with "dbconfig-common". Choose “No” because we will do it manually (see below).
Create Icinga users database
Create the users database for Icinga.
First go to the /tmp directory because that is the default unix socket location for PostgreSQL.
$ cd /tmp
Create a role (similar to a user) for the database. The database will require to login and we choose a password. You can choose a different role name ("icingaweb") and a different password ("icingawebpass") than what is given as an example below. Remember them for later!
$ sudo -u postgres psql -c "CREATE ROLE icingaweb WITH LOGIN PASSWORD 'icingawebpass'"
Create the database (“icingawebdb”) and we assign its owner as being “icingaweb” (created earlier) with UTF8 encoding.
$ sudo -u postgres createdb -O icingaweb -E UTF8 icingawebdb
Create IDO database
Create the main database for Icinga.
Make sure you are in the /tmp directory (default unix socket location for PostgreSQL).
$ cd /tmp
Create a role (similar to a user) for the database.
The database will require to login and we choose a password.
You can choose a different role name ("icingaido") and a different password ("icingaidopass") than what is given as an example below.
Remember them for later!
$ sudo -u postgres psql -c "CREATE ROLE icingaido WITH LOGIN PASSWORD 'icingaidopass'"
Create the database (“icingaidodb”) and we assign its owner as being “icingaido” (created earlier) with UTF8 encoding.
$ sudo -u postgres createdb -O icingaido -E UTF8 icingaidodb
Edit the file /etc/icinga2/features-available/ido-mysql.conf and insert the values you have chosen for the IDO database.
object IdoMysqlConnection "ido-mysql" {
  user = "icingaido",
  password = "icingaidopass",
  host = "localhost",
  database = "icingaidodb"
}
Configure databases authentication
PostgreSQL handles authentication to databases from a file which states which users can connect to which database using certain methods. Previously we have created a roles and databases. We must tell PostgreSQL how these databases can be accessed and by whom.
Edit the pg_hba.conf in /etc/postgresql/*/main/pg_hba.conf and add the roles and databases we defined earlier user with md5 authentication method. 'md5' means that the user needs to authenticate with a password to access the database.
# TYPE  DATABASE         USER           ADDRESS               METHOD
#icinga
local   icingaidodb      icingaido                            md5
host    icingaidodb      icingaido      127.0.0.1/32          md5
host    icingaidodb      icingaido      ::1/128               md5

local   icingawebdb      icingaweb                            md5
host    icingawebdb      icingaweb      127.0.0.1/32          md5
host    icingawebdb      icingaweb      ::1/128               md5
Restart PostgreSQL
$ service postgresql restart
Import database schemas
So far Icinga can access both databases, but they are empty (not a single table, index, function).
Import the respective schemas for each of them.
Import the web database schema
This will populate the web database with tables and indexes,... The password we setup for this role will be asked.
$ psql -U icingaweb -d icingawebdb < /usr/share/icingaweb2/etc/schema/pgsql.schema.sql
Password for user icingaweb:
A list of statements such as “CREATE TABLE”, “CREATE INDEX” appears.
Import the IDO database schema
This will populate the IDO database with tables, indexes,...
$ psql -U icingaido -d icingaidodb < /usr/share/icinga2-ido-pgsql/schema/pgsql.sql
Password for user icingaido:
A long list of statements such as “CREATE FUNCTION”, “CREATE TABLE”, “CREATE INDEX” appears.
Enable Icinga features
Enable Icinga IDO for PostgreSQL and 'command' modules and restart Icinga.
$ icinga2 feature enable ido-pgsql command
$ service icinga2 restart
Check that ido-pgsql and command modules are enabled.
$ icinga2 feature list
By default the command module file is owned by the group "nagios" with read/write permissions. Add Apache user ("www-data") to the group "nagios" to enable sending commands to Icinga 2 through the web interface.
$ usermod -a -G nagios www-data
Set up the web interface
Open a browser and go to http://[server_ip]/icingaweb2/setup.
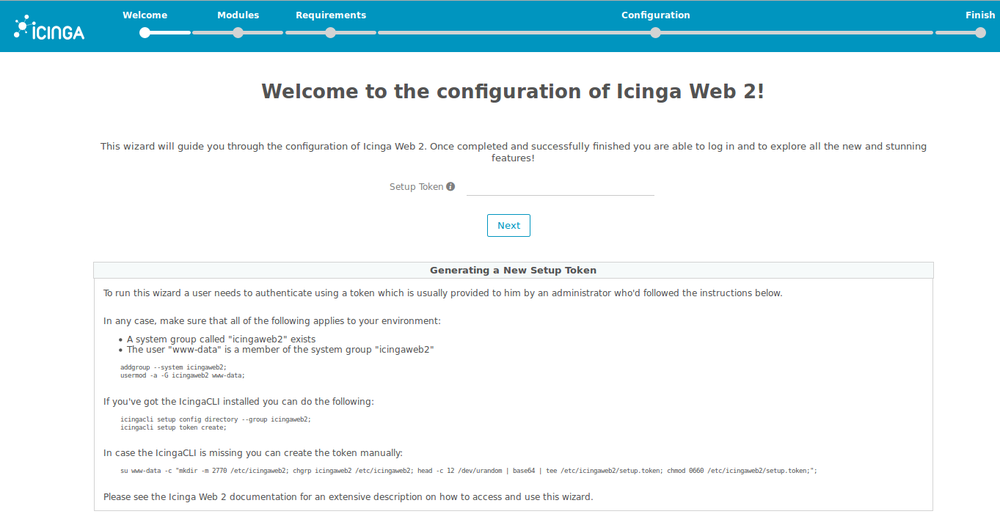
1. First is the welcome page asking to insert a token.
To get a token, do in your terminal $ icingacli setup token create and insert it on the page.
Note: in case you need to see the token again, do $ icingacli setup token show.
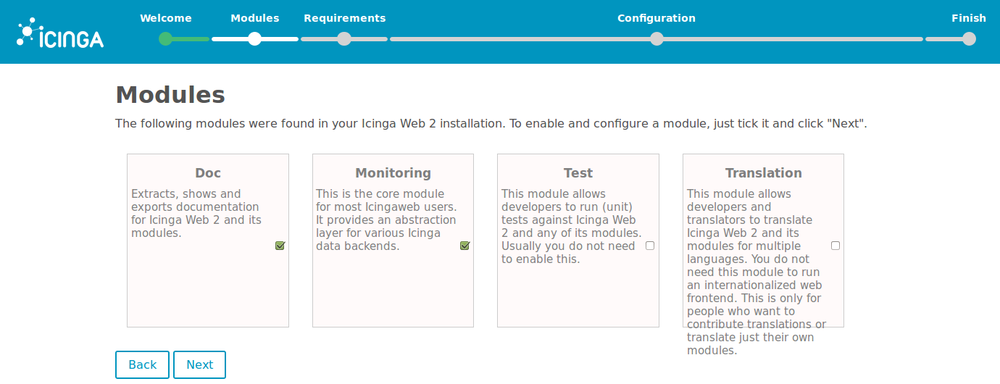
2. Choose the modules to install for Icinga Web 2.
For a normal usage, we suggest “Doc” and “Monitoring” modules.
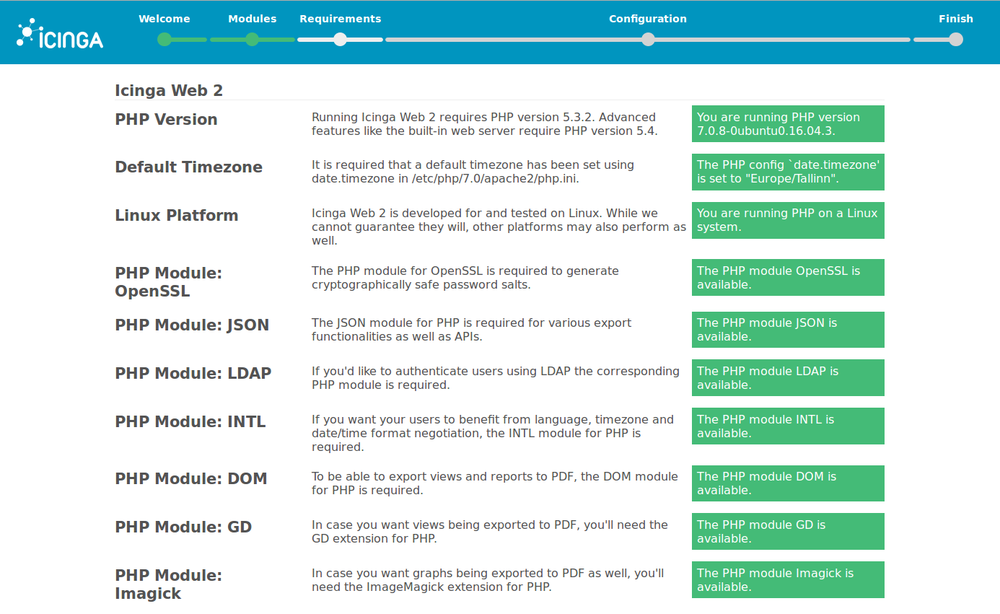
3. Icinga checks that all the requirements it needs are met. You may have some missing, in that case, you must fix them. We are not going to detail how to fix all of them but two that are likely to be missing.
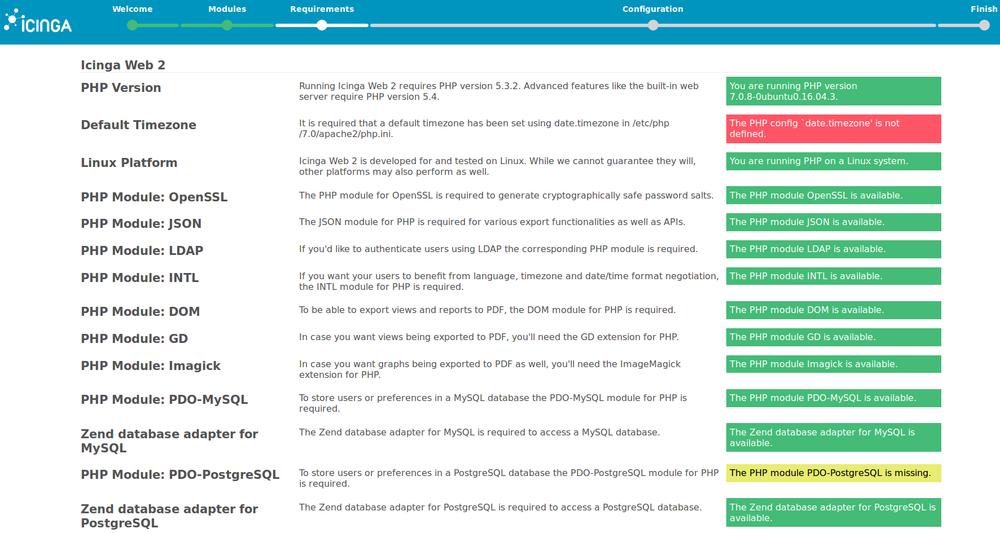
- “The PHP config ‘date.timezone’ is not defined”
- The page already guides you how to fix the Default TimeZone.
- Go to /etc/php/7.0/apache2/php.ini file, uncomment and set the line date.timezone = with your time zone.
- For example
date.timezone = Europe/Tallinn(see the list of php time zones).
- “The PHP module PDO-PostgreSQL is missing”
- Install the missing module.
$ apt install php-pgsql
- In /etc/php/7.0/apache2/php.ini, add these lines to enable the extension/module
extension=pdo_pgsql.so
extension=pgsql.so
Restart the web server to apply the new configuration
$ service apache2 restart
Click the button “Refresh” at the bottom of the page to check the the requirements are now met.
4. Choose “Database” for authentication unless you specifically want to authenticate using LDAP or another way.

5. Enter the credentials that we set up for users and groups database, and check that the configuration is correct by clicking on “Validate configuration”.
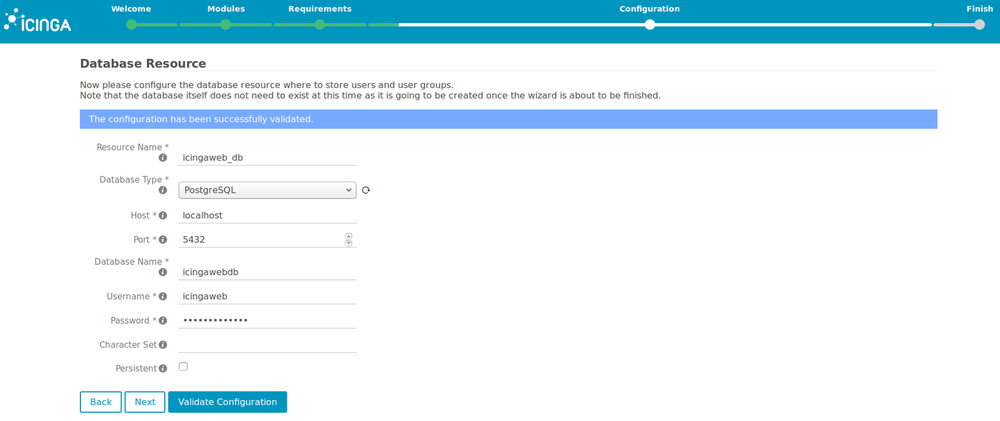
6. Use the default backend name “icingaweb2”.

7. Choose the credentials that will be asked when you will log into Icinga’s web interface to access the monitoring dashboard.
Remember these credentials! (for point 16 below).

8. Leave the default application and logging configuration unless you know what you are doing.
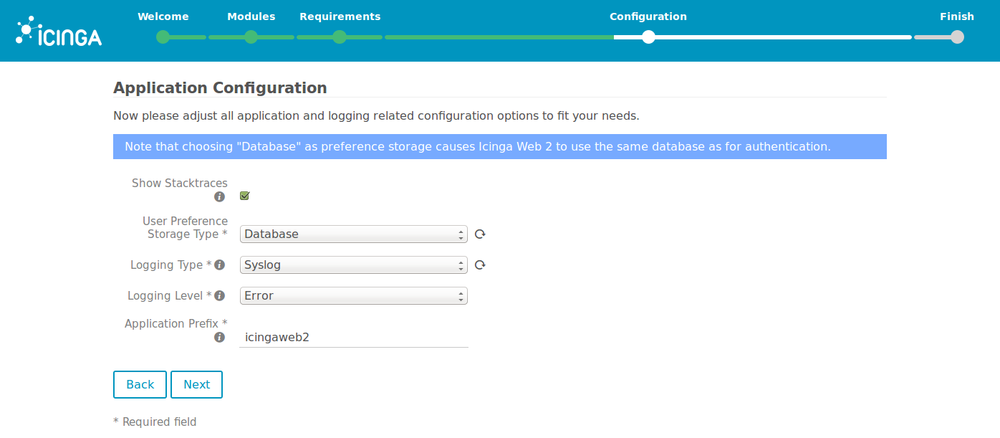
9. Check that the configuration is correct and continue.

10. You arrive to the configuration of the monitoring module.

11. Leave the defaults values for the monitoring backend ("IDO").

12. Insert values you chose for the IDO database and check that the configuration is correct by clicking on “Validate configuration”.
The values are also in the file /etc/icinga2/features-enabled/ido-pgsql.conf.
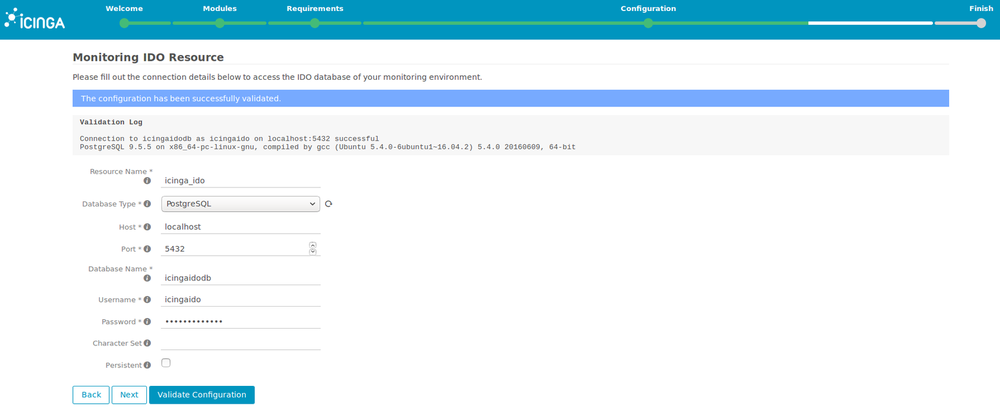
13. Leave the defaults values for the command transport.

14. Leave the defaults values for the monitoring security.

15. Check that the configuration is correct and finish.
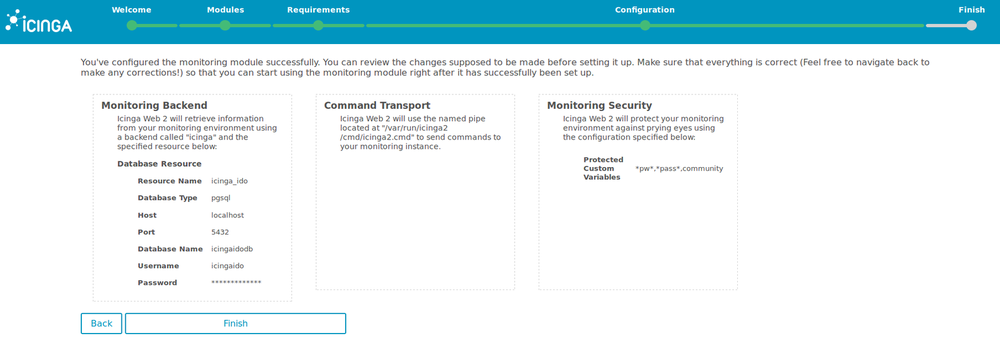

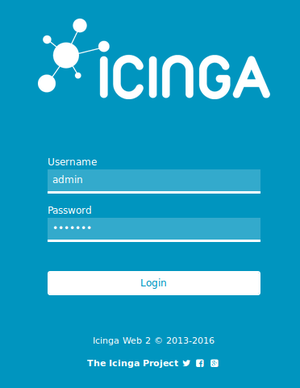
16. Login to Icinga 2 using the credentials on point 7.
Add nodes to Icinga 2
The server node
In order to be able to add hosts securely, we have to go to the server and run the following command:
$ sudo icinga2 node wizard
This will start a wizard which will first ask you whether this is a satellite setup or not. Since this is the server or master you have to say ‘No’ here, to input an ‘n’:
Please specify if this is a satellite setup (‘n’ installs a master setup) [Y/n]: n
It then starts generating keys are certificates required for secured TLS communication. In addition to that, it adds these to the configuration, plus it ensures this server is listed as the master:
information/base: Writing private key to ‘/var/lib/icinga2/ca/ca.key’.
    information/base: Writing X509 certificate to ‘/var/lib/icinga2/ca/ca.crt’.
    information/cli: Initializing serial file in ‘/var/lib/icinga2/ca/serial.txt’.
    information/cli: Generating new CSR in ‘/etc/icinga2/pki/icinga-server.csr’.
    information/base: Writing private key to ‘/etc/icinga2/pki/icinga-server.key’.
    information/base: Writing certificate signing request to ‘/etc/icinga2/pki/icinga-server.csr’.
    information/base: Writing private key to ‘/etc/icinga2/pki/icinga-server.key’.
    information/base: Writing certificate signing request to ‘/etc/icinga2/pki/icinga-server.csr’.
    information/cli: Signing CSR with CA and writing certificate to ‘/etc/icinga2/pki/icinga-server.crt’.
    information/cli: Copying CA certificate to ‘/etc/icinga2/pki/ca.crt’.
    information/cli: Dumping config items to file ‘/etc/icinga2/zones.conf’.
    information/cli: Created backup file ‘/etc/icinga2/zones.conf.orig’.
It then asks you for the host and port for the API. We have no reason to change these, so leave these empty:
Please specify the API bind host/port (optional):
    Bind Host []:
    Bind Port []:
It then finalizes setting up this server as a master my editing some more configuration files:
information/cli: Enabling the APIlistener feature.
    Enabling feature api. Make sure to restart Icinga 2 for these changes to take effect.
    information/cli: Created backup file ‘/etc/icinga2/features-available/api.conf.orig’.
    information/cli: Updating constants.conf.
    information/cli: Created backup file ‘/etc/icinga2/constants.conf.orig’.
    information/cli: Updating constants file ‘/etc/icinga2/constants.conf’.
    information/cli: Updating constants file ‘/etc/icinga2/constants.conf’.
    Done.
Now restart your Icinga 2 daemon to finish the installation!
With that done, restart Icinga 2 in order to use the new settings:
$ sudo service icinga2 restart
And the master is good for now. Let’s move on to the host node!
The host node
On the host node, we’re first going to have to ensure the Icinga 2 repository is present:
$ add-apt-repository ppa:formorer/icinga
Press ENTER when it asks you to.
Note: If this command gives you an error, run ‘sudo apt-get install software-properties-common’ to get the ‘add-apt-repository’ command!
Once the repository has been added, update apt:
$ sudo apt-get update
And install Icinga 2:
$ sudo apt-get install icinga2
With that out of the way, we can initiate the same wizard as we did on the master:
$ sudo icinga2 node wizard
This time we answer ‘Yes’ when it asks us if this is a satellite setup by just hitting ENTER:
Please specify if this is a satellite setup (‘n’ installs a master setup) [Y/n]:
After which is starts a different wizard:
Starting the Node setup routine…
    Please specifiy the common name (CN) [icinga-node]:
    Please specifiy the local zone name [icinga-node]:
It asks you for the common name and the local zone name for this server. These default to the system’s hostname in fully qualified domain name format. These master uses the common name to connect to the server and the local zone name to identify it in configuration files. I just let these be.
It then goes on to ask you about your master node:
Please specify the master endpoint(s) this node should connect to:
    Master Common Name (CN from your master setup): icinga-server
    Do you want to establish a connection to the master from this node? [Y/n]:
Please enter the Common Name of your master node (in my case ‘icinga-server’). This is usually the hostname unless you’ve changed it. Then press ENTER when asked if you want to establish a connection to the master from this node. This triggers the next question:
Please fill out the master connection information:
    Master endpoint host (Your master’s IP address or FQDN): icinga-server
    Master endpoint port [5665]:
    Add more master endpoints? [y/N]:
Enter the master’s IP address or Fully Qualified Domain Name (FQDN) here and accept the default port. Also press ENTER in order to not add more endpoints: we’re just working with one master right now.
Then it’s on to the connection for CSR auto-signing, the bit of magic that makes setting up a secure connection a bit easier for you:
Please specify the master connection for CSR auto-signing (defaults to master endpoint host):
    Host [icinga-server]:
    Port [5665]:
Accept the defaults here as well, because the master we have entered before is also our server for CSR auto-signing.
After this, Icinga 2 is going to save some configuration on the host node and start the setup of a secure connection. As part of this process the master is contacted:
information/base: Writing private key to ‘/etc/icinga2/pki/icinga-node.key’.
    information/base: Writing X509 certificate to ‘/etc/icinga2/pki/icinga-node.crt’.
    information/cli: Generating self-signed certifiate:
    information/cli: Fetching public certificate from master (icinga-server, 5665):

    information/cli: Writing trusted certificate to file ‘/etc/icinga2/pki/trusted-master.crt’.
    information/cli: Stored trusted master certificate in ‘/etc/icinga2/pki/trusted-master.crt’.
The certificate that has been set up needs to be signed in order to prove that you’re actually in command of both servers and approve of this secure communication:
Please specify the request ticket generated on your Icinga 2 master.
    (Hint: # icinga2 pki ticket –cn ‘icinga-node’):
This means you need to run the following command on the master:
$ sudo icinga2 pki ticket –cn ‘icinga-node’
And copy the output from that command, which looks like ‘ff84267fca3b0b29c4c88d94706c76f4247cac34’ to the host node.
information/cli: Processing self-signed certificate request. Ticket ‘ff84267fca3b0b29c4c88d94706c76f4247cac34’.

    information/cli: Created backup file ‘/etc/icinga2/pki/icinga-node.crt.orig’.
    information/cli: Writing signed certificate to file ‘/etc/icinga2/pki/icinga-node.crt’.
    information/cli: Writing CA certificate to file ‘/etc/icinga2/pki/ca.crt’.
With all certificates signed and in place, we’re asked about the API again:
Please specify the API bind host/port (optional):
    Bind Host []:
    Bind Port []:
Just like at the master, we’re not going to touch these here.
The wizard now asks you whether to accept the configuration and commands from the master:
Accept config from master? [y/N]: y
    Accept commands from master? [y/N]: y
Select ‘Yes’ for both. Unfortunately, the Icinga 2 documentation is a bit fuzzy on this part. There are several ways to setup up a client, for example with a local configuration or as an execution bridge. I’m aiming for the latter of the two here: the master is in control and sends commands, the host node just executes them and returns the results. This is closest to what NRPE does and should keep all the data on the master.
With this done, everything is being put in place to make this work:
information/cli: Disabling the Notification feature.
    Disabling feature notification. Make sure to restart Icinga 2 for these changes to take effect.
    information/cli: Enabling the Apilistener feature.
    Enabling feature api. Make sure to restart Icinga 2 for these changes to take effect.
    information/cli: Created backup file ‘/etc/icinga2/features-available/api.conf.orig’.
    information/cli: Generating local zones.conf.
    information/cli: Dumping config items to file ‘/etc/icinga2/zones.conf’.
    information/cli: Created backup file ‘/etc/icinga2/zones.conf.orig’.
    information/cli: Updating constants.conf.
    information/cli: Created backup file ‘/etc/icinga2/constants.conf.orig’.
    information/cli: Updating constants file ‘/etc/icinga2/constants.conf’.
    information/cli: Updating constants file ‘/etc/icinga2/constants.conf’.
    Done.

    Now restart your Icinga 2 daemon to finish the installation!
After which you need to restart Icinga 2 on the host node:
$ sudo service icinga2 restart
And it’s back to the master. Back to the server node (the master)
With the host node set up properly, only a few things remain on the master to be set up. First of all, we want to list the nodes on the master to see if our new host node is in there:
$ sudo icinga2 node list
The output should include the node you’ve just added.
Then, we update the configuration on the master so the host node is being included in checks, or in other words is being added to the master:
$ sudo icinga2 node update-config
If it did not work first time try changing permission of icinga2 directory to 755 ( with -R ).
The only thing that remains right now is to reload Icinga 2:
$ sudo service icinga2 reload
Summary from the author
The installation is really difficult.
Although the official documentation is well written and gives detailed commands for different distributions and databases, it lacks crucial explanations to understand to the user what it is being done.
Here are a few problems we encountered:
- The installation documentation for Icinga 2 and Official Icinga Web 2 are not at the same place and are not consistent in their format and style.
- Icinga2 IDO package has a wizard to create and configure the IDO database (which non-experienced users will probably follow), but it is not absolutely clear in the documentation that if you follow the wizard, you do not need to create the IDO database manually afterwards.
- If you follow the wizard, the IDO database name and user will have default values. The user will only have to choose the password. But when the user arrives to web interface where he must enter the credentials of this database, there is no indication that he can find them in a configuration file.
- According to Icinga documentation, the users database can be created automatically by the web interface at the end of the procedure. But experience showed that it never worked (errors occur). The user is left with the documentation that does not explain how to create this users database manually (which we took a long time to figure out).
- In case of problem during installation, a user who is not familiar with his database system will have trouble debugging. The web interface does not provide useful solutions.
I would not recommend Icinga with the experience I have, unless you follow this guide.