Tulemüüri graafilise liidesega: Difference between revisions
| Line 151: | Line 151: | ||
cd /var/log | cd /var/log | ||
/var/log/logwatch | |||
Click on the Logs link on the left navigation bar. It will open in the "other" screen, where you can click the drop-down menu and select a variety of logs to view, such as Kernel, SSH, IPSec, and DHCP server. If you click on the Web Proxy link on the navigation bar at the top of the screen, you'll see the list of files that your IPCop proxy server has cached. One of the nice features here is that you can select the Source IP to look at the files cached only by a particular system. This can be helpful for forensic analysis or for monitoring the Internet usage of an employee (remember that you need to have a policy in place before monitoring Internet usage). | Click on the Logs link on the left navigation bar. It will open in the "other" screen, where you can click the drop-down menu and select a variety of logs to view, such as Kernel, SSH, IPSec, and DHCP server. If you click on the Web Proxy link on the navigation bar at the top of the screen, you'll see the list of files that your IPCop proxy server has cached. One of the nice features here is that you can select the Source IP to look at the files cached only by a particular system. This can be helpful for forensic analysis or for monitoring the Internet usage of an employee (remember that you need to have a policy in place before monitoring Internet usage). | ||
Revision as of 23:20, 21 January 2010
Tulemüür graafilise liidesega IPCopi näitel
Autor
Alvar Unuks AK32 aunuks (at) itcollege.ee
Legend
Versioon
0.1 18.12.2009
0.2 09.01.2010
0.3 19.01.2009
0.4 21.01.2009
Sissejuhatus
Mis asi on tulemüür
Tulemüür on tarkvara või seadeldis, mis piirab ja reguleerib võrguliiklust vastavalt seadistatud piirangutele (et.wikipedia.org). Teisisõnu on tulemüür võrguseade, mis eraldab sise- ja välisvõrku ning kaitseb sisevõrgus olevaid arvuteid (teie kontorit) välisvõrgust tulevate rünnete eest. Võrkudevaheline suhtlus toimub ainult tulemüüri kaudu – pole võimalik sellest mööda minna ja võrkude vahel ükskõik mis suunas "otseühendust" luua. IPCop on tulemüürilahendus, mis ühendab Sinu asutuse sisevõrgu turvaliselt Internetiga. Kogu liiklus baseerub seda lubavatel reeglitel - kui midagi pole lubatud, siis see tulemüürist läbi ei lähe.
Mis asi on IPCop ja mida sellega teha saab
IPCop tulemüür on Debian Linuxi tulemüüri distributsioon. See on mõeldud kodukasutajatele ja SOHO kasutajatele. IPCopi web kasutaja liides on väga kasutaja sõbralik ja teeb kasutamise lihtsaks.
Vana info IPCopi kohta voib leida siit [1]
Mida IPCop sisaldab
Network Address Translation (NAT) DHCP server VPN server Transparent Web proxy Secure Shell (SSH) ligipääs Port forwarding DMZ setup Detailsed hästi organiseeritud logid Intrusion Detection System (IDS) Liikluse statistika ja graafikud
Erinevad sektsioonid
IPCop lubab sul jagada oma võrk erinevateks sektsioonideks roheline -usaldusväärne sisevõrk oranz - DMZ punane - internet sinine - WIFI
Mida on plaanis teha
Eeldused / nõuded
Nõuded riistavarale
min. 386 Protsessor, 32MB RAM, 300MB kõvaketas ja 2 võrgukaarti
Paigaldamine ja häälestamine
Allalaadimine
IPCopi saab allalaadida [2]
Tarkvara paigaldamine
Esimese asjana peaks IPCopi laadima alla ISO image, kirjutama plaadile kasutades oma kirjutamise tarkvara ja sisestama plaadi arvutisse millega plaanite tulemüüri pakkumist. Valige BIOSist, et arvuti boodiks esimesena CD/DVD pealt
Esmane ekraanipilt on selline kui masin hakkab bootima, vajutage <Enter>
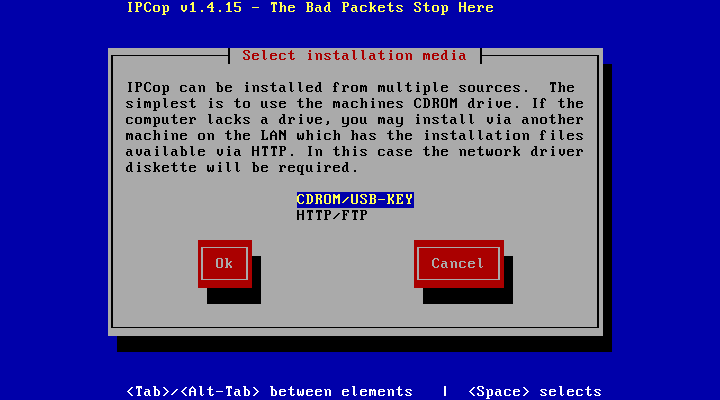
Järgmiseks valige keel ja boot meedia
Järgmisena valige võrgukaardi draiverid, seda saab valida käsitsi või lasta automaatselt need paika panna
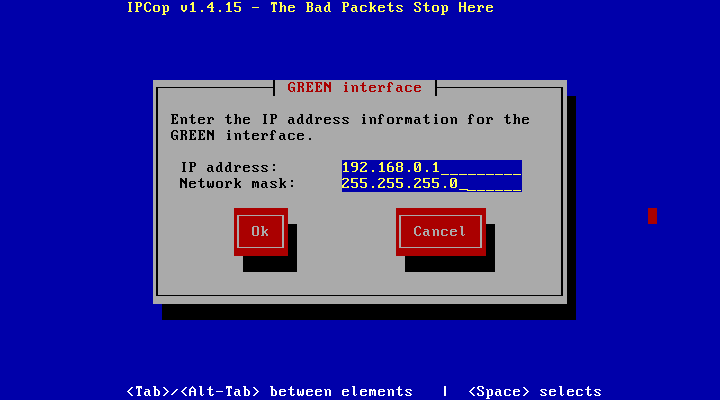
Sisestage IP aadress mida tahate näha rohelise sektsiooni jaoks
5. Type in the IP address that you want for the Green interface. This will also set up the DHCP address space for the Green interface. Once you save the IP, IPCop will tell you that it was successfully installed. Click OK one more time to continue. Valige oma klaviatuuri layout, ajavöönd, andke hostname ja domeeni nimi tulemüürile
Kui te mingil põhjusel kasutate ISDN, te saate seda seadistada. Muul juhul valige disable ISDN
Nüüd konfigureerige oma võrk. Valige "Network Configuration Type" ja valige millise võrgu soovite konfigureerida. Lihtsa kahe võrgu kaardiga võrgu jaoks valige Green+Red
Valige ‘Drivers and Card Assignments’ et konfigureerida uus Red kaart. Kinnitage et te tahate muuta sätteid, ja see peab nägema et seal on konfigureerimata NIC. Lisage ta punasele
Valige ‘Address Settings’ ja siis Red interface. Valige millist tüüpi püsiühendust te kasutate (staatiline kui teie ISP on andnud teile staatilise IP aadressi, DHCP muudel puhkudel
Kui te tahate konfigureerida DHCP rohelise võrgu jaoks, mine alla ja vali ‘DHCP Server Configuration’ Täida sätted mida soovid kasutada
Nüüd valige paroolid süsteemile. root parool füüsiliseks ja ssh ks admin parool millega pääseb web interfaceile ligi backup parool millega saab teha backupi
Nüüd on kõik nõuded täidetud ja masin teeb reboodi.
Et ligipääseda uuele tulemüürile, mine aadressile http://<rohelise kaardi aadress mille sisestasid>:81 . Sealt edasi saad muuta sätteid
Seadistamine
Kui IPCop on installeeritud, te pääsete Webi liidesele ligi kas HTTP või HTTPS 192.168.1.1 vaheta välja oma IP aadressiga, mille oled lisanud oma rohelisele kaardile
Jooksvad teenused
See on põhi leht kust leiate informatsiooni IPCopil jooksvate ja peatatud teenuste kohta. Selle lehe leiate System>System status. Te omate kontrolli 5 teenuse üle (IDS, DHCP, Web proxy, VPN, and SSH ja te saate nad välja lülitada kui on vajadus. Üle jäänud 5 teenust peavad alati olema sisse lülitatud. Kui mõni neist on välja lülitatud siis peate tegema restardi IPCopile
Järgmistes moodulites näed
mälu kasutust, RAM i, cache ja SWAP i kasutamine
kõvaketta kasutust
inodede kasutust
uptime ja kasutajad
laaditud moodulid
kernel
Web proxy seadistamine
Web proxy ei ole sisse lülitatud by default. IPCop sisaldab endas sisseehitatud Squid Web Proxy Cache, populaarset vabavaralist web proxy serveri tarkvara.
Web proxy saab sisselülitada Services > Proxy
Muud teenused
DHCP server
Port forwarding— Siin saate suunata punasel poolel tulemüüri olevad pordid serveritele tulemüüri taga.
Välised aliased — See on võimalik kui teie punane interface omab staatilist IP aadressi. Tüüpiliselt on see kasutusel kui teil IP aadressite vahemik teie ISPlt ja te soovite nad ümber suunata teatud serveritele tulemüüri taga.
External service access—You'll need to use this only if you want to set up your IPCop firewall to be administered over the Internet (which, of course, is a serious security risk, but is necessary sometimes). If you do want to provide external access to IPCop, simply enter 81 and/or 445 (which is what I would recommend because it uses HTTPS) as the Destination Port and click Add.
DMZ pinholes—This is where you enter the information for any ports you need opened for servers you are hosting on your DMZ. This is applicable only if you have set up an ORANGE interface for a DMZ during your installation of IPCop.
Dynamic DNS—For those who want to host servers behind IPCop but don't have a static IP address, the only option in many cases is to use a dynamic DNS service such as dyndns.org or zoneedit.com. IPCop supports those two services, as well as the other services shown in the drop-down menu in this section.
Logi failid
Logi failid asuvad aadressil
  cd /var/log
     /var/log/logwatch
Click on the Logs link on the left navigation bar. It will open in the "other" screen, where you can click the drop-down menu and select a variety of logs to view, such as Kernel, SSH, IPSec, and DHCP server. If you click on the Web Proxy link on the navigation bar at the top of the screen, you'll see the list of files that your IPCop proxy server has cached. One of the nice features here is that you can select the Source IP to look at the files cached only by a particular system. This can be helpful for forensic analysis or for monitoring the Internet usage of an employee (remember that you need to have a policy in place before monitoring Internet usage).
Next, click on the Firewall link and you'll see the list of packets that your IPCop firewall has blocked. Finally, you can click on Intrusion Detection System to see the list of security alerts that Snort has detected. Some of these messages are pretty cryptic, but if you do a Google search for the text of the message, you should easily find the meaning in a newsgroup or forum.
IPCopi uuendamine
I have been impressed with the speed with which IPCop is updated when there is a security flaw found in any of the Linux software that IPCop uses. Several times I have come across news alerts revealing Linux flaws and suspected that they probably affect my IPCop firewall. Every time I have checked, there was already an IPCop update that fixed the flaw. Stay informed of updates If you are running an IPCop firewall, you should definitely join the IPCop-Announce mailing list. This is a low-volume e-mail list that only sends announcements about patches and updates.
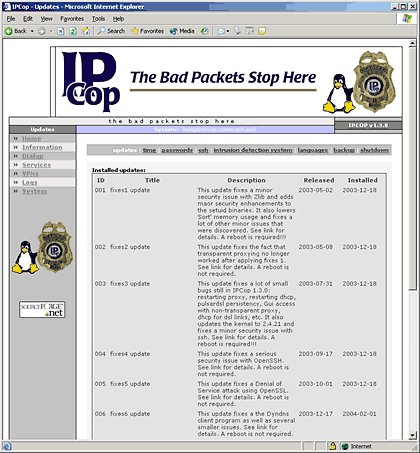
Fortunately, IPCop is fairly easy to update. You simply click on the System link on the left navigation bar, and the Updates section is the first screen you see (Figure F). It lists all of the available updates for your version of IPCop, explains what they do, and shows whether you've installed them or not.

Varundus ja taastamine
Andmete asukohad
/var/ipcop/backup
Varundamise ja taastamise näited
Kõige lihtsam viis on varundada valides System > Backup Sealt Select Media ja varundada


