BackBox OS: Difference between revisions
No edit summary |
|||
| (10 intermediate revisions by the same user not shown) | |||
| Line 1: | Line 1: | ||
= BackBox Linux = | = BackBox Linux = | ||
== | == Introduction == | ||
BackBox is an open source Ubuntu based Linux distribution. Its main purpose is to provide a desktop environment for network and systems analysis, penetration and security assessment. It is a community project and full of some of the most commonly used security and analysis tools. It runs a desktop environment based on the XFCE window manager, which makes it very easy to use. | BackBox is an open source Ubuntu based Linux distribution. Its main purpose is to provide a desktop environment for network and systems analysis, penetration and security assessment. It is a community project and full of some of the most commonly used security and analysis tools. It runs a desktop environment based on the XFCE window manager, which makes it very easy to use. | ||
=== BackBox Features === | === BackBox Features === | ||
Main BackBox features discussed in this article: | |||
* Information Gathering | * Information Gathering | ||
* Vulnerability Assessment | * Vulnerability Assessment | ||
| Line 16: | Line 18: | ||
* Documentation and Reporting | * Documentation and Reporting | ||
* Reverse Engineering | * Reverse Engineering | ||
== Installing and Tuning == | == Installing and Tuning == | ||
| Line 28: | Line 29: | ||
* DVD-ROM drive or USB port (3 GB) | * DVD-ROM drive or USB port (3 GB) | ||
Since this is a free and open sourced project, [https://backbox.org/download BackBox Linux .iso] file can be downloaded from the projects homepage. The installation and tweaking of the system follows up the usual Ubuntu/Debian guide lines. | Since this is a free and open sourced project, [https://backbox.org/download BackBox Linux .iso] file can be downloaded from the projects homepage. The installation and tweaking of the system follows up the usual Ubuntu/Debian guide lines. | ||
[[File:BB_Desktop.png|700x350px|center|thumb|Desktop View]] | |||
[[File:BB_Desktop.png| | |||
After the installation, the user can start configuring and using the services available in this operating system. This can be achieved by simply left-clicking on the blue 'B' button on the upper-left corner. | After the installation, the user can start configuring and using the services available in this operating system. This can be achieved by simply left-clicking on the blue 'B' button on the upper-left corner. | ||
[[File:BB_Services.png| | [[File:BB_Services.png|400x500px|center|thumb|BlackBox Sevices Menu View]] | ||
To manage applications, Synaptic Package Manager or Ubuntu Software Center can be used. | To manage applications, Synaptic Package Manager or Ubuntu Software Center can be used. | ||
To access the security applications, use the 'Auditing' option: | |||
[[File:Auditing_Menupng.png|center|thumb|Auditing Menu]] | |||
== Securing BackBox itself == | == Securing BackBox itself == | ||
| Line 80: | Line 81: | ||
Some of the tools used in BackBox for information gathering are: | Some of the tools used in BackBox for information gathering are: | ||
==== Arping ==== | ==== Network ==== | ||
===== Arping ===== | |||
This utility sends ARP requests to the hosts on a specific subnet. | This utility sends ARP requests to the hosts on a specific subnet. | ||
[[File:BB_OS_Arping.png]] | [[File:BB_OS_Arping.png|400x500px|center|thumb|Arping Manual]] | ||
Example command: | Example command: | ||
| Line 92: | Line 95: | ||
This finds out the reachability of an IP on the local Ethernet. The '-I' identifies the intended interface, the '-c' is the count of the ARP requests taken. | This finds out the reachability of an IP on the local Ethernet. The '-I' identifies the intended interface, the '-c' is the count of the ARP requests taken. | ||
==== Arp-scan ==== | ===== Arp-scan ===== | ||
This is a simple but very powerful command-line tool that can be used for system discovery and fingerprinting. It assembles and sends ARP requests to specified IP addresses, displaying any responses that are received. | This is a simple but very powerful command-line tool that can be used for system discovery and fingerprinting. It assembles and sends ARP requests to specified IP addresses, displaying any responses that are received. | ||
| Line 100: | Line 103: | ||
sudo arp-scan -l | sudo arp-scan -l | ||
==== Knock ==== | ===== Knock ===== | ||
This is a Python script, written by Gianni 'guelfoweb' Amato, designed to enumerate sub-domains on a target domain through a word-list. | This is a Python script, written by Gianni 'guelfoweb' Amato, designed to enumerate sub-domains on a target domain through a word-list. | ||
[[File:BB_Knock.png]] | [[File:BB_Knock.png|400x500px|center|thumb|knock manual]] | ||
Example command would be this: | Example command would be this: | ||
| Line 112: | Line 115: | ||
This would start looking for the aforementioned site's subdomains. This is helpful if you are looking for subdomain takeover vulnerabilities. | This would start looking for the aforementioned site's subdomains. This is helpful if you are looking for subdomain takeover vulnerabilities. | ||
==== Nbtscan ==== | ===== Nbtscan ===== | ||
This is an application to scan and get information about IP networks for NetBIOS name information. | This is an application to scan and get information about IP networks for NetBIOS name information. | ||
===== theHarvest ===== | |||
==== theHarvest ==== | |||
This is an information collector used to harvest e-mails, subdomains, hosts and personal information about individuals. | This is an information collector used to harvest e-mails, subdomains, hosts and personal information about individuals. | ||
[[File:TheHarvester.png]] | [[File:TheHarvester.png|400x500px|center|thumb|theHarvester Manual]] | ||
Example command: | Example command: | ||
| Line 130: | Line 131: | ||
This would print all the email addresses in the site 'domain.com' that can be found by the google search engine. | This would print all the email addresses in the site 'domain.com' that can be found by the google search engine. | ||
==== Zenmap ==== | ===== Zenmap ===== | ||
Zenmap is a multi-platform graphical Nmap frontend and results viewer. This GUI is designed to make Nmap - Network Mapper, an open source tool for network exploration and security auditing - easy for beginners while also giving experienced Nmap users advanced features. | Zenmap is a multi-platform graphical Nmap frontend and results viewer. This GUI is designed to make Nmap - Network Mapper, an open source tool for network exploration and security auditing - easy for beginners while also giving experienced Nmap users advanced features. | ||
| Line 138: | Line 139: | ||
sudo zenmap | sudo zenmap | ||
[[File:Zenmap.png|400x450px]] | [[File:Zenmap.png|400x450px|center|thumb|Zenmap Manual]] | ||
In the opened window, type the ip address of the host that you want to scan in the Target field and select the desired profile from the Profile drop-down box: | In the opened window, type the ip address of the host that you want to scan in the Target field and select the desired profile from the Profile drop-down box: | ||
[[File:Zenmap_Example.png]] | [[File:Zenmap_Example.png|500x600px|center|thumb|Zenmap Example]] | ||
To find the scanned host’s list of open ports, port states, the services corresponding to the ports and it’s version details etc., click on the Ports/Hosts tab. | To find the scanned host’s list of open ports, port states, the services corresponding to the ports and it’s version details etc., click on the Ports/Hosts tab. | ||
| Line 197: | Line 198: | ||
A lot of focus will be put into host detection, continuing even if the initial ping request fails. Three different protocols will be used to detect the hosts - TCP, UDP and SCTP. If host detection has succeeded, it will do its best to determine what OS, services and versions the host are running based on the most common TCP and UDP services. Also the scan camouflages itself as source port 53 (DNS). | A lot of focus will be put into host detection, continuing even if the initial ping request fails. Three different protocols will be used to detect the hosts - TCP, UDP and SCTP. If host detection has succeeded, it will do its best to determine what OS, services and versions the host are running based on the most common TCP and UDP services. Also the scan camouflages itself as source port 53 (DNS). | ||
==== | ==== Web Application ==== | ||
===== WhatWeb ===== | |||
This is an application that recognizes web technologies including content management systems (CMS), blogging platforms, statistic/analytics packages, JavaScript libraries, web servers, and embedded devices. | |||
== Vulnerability Assessment == | == Vulnerability Assessment == | ||
| Line 211: | Line 208: | ||
After the information is gathered, the next step should be to analyze it. That's where vulnerability Assessment tools come into play. With them, you can identify the vulnerabilities present in systems and prioritize them. | After the information is gathered, the next step should be to analyze it. That's where vulnerability Assessment tools come into play. With them, you can identify the vulnerabilities present in systems and prioritize them. | ||
==== OpenVAS ==== | ==== Network ==== | ||
===== OpenVAS ===== | |||
This is a framework composed of several services and tools to deliver a comprehensive, powerful vulnerability scanning management solution. | This is a framework composed of several services and tools to deliver a comprehensive, powerful vulnerability scanning management solution. | ||
| Line 223: | Line 222: | ||
You will be promted with a login screen (Accept the self-signed SSL certificate). From there, enter the details of the user you created above and the OpenVAS web interface will open: | You will be promted with a login screen (Accept the self-signed SSL certificate). From there, enter the details of the user you created above and the OpenVAS web interface will open: | ||
[[File:OpenVAS_WebInt.png|900x650px]] | [[File:OpenVAS_WebInt.png|900x650px|center|thumb|OpenVas Web Interface]] | ||
In the opened window, create a new task and fill in the information required - type in either the name or the IP of the domain you want to target for the scan. Then click start. Once it has finished, a report will be created. You can better analyze it by exporting it to different main popular file formats such as .pdf, .txt or .html. | In the opened window, create a new task and fill in the information required - type in either the name or the IP of the domain you want to target for the scan. Then click start. Once it has finished, a report will be created. You can better analyze it by exporting it to different main popular file formats such as .pdf, .txt or .html. | ||
| Line 229: | Line 228: | ||
OpenVAS will have grouped the possible vulnerabilities into high-, medium-, low- and log-level (information). These reports are not false proof but they help with simplifying the security assessment. | OpenVAS will have grouped the possible vulnerabilities into high-, medium-, low- and log-level (information). These reports are not false proof but they help with simplifying the security assessment. | ||
==== Nikto ==== | ==== Web Application ==== | ||
===== Nikto ===== | |||
This is an open-sourced web server scanner. It performs comprehensive tests against web servers for multiple items, including over 6700 potentially dangerous files/programs, checks for outdated versions of over 1250 servers, and version specific problems on over 270 servers. It also checks for server configuration items such as the presence of multiple index files, HTTP server options, and will attempt to identify installed web servers and software. | This is an open-sourced web server scanner. It performs comprehensive tests against web servers for multiple items, including over 6700 potentially dangerous files/programs, checks for outdated versions of over 1250 servers, and version specific problems on over 270 servers. It also checks for server configuration items such as the presence of multiple index files, HTTP server options, and will attempt to identify installed web servers and software. | ||
| Line 247: | Line 248: | ||
This performs an injection test and saves the result as a plain text file while also displaying a Verbose output in the terminal. | This performs an injection test and saves the result as a plain text file while also displaying a Verbose output in the terminal. | ||
==== Skipfsh ==== | ===== Skipfsh ===== | ||
This is an active web application security reconnaissance tool. It prepares an interactive sitemap for a targeted site by undertaking a recursive crawl and dictionary-based probes. | This is an active web application security reconnaissance tool. It prepares an interactive sitemap for a targeted site by undertaking a recursive crawl and dictionary-based probes. | ||
| Line 259: | Line 260: | ||
To get a list of which tests Skipfish does, visit the [https://code.google.com/archive/p/skipfish/wikis/SkipfishDoc.wiki Google Code Archive Wiki]. | To get a list of which tests Skipfish does, visit the [https://code.google.com/archive/p/skipfish/wikis/SkipfishDoc.wiki Google Code Archive Wiki]. | ||
==== ZAP ==== | ===== ZAP ===== | ||
OWASP Zed Attack Proxy tool is one of the most popular web application vulnerability finders. The main features of this tool are: | OWASP Zed Attack Proxy tool is one of the most popular web application vulnerability finders. The main features of this tool are: | ||
| Line 279: | Line 280: | ||
- Extensibility - Adding additional functionalities to ZAP (code.google.com/p/zap-extensions) | - Extensibility - Adding additional functionalities to ZAP (code.google.com/p/zap-extensions) | ||
[[File:Zap.png|800x450px]] | [[File:Zap.png|800x450px|center|thumb|Zap GUI]] | ||
To use it, type in the website you want to test on the 'URL attack' bar and press 'attack': | To use it, type in the website you want to test on the 'URL attack' bar and press 'attack': | ||
==== | == Exploitation == | ||
This is the process of where the weakness found in the system is penetrated. This is achieved by using exploit, an automated script designed to attack the target system. | |||
==== Browser ==== | |||
===== BeEF ===== | |||
Short for The Browser Exploitation Framework, it is a penetration testing tool that focuses on the web browser. It allows the professional penetration tester to assess the actual security posture of a target environment by using client-side attack vectors. | |||
BeEF can be started from the services > auditing > exploitation menu | |||
[[File:BeEF.png|center|thumb|BeEF after starting it]] | |||
You need to click on one of the UI URL-s, which will open the BeEF login page on your browser. | |||
[[File:BeEF_Auth_Page.png|800x600px|center|thumb|BeEF Authorization page]] | |||
Type in the default username and password (beef & beef). This will open the startup page, where you can get the overview of the tool. | |||
[[File:BeEF_SPage.png|800x600px|center|thumb|BeEF Startup page]] | |||
= | You can test this program out by running an apache server on your BackBox and creating a [https://youtu.be/WtLTtbe5JcM?t=383 a simple script] to hook a the intended website with BeEf. The result of this would make information about the browser used available to the BeEF user, like the browser components, the running scripts and hardware information. On the 'commands' tab in the BeEF GUI (after you chose the active IP address from the left menu), you can extract even more data and manipulate the ongoing browser session. For example, you can redirect the intended URL to another site. | ||
==== Database ==== | |||
==== Sqlmap ==== | ===== Sqlmap ===== | ||
This is an automated tool to detect SQL flaws. SQL-Injection is usually the most common forms of attacks and usually very effective in getting data from the target. | This is an automated tool to detect SQL flaws. SQL-Injection is usually the most common forms of attacks and usually very effective in getting data from the target. | ||
| Line 307: | Line 324: | ||
This command tries to find databases from the specific site while keeping the session active using the mentioned cookie. | This command tries to find databases from the specific site while keeping the session active using the mentioned cookie. | ||
==== | ==== Network ==== | ||
===== Armitage ===== | |||
This is the graphical frontend of the Metasploit Framework. It is a scriptable red team collaboration tool. It has a server component to allow a team of hackers to share their accesses to compromised hosts. | |||
To start it, type 'armitage' in your terminal. This will open up a new window: | |||
[[File: | [[File:Armitage.png|center|thumb|Armitage Window]] | ||
Click connect and if the tool asks you if you want to start Metasploit RPC server, click 'yes'. This will open the Armitage GUI: | |||
[[File: | [[File:ArmitageGUI.png|center|thumb|Armitage GUI]] | ||
From this, you can create [http://www.fastandeasyhacking.com/manual#4 custom attacks] against a host. For example, you can test out yous skills on a [http://sourceforge.net/projects/metasploitable/files/Metasploitable2/ virtual machine maintained by the Metasploit project team]. | |||
==== | ===== msfconsole ===== | ||
Probably the most popular interface to the Metasploit Framework (MSF). It provides an “all-in-one” centralized console and allows you efficient access to virtually all of the options available in the MSF. MSFconsole may seem intimidating at first, but once you learn the syntax of the commands you will learn to appreciate the power of utilizing this interface. | |||
To | To launch the console(in quiet mode), simply type: | ||
mfsconsole -q | |||
Common commands: | |||
[[File: | [[File:Msfconsolepng.png|1000x800px|center|thumb|msfconsole common commands]] | ||
==== Web Application ==== | |||
==== Fimap ==== | ===== Fimap ===== | ||
This is a python tool which can find, prepare, audit and exploit bugs in webapps. | This is a python tool which can find, prepare, audit and exploit bugs in webapps. | ||
| Line 349: | Line 364: | ||
This will try to find bugs in the mentioned url of the webapp. | This will try to find bugs in the mentioned url of the webapp. | ||
==== | ===== Wpscan ===== | ||
This tool can test a WordPress installation for security vulnerabilities. It allows remote testing of a WordPress installation, find vulnerable plugins and themes, security configuration issues and attack users by brute forcing passwords. | |||
== Privilege Escalation == | == Privilege Escalation == | ||
| Line 365: | Line 372: | ||
This occurs when you have gained access to a system but have not gained enough privileges to gather useful information or make necessary changes. | This occurs when you have gained access to a system but have not gained enough privileges to gather useful information or make necessary changes. | ||
==== John ==== | ==== Local Passwords ==== | ||
===== John ===== | |||
This (also known as John the Ripper) is a password cracking software tool written in C. | This (also known as John the Ripper) is a password cracking software tool written in C. | ||
| Line 391: | Line 400: | ||
john --show mypasswd.txt | john --show mypasswd.txt | ||
==== Xhydra ==== | ===== Others ===== | ||
- Hashcat: This is incredibly the fastest CPU-based password recovery tool. | |||
- Chntpw: This is a utility used for resetting or blanking local passwords in Wintel systems. | |||
- Crunch: This is a wordlist generator where you can specify a standard character set. | |||
- Fcrackzip: This is a fast password cracker partly written in assembler. | |||
- Hash-id: Software to identify the different types of hashes used to encrypt data and especially passwords. | |||
- Ophcrack: This is a Windows password cracker based on rainbow tables. | |||
- Pdfcrack: This is a tool for recovering passwords and content from PDF fles. | |||
==== Remote Passwords ==== | |||
===== Xhydra ===== | |||
A GTK+ based GUI for hydra, this is a parallized login cracker which supports numerous protocols (such as TELNET, FTP, HTTP, HTTPS, HTTP-PROXY, LDAP, SMB etc.) to attack by using the Telnet module. This tool gives researchers and security consultants the possiblity to show how easy it would be to gain unauthorized access from remote to a system. This can also be very useful to a hacker in the scenario where one has cracked a wifi password and gained local access to the network. | A GTK+ based GUI for hydra, this is a parallized login cracker which supports numerous protocols (such as TELNET, FTP, HTTP, HTTPS, HTTP-PROXY, LDAP, SMB etc.) to attack by using the Telnet module. This tool gives researchers and security consultants the possiblity to show how easy it would be to gain unauthorized access from remote to a system. This can also be very useful to a hacker in the scenario where one has cracked a wifi password and gained local access to the network. | ||
| Line 397: | Line 424: | ||
To start the program, type 'xhydra' in your terminal. This will open the GUI: | To start the program, type 'xhydra' in your terminal. This will open the GUI: | ||
[[File:Xhydra.png|300x400px | [[File:Xhydra.png|300x400px|center|thumb|Hydra GUI]] | ||
Type in the target IP or the target. Choose whether you'd like to use IPv6, choose the port and protocol. And tick the optional boxes in the 'output options', for example, when you want to enable verbose output or debug mode. | Type in the target IP or the target. Choose whether you'd like to use IPv6, choose the port and protocol. And tick the optional boxes in the 'output options', for example, when you want to enable verbose output or debug mode. | ||
| Line 409: | Line 436: | ||
Then all that is left is to start the tool, wait for the results and analyze them. | Then all that is left is to start the tool, wait for the results and analyze them. | ||
==== Ettercap ==== | ===== RedFang ===== | ||
RedFang is a Linux-based tool made to find Bluetooth devices in undiscoverable mode. The technology is attributed to Ollie Whitehouse and a small tech enterprise called @stake. It was originally developed as a “proof-of-concept” research resource, and is now a common part of many Bluetooth tutorials on security.RedFang uses a method called brute force to discover previously unknown Bluetooth locations. | |||
===== Medusa ===== | |||
Intended to be a speedy, massively parallel, modular, login brute-forcer. The goal is to support as many services which allow remote authentication as possible. The author considers following items as some of the key features of this application: | |||
- Thread-based parallel testing. Brute-force testing can be performed against multiple hosts, users or passwords concurrently. | |||
- Flexible user input. Target information (host/user/password) can be specified in a variety of ways. For example, each item can be either a single entry or a file containing multiple entries. Additionally, a combination file format allows the user to refine their target listing. | |||
- Modular design. Each service module exists as an independent .mod file. This means that no modifications are necessary to the core application in order to extend the supported list of services for brute-forcing. | |||
Medusa [-h host|-H file] [-u username|-U file] [-p password|-P file] [-C file] -M module [OPT] | |||
==== Sniffing ==== | |||
===== Wireshark ===== | |||
Formerly known as Etheral, it is the world's foremost network protocol analyzer. | |||
To start capturing packets with your user, first you need to make sure that your user belongs to the usergroup named 'wireshark'. To be sure of that, use this command: | |||
grep 'wireshark' /etc/group | |||
If your username does not appear in the following output, it is not part of the group. To add your user to the group, use the following command: | |||
sudo usermod -a -G wireshark yourusername | |||
Now you can oped the Wireshark GUI, choose the network interface that is functional and start capturing and analyzing packets. | |||
====== Tshark ====== | |||
A terminal oriented version of Wireshark. For example, to start off, you would want to know the available interfaces you can use with the command: | |||
sudo tshark -D | |||
An example of capturing network data with tshark: | |||
tshark -eth0 -c 100 -w log.pcap | |||
This will capture 100 network packets and save them into a file called log.pcap. | |||
With the following example, we extract data from any HTTP request. The '-Y' is used to request filters, '-T' is used to specify the extract process and the '-e' is used to identify the wanted fields: | |||
tshark -i eth0 -Y HTTP.request -T fields -e http.host -e http.user_agent | |||
This command basically prints out the same output as Wireshark GUI: | |||
tshark -r ~/dhcp.pcap -V frame.number == 1 | |||
===== Ettercap ===== | |||
This is a free and open-sourced tool for man-in-the-middle attacks. It has a user-friendly GUI interface and supports passive and active dissection of the amount of protocols. | This is a free and open-sourced tool for man-in-the-middle attacks. It has a user-friendly GUI interface and supports passive and active dissection of the amount of protocols. | ||
[[File:Ettercap.png|600x450px]] | [[File:Ettercap.png|600x450px|center|thumb|Ettercap GUI]] | ||
Ettercap can work with these four models: | Ettercap can work with these four models: | ||
| Line 452: | Line 531: | ||
Finally, click the "Start" menu and select "start sniffing". | Finally, click the "Start" menu and select "start sniffing". | ||
==== Tcpdump ==== | ===== Tcpdump ===== | ||
A command line packet sniffer that prints out a description of the contents of packets on a network interface that match the boolean expression. | A command line packet sniffer that prints out a description of the contents of packets on a network interface that match the boolean expression. | ||
| Line 468: | Line 547: | ||
sudo tcpdump host PC1 and not PC2 | sudo tcpdump host PC1 and not PC2 | ||
==== | ===== Others ===== | ||
== | |||
- Driftnet: This is an application that listens to network traffc and picks out images from the TCP streams it observes. | - Driftnet: This is an application that listens to network traffc and picks out images from the TCP streams it observes. | ||
| Line 539: | Line 558: | ||
- Sslstrip: This is a sniffer against secure socket layer protocol. | - Sslstrip: This is a sniffer against secure socket layer protocol. | ||
==== Spoofing ==== | |||
- scapy: is a powerful interactive packet manipulation program. It is able to forge or decode packets of a wide number of protocols, send them on the wire, capture them, match requests and replies, and much more. | |||
- arpspoof: This tool redirects packets from a target host (or all hosts) on the LAN intended for another host on the LAN by forging ARP replies. | - arpspoof: This tool redirects packets from a target host (or all hosts) on the LAN intended for another host on the LAN by forging ARP replies. | ||
- dnsspoof: This tool forges replies to arbitrary DNS address/pointer queries on the LAN. This is useful in bypassing hostname-based access controls, or in implementing a variety of man-in-the-middle attacks. | |||
- yersinia: Yersinia is a network tool designed to take advantage of some weakeness in different network protocols. It pretends to be a solid framework for analyzing and testing the deployed networks and systems. | |||
== Maintaining Access == | == Maintaining Access == | ||
| Line 546: | Line 573: | ||
Maintaining Access comes into play once we have gained access to a system. The tools in this category allow us to access it again without repeating all the tasks done initially. | Maintaining Access comes into play once we have gained access to a system. The tools in this category allow us to access it again without repeating all the tasks done initially. | ||
==== Iodine ==== | ==== Tunneling ==== | ||
===== Iodine ===== | |||
This is a free (ISC licensed) tunnel application to forward IPv4 traffc through DNS servers. This can be usable in different situations where internet access is firewalled, but DNS queries are allowed. | This is a free (ISC licensed) tunnel application to forward IPv4 traffc through DNS servers. This can be usable in different situations where internet access is firewalled, but DNS queries are allowed. | ||
| Line 567: | Line 596: | ||
Scripts to configure the client can be found [http://dev.kryo.se/iodine/wiki/TipsAndTricks here]. | Scripts to configure the client can be found [http://dev.kryo.se/iodine/wiki/TipsAndTricks here]. | ||
==== Weevely ==== | ===== Others ===== | ||
- Cryptcat: a simple Unix utility which reads and writes data across network connections, using TCP or UDP protocol while encrypting the data being transmitted. | |||
- ncat: a feature-packed networking utility which reads and writes data across networks from the command line. Ncat was written for the Nmap Project and is the culmination of the currently splintered family of Netcat incarnations. It is designed to be a reliable back-end tool to instantly provide network connectivity to other applications and users. | |||
- proxychains: redirects the traffic of an application without proxy support. | |||
- ptunnel: This is an application that allows you to reliably tunnel TCP connections to a remote host using ICMP echo request and reply packets, commonly known as ping requests and replies | |||
==== Web Backdoors ==== | |||
===== Weevely ===== | |||
This is a stealth PHP web shell that simulates a telnet-like connection. The weevely modules ecosystem provides a working shell interface even with no shell command execution, replacing the standard shell commands (e.g. the file editors, cd and ls, SQL cli and dump, compression utilities, port scanners, etc.) with the weevely modules. | This is a stealth PHP web shell that simulates a telnet-like connection. The weevely modules ecosystem provides a working shell interface even with no shell command execution, replacing the standard shell commands (e.g. the file editors, cd and ls, SQL cli and dump, compression utilities, port scanners, etc.) with the weevely modules. | ||
| Line 586: | Line 627: | ||
And now you have access to the webserver with weevely module. | And now you have access to the webserver with weevely module. | ||
== Documentation and Reporting == | == Documentation and Reporting == | ||
| Line 605: | Line 636: | ||
This is a penetration tester productivity tool. It is designed to allow easy and straightforward data consolidation, querying, external command execution and report generation. All the data is stored in a tree structure, and it is designed to do the most cumbersome and boring part of penetration testing - data management and reporting. | This is a penetration tester productivity tool. It is designed to allow easy and straightforward data consolidation, querying, external command execution and report generation. All the data is stored in a tree structure, and it is designed to do the most cumbersome and boring part of penetration testing - data management and reporting. | ||
[[File:MTree.png|800x450px]] | [[File:MTree.png|800x450px|center|thumb|MagicTree GUI]] | ||
To test it out, choose the Node menu and then autocreate. When prompted, enter the target’s IP and click 'ok'. | To test it out, choose the Node menu and then autocreate. When prompted, enter the target’s IP and click 'ok'. | ||
| Line 627: | Line 658: | ||
Programs that can be used for this in Backbox are: | Programs that can be used for this in Backbox are: | ||
Thpot: This is a tiny honeypot to set up simple and fake services. | |||
settoolkit: This (also known as Social-Engineer Toolkit) is designed to perform attacks against human interaction. | |||
== Reverse Engineering == | == Reverse Engineering == | ||
| Line 635: | Line 666: | ||
The tools in this menu are used for reversing the system by analyzing its structure from both hardware and software perspective. | The tools in this menu are used for reversing the system by analyzing its structure from both hardware and software perspective. | ||
- Flasm: This is a command-line assembler/disassembler of Flash ActionScript bytecode. Flasm disassembles your entire swf including all the timelines and events. looking at disassembly, you learn how the flash compiler works. you can also do some optimization on the disassembled code by hand or adjust the code as you wish. flasm can then re-assemble the bytecode into a new swf. | |||
[[File:Flasm.png|center|thumb|Flash Manual]] | |||
Example command: | |||
flasm -d examplefile.swf | |||
This disassembles the example file to your terminal. | |||
This is a simple binary GUI hex editor. | - Ghex: This is a simple binary GUI hex editor. | ||
- Nasm: This is a network wide assembler tool. | |||
- binwalk: Binwalk is a tool for searching a given binary image for embedded files and executable code. Specifically, it is designed for identifying files and code embedded inside of firmware images. Binwalk uses the libmagic library, so it is compatible with magic signatures created for the Unix file utility. Binwalk also includes a custom magic signature file which contains improved signatures for files that are commonly found in firmware images such as compressed/archived files, firmware headers, Linux kernels, bootloaders, filesystems, etc. | |||
- radare2: Radare project started as a forensics tool, a scriptable commandline hexadecimal editor able to open disk files. I can now also analyze binaries, disassembe code, debug programs, attaching to remote gdb servers etc. | |||
This is a | - Dissy: This is a graphical frontend to the objdump disassembler. | ||
== Wireless Analysis == | == Wireless Analysis == | ||
| Line 661: | Line 690: | ||
These tools are dedicated for analyzing wireless devices and their protocols. | These tools are dedicated for analyzing wireless devices and their protocols. | ||
==== | ==== Buetooth ==== | ||
- btscanner: a tool designed specifically to extract as much information as possible from a bluetooth device without the requirement to pair. | |||
- hcidump: reads raw HCI data coming from and going to a Bluetooth device which can be specified with the option -i, default is the first avail-able one) and prints to screen commands, events and data in a human-readable form. Optionally, the dump can be written to a file rather than parsed, and the dump file can be parsed in a subsequent moment. | |||
- obexftp: this tool is used to access files on mobile equipment, i.e. cell phones. With obexftpd you can transfer files between any computers using IrDA, Bluetooth and TCP/IP . | |||
- ussp-push: This program allows you to send objects using the OBEX PUSH protocol. The OBEX PUSH protocol is used to transfer files to a mobile device, generally via Bluetooth or IrDA. The protocol does not allow any other action than sending and generally requires less strict authentication, which is why it is sometimes preferred to the OBEX FTP protocol (which allows full filesystem access and is provided by the obexftp package). | |||
==== WiFi ==== | |||
==== | ===== Cracking ===== | ||
This is | - Aircrack-ng: This is a network software suite consisting of a detector, packet sniffer, WEP and WPA/WPA2-PSK cracker and analysis tool for 802.11 wireless LANs. | ||
- Pyrit: This is an application GPGPU-driven WPA/WPA2-PSK key cracker. | |||
This is an | - Reaver: This is an application to perform brute-force attacks against Wi-Fi Protected Setup (WPS) | ||
- Wifte: This is an automated wireless auditing tool. | |||
===== Scanning ===== | |||
- Kismet: This is an 802.11 layer2 wireless network identifer and passive data package collector | |||
- Wash: a tool to find WPS enabled routers in your area. | |||
== Other Useful Features == | == Other Useful Features == | ||
==== Stress Testing ==== | |||
- Siege: an http load testing and benchmarking utility. It was designed to let web developers measure their code under duress, to see how it will stand up to load on the internet. Siege supports basic authentication, cookies, HTTP, HTTPS and FTP protocols. It lets its user hit a server with a configurable number of simulated clients. Those clients place the server "under siege." | |||
- SlowHttpTest: A tool to test for slow HTTP DoS vulnerabilities. | |||
==== Automotive Analysis ==== | |||
- can-utils: provides a simple set of tools for working with CAN from the Linux command line. | |||
==== Anonymous mode ==== | ==== Anonymous mode ==== | ||
| Line 716: | Line 755: | ||
BackBox also offers it's users the option to wipe the computer's RAM at shutdown/reboot. Simply search for 'RAM Wiping' on the services menu and turn it on. Pulling the PC's cord usually does the trick, but this feature makes extra sure that no data can be recovered. | BackBox also offers it's users the option to wipe the computer's RAM at shutdown/reboot. Simply search for 'RAM Wiping' on the services menu and turn it on. Pulling the PC's cord usually does the trick, but this feature makes extra sure that no data can be recovered. | ||
==== | ==== Forensic Analysis ==== | ||
Forensic analysis is the act of carrying out an investigation to obtain evidence from devices. It is a structured examination that aims to rebuild the user's history in a computer device or a server system. Some of the tools used for this in BackBox are: | |||
- Dcfldd: This is an enhanced version of GNU dd with features useful for forensics and security | |||
- Ddrescue: This is a data recovery tool that copies and attempts to recover data from one fle or block device (hard disc, CD-ROM, and so on) onto another. | |||
- Guymager: This is a fast and most user-friendly forensic imager, based on libewf and libguytools. | |||
- DFF: This (also known as Digital Forensics Framework) is a digital data collector for forensic purposes. | |||
- Foremost: This is a console application that helps you to recover files based on their headers, footers, and internal data structures. | |||
- Photorec: This is a file carver data recovery software tool explicitly focused on image recovery from digital cameras (CompactFlash, Memory Stick, Secure Digital, SmartMedia, Microdrive, MMC, USB flash drives, and so on), hard disks, and CD-ROMs. | |||
- Scalpel: This is a carver tool designed to recover deleted data from the system. | |||
- Testdisk: This is a free data recovery utility. | |||
- Steghide: This is a steganography program that is able to hide data in the image and audio files. | |||
- Vinetto: This examines the Thumbs.db fles for forensic purposes. | |||
==== Malware Analysis ==== | |||
Malware analysis is the process of determining the purpose and functionality of a given malware sample such as a virus, worm, or Trojan horse. This process is a necessary step to be able to develop effective detection techniques for malicious code. | |||
In BackBox, there are three main tools for this: | |||
- Pyew: a (command line) python tool to analyse malware. It does have support for hexadecimal viewing, disassembly (Intel 16, 32 and 64 bits), PE and ELF file formats (it performs code analysis and let you write scripts using an API to perform many types of analysis), follows direct call/jmp instructions in the interactive command line, displays function names and string data references; supports OLE2 format, PDF format and more. It also supports plugins to add more features to the tool. | |||
- Yara: a tool aimed at (but not limited to) helping malware researchers to identify and classify malware samples. With YARA you can create descriptions of malware families (or whatever you want to describe) based on textual or binary patterns. Each description, a.k.a rule, consists of a set of strings and a boolean expression which determine its logic. | |||
- Volatility Framework - Volatile memory extraction utility framework - a completely open ollection of tools, implemented in Python under the GNU General Public License, for the extraction of digital artifacts from volatile memory (RAM) samples. The extraction techniques are performed completely independent of the system being investigated but offer visibilty into the runtime state of the system. The framework is intended to introduce people to the techniques and complexities associated with extracting digital artifacts from volatile memory samples and provide a platform for further work into this exciting area of research. | |||
==== Mobile Analysis ==== | |||
Some of the tools for mobile security assessment in BackBox Linux are: | |||
adb - Android Debug Bridge - a versatile command-line tool that lets you communicate with a device (an emulator or a connected Android device). The adb command facilitates a variety of device actions, such as installing and debugging apps, and it provides access to a Unix shell that you can use to run a variety of commands on a device. | |||
apktool - A tool for reverse engineering 3rd party, closed, binary Android apps. It can decode resources to nearly original form and rebuild them after making some modifications. It also makes working with an app easier because of the project like file structure and automation of some repetitive tasks like building apk, etc. | |||
iPBA - iPhone Backup Decoder and Analyzer - This software allows the user to browse through the content of an iPhone/iPad backup made by iTunes (or other software able to perform iOS devices' backup). The software is packed with all the routines needed to understand and show the content of files found. | |||
==== VoIP Analysis ==== | |||
This is a set of utilities to perform sniffng and cracking of SIP protocols. | For this feature, BackBox has a tool called sipcrack. This is a set of utilities to perform sniffng and cracking of SIP protocols. | ||
== Summary == | |||
As seen above, BackBox has many tools that can be used for security purposes. Learning and writing about it gave me a good overview of what is needed to become a good cybersecurity specialist, especially in terms of what tools can be used. | |||
== References == | == References == | ||
| Line 749: | Line 838: | ||
[http://www.fastandeasyhacking.com/manual armitage manual] | [http://www.fastandeasyhacking.com/manual armitage manual] | ||
[https://www.offensive-security.com/metasploit-unleashed/msfconsole/ Using the MSFconsole Interface] | |||
[https://blog.cobaltstrike.com/2013/02/06/getting-started-with-armitage-and-the-metasploit-framework-2013/ Getting Started with Armitage and the Metasploit Framework] | [https://blog.cobaltstrike.com/2013/02/06/getting-started-with-armitage-and-the-metasploit-framework-2013/ Getting Started with Armitage and the Metasploit Framework] | ||
[https://www.exploit-db.com/papers/12872/ LFI/RFI testing and Exploiting with fimap] | [https://www.exploit-db.com/papers/12872/ LFI/RFI testing and Exploiting with fimap] | ||
[https://hackertarget.com/wpscan-install-ubuntu/ WPScan Install on Ubuntu] | |||
[https://linuxconfig.org/password-cracking-with-john-the-ripper-on-linux Password cracking with John the Ripper on Linux] | [https://linuxconfig.org/password-cracking-with-john-the-ripper-on-linux Password cracking with John the Ripper on Linux] | ||
| Line 773: | Line 866: | ||
[http://tools.kali.org/maintaining-access/cryptcat CryptCat] | [http://tools.kali.org/maintaining-access/cryptcat CryptCat] | ||
[http://cyborg.ztrela.com/redfang.php/ Cyborg Redfang] | |||
[http://cyborg.ztrela.com/medusa.php/ Cyborg Medusa] | |||
[http://tools.kali.org/password-attacks/hash-identifier hash-identifier] | |||
[https://linux.die.net/man/8/dnsspoof dnsspoof] | |||
[[http://www.secdev.org/projects/scapy/ scapy]] | |||
[http://www.yersinia.net/ yersinia] | |||
[http://man7.org/linux/man-pages/man1/ncat.1.html Ncat Reference Guide] | [http://man7.org/linux/man-pages/man1/ncat.1.html Ncat Reference Guide] | ||
| Line 781: | Line 886: | ||
[http://cyborg.ztrela.com/magictree.php/ cyborg - MagicTree] | [http://cyborg.ztrela.com/magictree.php/ cyborg - MagicTree] | ||
[http://tools.kali.org/forensics/binwalk KALITOOLS binwalk] | |||
[https://community.linuxmint.com/software/view/flasm flasm] | |||
[http://manpages.ubuntu.com/manpages/xenial/man1/btscanner.1.html btscanner] | |||
[http://www.linuxcommand.org/man_pages/hcidump8.html hcidump] | |||
[https://linux.die.net/man/1/obexftp obexftp] | |||
[https://packages.debian.org/sid/comm/ussp-push Client for OBEX PUSH] | |||
[https://www.joedog.org/siege-home/ Siege Home] | |||
[https://discuss.cantact.io/t/using-can-utils/24 can-utils] | |||
[http://www.ijarcsse.com/docs/papers/Volume_3/4_April2013/V3I4-0371.pdf International Journal of Advanced Research in Computer Science and Software Engineering] | |||
[https://github.com/joxeankoret/pyew GitHub Pyew] | |||
[http://virustotal.github.io/yara/ yara in a nutshell] | |||
[https://github.com/volatilityfoundation/volatility Volatility Github] | |||
[https://developer.android.com/studio/command-line/adb.html Android Debug Bridge] | |||
[https://ibotpeaches.github.io/Apktool/ apktool] | |||
[https://github.com/PicciMario/iPhone-Backup-Analyzer-2 iPhone Backup Decoder and Analyzer] | |||
[[Category:Operatsioonisüsteemide administreerimine ja sidumine]] | [[Category:Operatsioonisüsteemide administreerimine ja sidumine]] | ||
Latest revision as of 23:02, 8 May 2017
BackBox Linux
Introduction
BackBox is an open source Ubuntu based Linux distribution. Its main purpose is to provide a desktop environment for network and systems analysis, penetration and security assessment. It is a community project and full of some of the most commonly used security and analysis tools. It runs a desktop environment based on the XFCE window manager, which makes it very easy to use.
BackBox Features
Main BackBox features discussed in this article:
- Information Gathering
- Vulnerability Assessment
- Exploitation
- Privilege Escalation
- Maintaining Access
- Social Engineering
- Wireless Analysis
- Documentation and Reporting
- Reverse Engineering
Installing and Tuning
System requirements for the latest version (4.7):
- 32-bit or 64-bit processor
- 1024 MB of system memory (RAM)
- 10 GB of disk space for installation
- Graphics card capable of 800×600 resolution
- DVD-ROM drive or USB port (3 GB)
Since this is a free and open sourced project, BackBox Linux .iso file can be downloaded from the projects homepage. The installation and tweaking of the system follows up the usual Ubuntu/Debian guide lines.
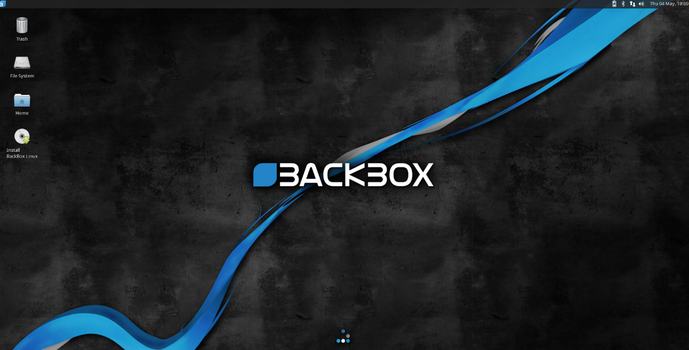
After the installation, the user can start configuring and using the services available in this operating system. This can be achieved by simply left-clicking on the blue 'B' button on the upper-left corner.
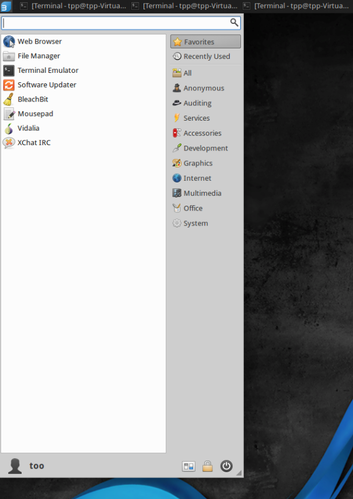
To manage applications, Synaptic Package Manager or Ubuntu Software Center can be used.
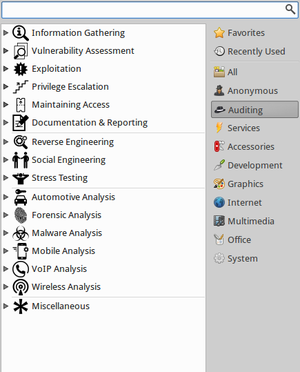
To access the security applications, use the 'Auditing' option:
Securing BackBox itself
Anyone wanting to use this OS for security purposes should start off by securing BackBox itself first. As it is an Ubuntu based Linux OS, the foundation for basic OS security should be:
- Strong passwords
- Immediate and frequent security updates
- Usage of official repositories, as much as possible
- Enable firewall (UFW is integrated but disabled by default in BB)
- Disk encryption and backups
- Common sense
One good eye should always be on user privileges as well, although BackBox does make extra sure to warn the user every time a security issue might arise with this (like warning users about consequences of using certain programs with root, or making sure the programs can only be used by users in certain groups).
There is no need for antivirus software in BlackBox, unless file sharing with other operating systems, like Windows, is active.
When using a web-browser like Mozilla, add-ons like Adguard, No-Script, BetterPrivacy should be installed.
Java and Flash should be disabled.
There is also an alternative to UFW - FirewallD, which has to be downloaded manually. It is more complex and has extra features, like Network Zone Management.
This OS also has AppArmor, an application-level firewall. It confines programs to a limited set of resources.
Disclaimer
ALL THE COMMANDS USED IN THIS ARTICLE ARE MEANT TO BE USED FOR EDUCATIONAL PURPOSES AND SHOULD NOT BE USED WITHOUT PERMISSION FROM THE TARGET!
Information Gathering
Gathering information should be the first step in any security project. Without it, it would be hard to evaluate any system.
Some of the tools used in BackBox for information gathering are:
Network
Arping
This utility sends ARP requests to the hosts on a specific subnet.
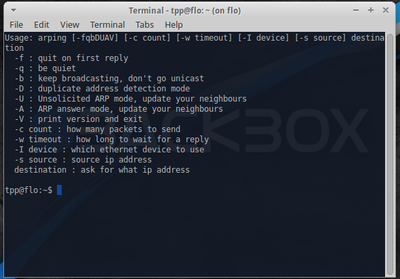
Example command:
sudo arping -I eth0 -c 3 192.168.1.1
This finds out the reachability of an IP on the local Ethernet. The '-I' identifies the intended interface, the '-c' is the count of the ARP requests taken.
Arp-scan
This is a simple but very powerful command-line tool that can be used for system discovery and fingerprinting. It assembles and sends ARP requests to specified IP addresses, displaying any responses that are received.
Example use is finding all local IP's and MAC addresses with this command:
sudo arp-scan -l
Knock
This is a Python script, written by Gianni 'guelfoweb' Amato, designed to enumerate sub-domains on a target domain through a word-list.
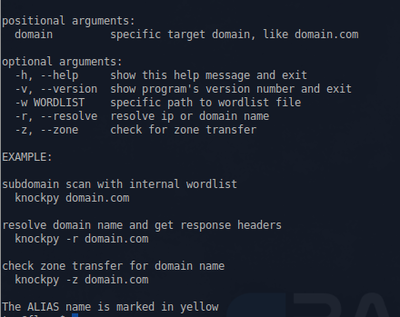
Example command would be this:
knockpy domain.com
This would start looking for the aforementioned site's subdomains. This is helpful if you are looking for subdomain takeover vulnerabilities.
Nbtscan
This is an application to scan and get information about IP networks for NetBIOS name information.
theHarvest
This is an information collector used to harvest e-mails, subdomains, hosts and personal information about individuals.
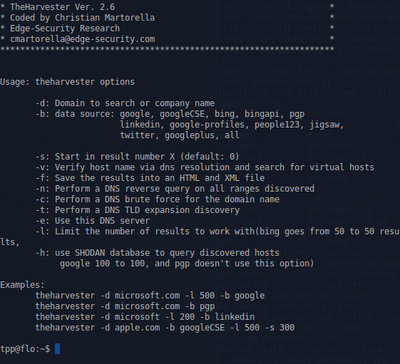
Example command:
theharvester -d domain.com -b google
This would print all the email addresses in the site 'domain.com' that can be found by the google search engine.
Zenmap
Zenmap is a multi-platform graphical Nmap frontend and results viewer. This GUI is designed to make Nmap - Network Mapper, an open source tool for network exploration and security auditing - easy for beginners while also giving experienced Nmap users advanced features.
Zenmak can be started by searching for it from the services menu or typing it in the command line:
sudo zenmap
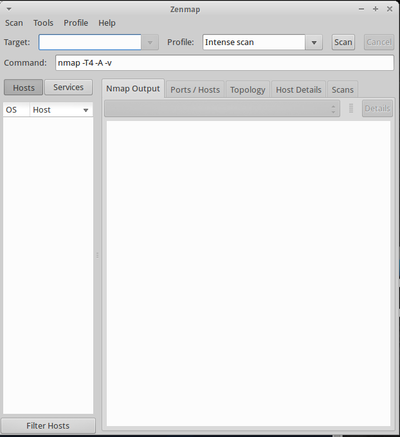
In the opened window, type the ip address of the host that you want to scan in the Target field and select the desired profile from the Profile drop-down box:
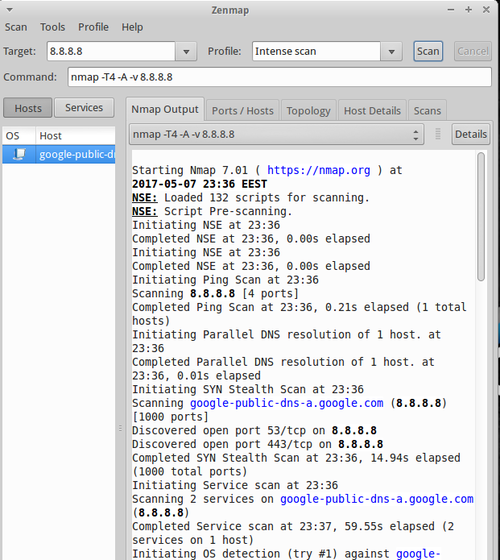
To find the scanned host’s list of open ports, port states, the services corresponding to the ports and it’s version details etc., click on the Ports/Hosts tab.
Also it will get you the host details as well. Click on the Host Details tab in the Zenmap main interface.
To scan your entire network, just enter the ip address series (ex. 192.168.1.0/24) of your network in the Target field of the Zenmap window. Click on Scan to start scanning your whole network.
The types of scans are:
- Intense scan
Quickly scans the most common TCP ports. Will also try to determine the type of OS and services running.
- Intense scan plus UDP
Same as the regular Intense scan, just that we will also scan UDP ports.
- Intense scan, all TCP ports
Normally Nmap scans a list of 1000 most common protocols, but this will leave no TCP ports (from 1 to 65535) unchecked.
- Intense scan, no ping
This scan will not ping the host and assumes it is up. Will be useful if the target has blocked ping requests.
- Ping scan
Pings the target, no port scanning.
- Quick scan
Scans only the 100 most common TCP ports.
- Quick scan plus
Quick scan with OS and version detection.
- Quick traceroute
Scan that can be used if it is nescessary to determine hosts and routers in a network scan. It does so by tracerouting and pinging all hosts defined in the target.
- Regular scan
A scan that will issue a TCP SYN scan for the most common 1000 TCP ports, using ICMP Echo request (ping) for host detection.
- Slow comprehensive scan
Command: nmap -sS -sU -T4 -A -v -PE -PP -PS80,443 -PA3389 -PU40125 -PY -g 53 –script “default or (discovery and safe)” <target>
Works similarly to 'Intense scan plus UDP' only with some extra features.
A lot of focus will be put into host detection, continuing even if the initial ping request fails. Three different protocols will be used to detect the hosts - TCP, UDP and SCTP. If host detection has succeeded, it will do its best to determine what OS, services and versions the host are running based on the most common TCP and UDP services. Also the scan camouflages itself as source port 53 (DNS).
Web Application
WhatWeb
This is an application that recognizes web technologies including content management systems (CMS), blogging platforms, statistic/analytics packages, JavaScript libraries, web servers, and embedded devices.
Vulnerability Assessment
After the information is gathered, the next step should be to analyze it. That's where vulnerability Assessment tools come into play. With them, you can identify the vulnerabilities present in systems and prioritize them.
Network
OpenVAS
This is a framework composed of several services and tools to deliver a comprehensive, powerful vulnerability scanning management solution.
To start off, a new admin account user should be created:
openvasmd --user=admin --new-password=new_password
To run OpenVAS, simply choose 'OpenVAS GSA' on the menu list or go to your localhost with the port given to OpenVAS (default is 9392).
You will be promted with a login screen (Accept the self-signed SSL certificate). From there, enter the details of the user you created above and the OpenVAS web interface will open:
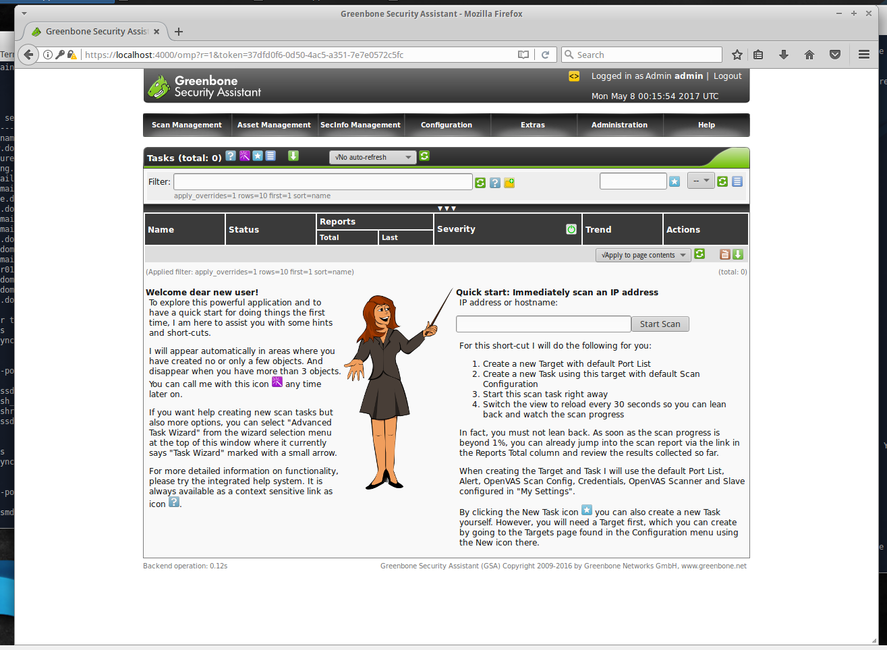
In the opened window, create a new task and fill in the information required - type in either the name or the IP of the domain you want to target for the scan. Then click start. Once it has finished, a report will be created. You can better analyze it by exporting it to different main popular file formats such as .pdf, .txt or .html.
OpenVAS will have grouped the possible vulnerabilities into high-, medium-, low- and log-level (information). These reports are not false proof but they help with simplifying the security assessment.
Web Application
Nikto
This is an open-sourced web server scanner. It performs comprehensive tests against web servers for multiple items, including over 6700 potentially dangerous files/programs, checks for outdated versions of over 1250 servers, and version specific problems on over 270 servers. It also checks for server configuration items such as the presence of multiple index files, HTTP server options, and will attempt to identify installed web servers and software.
Example commands:
nikto -h 10.0.2.15
This scans the target host with the ip '10.0.2.15'.
nikto -T x 6 -h http://site.com
This performs only a specific type of check against the target. In this case, a denial-of-service check. The types (and more) are written in the man file of nikto.
nikto -Display V -o results.txt -Format txt -Tuning 4 -h 10.0.2.15
This performs an injection test and saves the result as a plain text file while also displaying a Verbose output in the terminal.
Skipfsh
This is an active web application security reconnaissance tool. It prepares an interactive sitemap for a targeted site by undertaking a recursive crawl and dictionary-based probes.
Example command:
Skipfish –o /user/desktop http://targetwebsite.com
This scans the target website and creates an output file on the location specified by '-o'.
To get a list of which tests Skipfish does, visit the Google Code Archive Wiki.
ZAP
OWASP Zed Attack Proxy tool is one of the most popular web application vulnerability finders. The main features of this tool are:
- Proxy intercepting - Configuring your browser so that it sends all the requests and responses through ZAP. The responses and requests can also be intercepted and changed.
- Active scanners - Performs wide range of scans on the application.
- Passive scanners - Examines requests and responses and sometimes detects problems from doing this. It is 'safe' to use and it runs all the time.
- Spider - Crawls the application to find links that are usually hidden.
- Report Generation - Generates reports of the issues found and directs to helpful pages from where you can learn how to solve them.
- Brute Force - Using OWASP Dirbuster Tool, this feature can find files even if there are no links to them.
- Fuzzing - For finding more subtle vulnerabilities that the automated scanners cannot usually find (using fuzzdb and OWASP JBroFuzz)
- Extensibility - Adding additional functionalities to ZAP (code.google.com/p/zap-extensions)
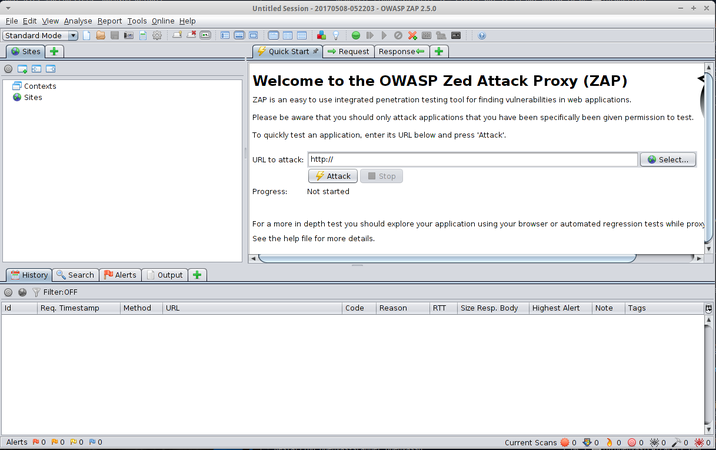
To use it, type in the website you want to test on the 'URL attack' bar and press 'attack':
Exploitation
This is the process of where the weakness found in the system is penetrated. This is achieved by using exploit, an automated script designed to attack the target system.
Browser
BeEF
Short for The Browser Exploitation Framework, it is a penetration testing tool that focuses on the web browser. It allows the professional penetration tester to assess the actual security posture of a target environment by using client-side attack vectors.
BeEF can be started from the services > auditing > exploitation menu
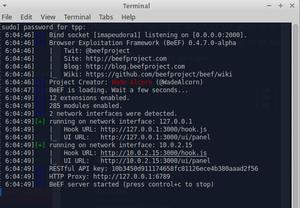
You need to click on one of the UI URL-s, which will open the BeEF login page on your browser.
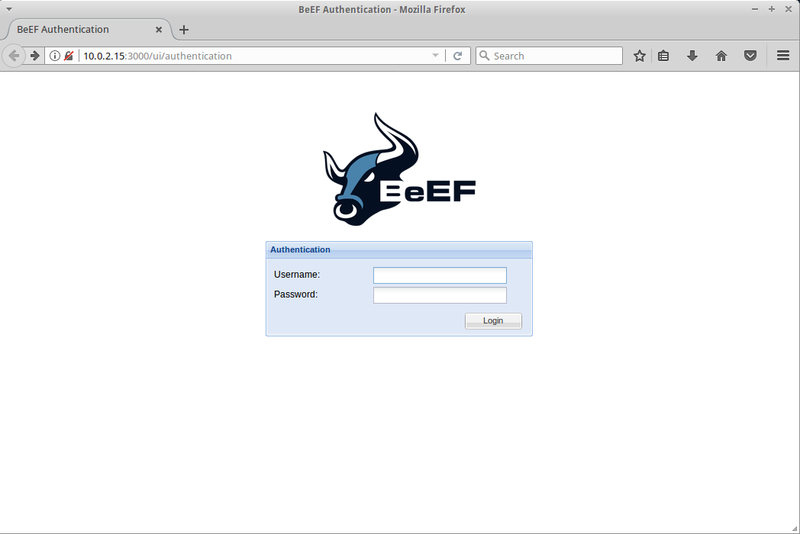
Type in the default username and password (beef & beef). This will open the startup page, where you can get the overview of the tool.
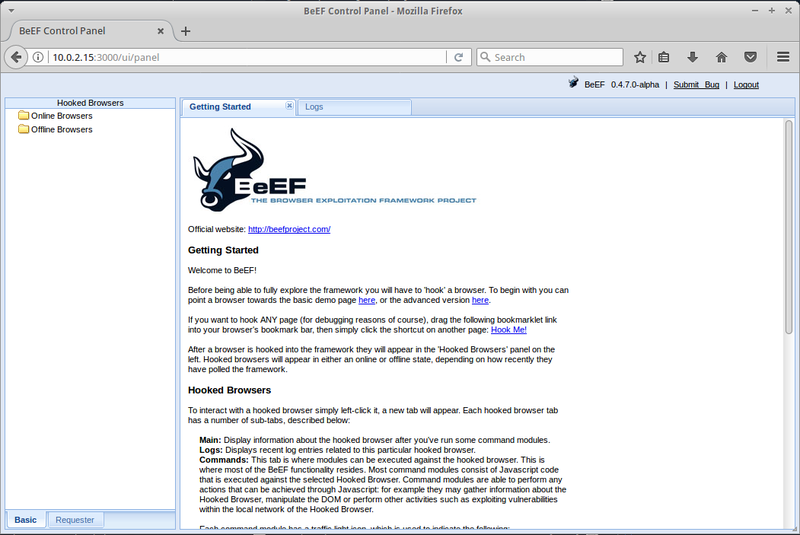
You can test this program out by running an apache server on your BackBox and creating a a simple script to hook a the intended website with BeEf. The result of this would make information about the browser used available to the BeEF user, like the browser components, the running scripts and hardware information. On the 'commands' tab in the BeEF GUI (after you chose the active IP address from the left menu), you can extract even more data and manipulate the ongoing browser session. For example, you can redirect the intended URL to another site.
Database
Sqlmap
This is an automated tool to detect SQL flaws. SQL-Injection is usually the most common forms of attacks and usually very effective in getting data from the target.
Example commands:
sqlmap -u http://www.examplesite.com --dbs
This command tries to find databases in the specified site.
sqlmap -u ”http://www.examplesite.com" --cookie="security=low; PHPSESSID=l0ng4m0un10fnumb3rs4ndl3tt3rs" --dbs
This command tries to find databases from the specific site while keeping the session active using the mentioned cookie.
Network
Armitage
This is the graphical frontend of the Metasploit Framework. It is a scriptable red team collaboration tool. It has a server component to allow a team of hackers to share their accesses to compromised hosts.
To start it, type 'armitage' in your terminal. This will open up a new window:
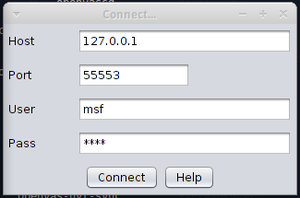
Click connect and if the tool asks you if you want to start Metasploit RPC server, click 'yes'. This will open the Armitage GUI:
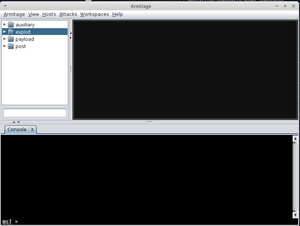
From this, you can create custom attacks against a host. For example, you can test out yous skills on a virtual machine maintained by the Metasploit project team.
msfconsole
Probably the most popular interface to the Metasploit Framework (MSF). It provides an “all-in-one” centralized console and allows you efficient access to virtually all of the options available in the MSF. MSFconsole may seem intimidating at first, but once you learn the syntax of the commands you will learn to appreciate the power of utilizing this interface.
To launch the console(in quiet mode), simply type:
mfsconsole -q
Common commands:

Web Application
Fimap
This is a python tool which can find, prepare, audit and exploit bugs in webapps.
Example command:
sudo fimap -u "http://IpOfWebApp/index.php"
This will try to find bugs in the mentioned url of the webapp.
Wpscan
This tool can test a WordPress installation for security vulnerabilities. It allows remote testing of a WordPress installation, find vulnerable plugins and themes, security configuration issues and attack users by brute forcing passwords.
Privilege Escalation
This occurs when you have gained access to a system but have not gained enough privileges to gather useful information or make necessary changes.
Local Passwords
John
This (also known as John the Ripper) is a password cracking software tool written in C.
You can start of by simply typing this in the terminal:
john --test
This will test the program to find it's capabilities on the current OS.
Another way of testing this program out is by creating a 'password.text' file on you system containing password format with a valid hash:
user:AZl.zWwxIh15Q
Then simply run john on the file (warning - this program is CPU-intensive and the password-cracking process can take a long time):
john password.txt
For systems, like Linux, that use shadow passwords - a system file in which encryption user password are stored so that they aren't available to people who try to break into the system - John offers an utility called 'unshadow', which can be used to create a file from /etc/passwd and shadow files.
unshadow /etc/passwd /etc/shadow > mypasswd.txt
If the cracking process is successful, the tool will write the password to ~/.john/john.pot. This file isn't human readable but with john you can still do it:
john --show mypasswd.txt
Others
- Hashcat: This is incredibly the fastest CPU-based password recovery tool.
- Chntpw: This is a utility used for resetting or blanking local passwords in Wintel systems.
- Crunch: This is a wordlist generator where you can specify a standard character set.
- Fcrackzip: This is a fast password cracker partly written in assembler.
- Hash-id: Software to identify the different types of hashes used to encrypt data and especially passwords.
- Ophcrack: This is a Windows password cracker based on rainbow tables.
- Pdfcrack: This is a tool for recovering passwords and content from PDF fles.
Remote Passwords
Xhydra
A GTK+ based GUI for hydra, this is a parallized login cracker which supports numerous protocols (such as TELNET, FTP, HTTP, HTTPS, HTTP-PROXY, LDAP, SMB etc.) to attack by using the Telnet module. This tool gives researchers and security consultants the possiblity to show how easy it would be to gain unauthorized access from remote to a system. This can also be very useful to a hacker in the scenario where one has cracked a wifi password and gained local access to the network.
To start the program, type 'xhydra' in your terminal. This will open the GUI:
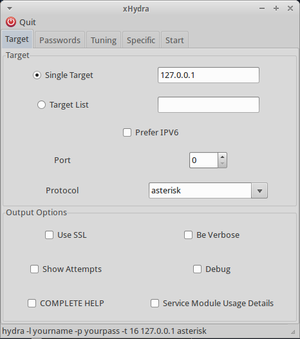
Type in the target IP or the target. Choose whether you'd like to use IPv6, choose the port and protocol. And tick the optional boxes in the 'output options', for example, when you want to enable verbose output or debug mode.
In the password menu tab, type in the username (like 'admin') and a commonly used password ("password", blank, "admin"). In most cases though, you would want to use a wordlist. A wordlist can be found by simply googling one. Then save it as a list file (like 'password.lst') and define it's path in the password list box (for example: ".\user\password.lst").
In the 'tuning' tab menu, you can choose, for example, a time when the attack will be finished or if the attack will stop once first valid login credentials are found. You can also use a proxy.
In the 'specific' tab menu, you can, for example, define in what directory the protected page is on the server by defining it in the '"http / https url" (use, for example, a simple "/").
Then all that is left is to start the tool, wait for the results and analyze them.
RedFang
RedFang is a Linux-based tool made to find Bluetooth devices in undiscoverable mode. The technology is attributed to Ollie Whitehouse and a small tech enterprise called @stake. It was originally developed as a “proof-of-concept” research resource, and is now a common part of many Bluetooth tutorials on security.RedFang uses a method called brute force to discover previously unknown Bluetooth locations.
Medusa
Intended to be a speedy, massively parallel, modular, login brute-forcer. The goal is to support as many services which allow remote authentication as possible. The author considers following items as some of the key features of this application:
- Thread-based parallel testing. Brute-force testing can be performed against multiple hosts, users or passwords concurrently.
- Flexible user input. Target information (host/user/password) can be specified in a variety of ways. For example, each item can be either a single entry or a file containing multiple entries. Additionally, a combination file format allows the user to refine their target listing.
- Modular design. Each service module exists as an independent .mod file. This means that no modifications are necessary to the core application in order to extend the supported list of services for brute-forcing.
Medusa [-h host|-H file] [-u username|-U file] [-p password|-P file] [-C file] -M module [OPT]
Sniffing
Wireshark
Formerly known as Etheral, it is the world's foremost network protocol analyzer.
To start capturing packets with your user, first you need to make sure that your user belongs to the usergroup named 'wireshark'. To be sure of that, use this command:
grep 'wireshark' /etc/group
If your username does not appear in the following output, it is not part of the group. To add your user to the group, use the following command:
sudo usermod -a -G wireshark yourusername
Now you can oped the Wireshark GUI, choose the network interface that is functional and start capturing and analyzing packets.
Tshark
A terminal oriented version of Wireshark. For example, to start off, you would want to know the available interfaces you can use with the command:
sudo tshark -D
An example of capturing network data with tshark:
tshark -eth0 -c 100 -w log.pcap
This will capture 100 network packets and save them into a file called log.pcap.
With the following example, we extract data from any HTTP request. The '-Y' is used to request filters, '-T' is used to specify the extract process and the '-e' is used to identify the wanted fields:
tshark -i eth0 -Y HTTP.request -T fields -e http.host -e http.user_agent
This command basically prints out the same output as Wireshark GUI:
tshark -r ~/dhcp.pcap -V frame.number == 1
Ettercap
This is a free and open-sourced tool for man-in-the-middle attacks. It has a user-friendly GUI interface and supports passive and active dissection of the amount of protocols.
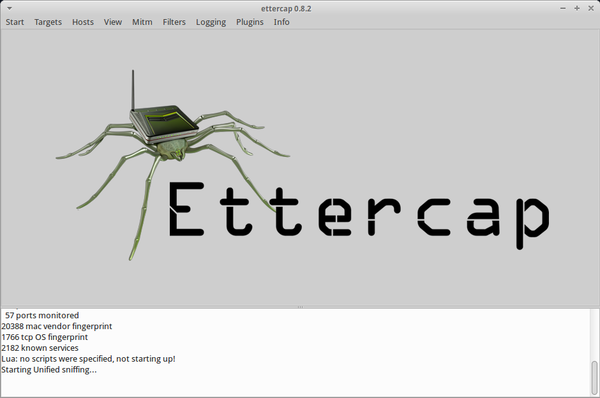
Ettercap can work with these four models:
- IP-based: Filtered packets by IP address. - MAC-based: Filtered packets by MAC address. - ARP-based: It is very useful for sniffing packets between two hosts on a switched network. - PublicARP-based: It is very useful for sniffing packets from a user to all hosts.
Some important features are:
- HTTPS support - OS fingerprinting - Passive scanning - Hijacking DNS
Ettercap provides four user interfaces:
- -T use text only GUI
- -C use curses GUI
- -G use GTK+ GUI
- -D daemonize ettercap (no GUI)
To use ettercap, you must specify a Networking Interface Card (NIC). This can be done with the command:
ifconfig -a
As mentioned above, ettercap uses Man-in-the-Middle attack method. This is done by arp-spoofing - an attack technique, where an attacker sends a fake ARP message to the local LAN. The goal of ARP spoofing is to hijack a system and an attacker wants to join his MAC address with the IP address of another host. The result is that any traffic meant for that IP address will be sent to the attacker.
In the ettercap GUI, from the sniff menu, choose "Unified Sniffing" and then the network interface in the opening window.
The next step is host scanning. Click the "Hosts" menu and then click "Scan for hosts". When the scan is finished, click the "Hosts" menu and then click on "Host List":
If Ettercap found any hosts on your network, it can be added as a target by clicking on it and choosing "Add to target 1".
Click the "Mitm" menu, select "Arp Poisoning", then select “Sniff Remote Connection” and click “OK”.
Finally, click the "Start" menu and select "start sniffing".
Tcpdump
A command line packet sniffer that prints out a description of the contents of packets on a network interface that match the boolean expression.
Command to capture data from a certain interface:
sudo tcpdump -i eth0
Commant that prints out all packets arriving or departing from host PC1:
sudo tcpdump host PC1
Command that prints all IP packets between PC1 and not PC2:
sudo tcpdump host PC1 and not PC2
Others
- Driftnet: This is an application that listens to network traffc and picks out images from the TCP streams it observes.
- Dsniff: This is a network traffc sniffer that analyzes and parses different application protocols by extracting the relevant information.
- Ngrep: This (also known as network grep) is a network packet analyzer.
- Sslsniff: This is an SSL traffc sniffer.
- Sslstrip: This is a sniffer against secure socket layer protocol.
Spoofing
- scapy: is a powerful interactive packet manipulation program. It is able to forge or decode packets of a wide number of protocols, send them on the wire, capture them, match requests and replies, and much more.
- arpspoof: This tool redirects packets from a target host (or all hosts) on the LAN intended for another host on the LAN by forging ARP replies.
- dnsspoof: This tool forges replies to arbitrary DNS address/pointer queries on the LAN. This is useful in bypassing hostname-based access controls, or in implementing a variety of man-in-the-middle attacks.
- yersinia: Yersinia is a network tool designed to take advantage of some weakeness in different network protocols. It pretends to be a solid framework for analyzing and testing the deployed networks and systems.
Maintaining Access
Maintaining Access comes into play once we have gained access to a system. The tools in this category allow us to access it again without repeating all the tasks done initially.
Tunneling
Iodine
This is a free (ISC licensed) tunnel application to forward IPv4 traffc through DNS servers. This can be usable in different situations where internet access is firewalled, but DNS queries are allowed.
To use this tunnel, you need control over a real domain (like mytunnel.com), and a server with a static public IP number that does not yet run a DNS server. Then, delegate a subdomain (say, tunnel1.mytunnel.com) to the server. If you use BIND for the domain, add these lines to the zone file:
tunnel1host     IN      A       10.15.213.99
tunnel1         IN      NS      tunnel1host.mytunnel.com.
Start iodined on the server. Example:
iodine -f 192.168.99.1 10.0.0.1
The first argument is the tunnel IP address and the second is the assigned domain (in this case tunnel1.mytunnel.com). The -f argument will keep iodined running in the foreground, which helps when testing. iodined will start a virtual interface, and also start listening for DNS queries on UDP port 53. Either enter a password on the commandline (-P pass) or after the server has started. Now everything is ready for the client.
On the client side, just start iodine. It also takes two arguments, the first is the local relaying DNS server and the second is the domain used (tunnel1.mytunnnel.com). If DNS queries are allowed to any computer, you can use the tunnel endpoint (example: 10.15.213.99 or tunnel1host.mytunnel.com) as the first argument. The tunnel interface will get an IP close to the servers (in this case 192.168.99.2) and a suitable MTU. Enter the same password as on the server either by argument or after the client has started. Now you should be able to ping the other end of the tunnel from either side.
The normal case is to route all traffic through the DNS tunnel. To do this, first add a route to the nameserver you use with the default gateway as gateway. Then replace the default gateway with the servers IP address within the DNS tunnel, and configure the server to do NAT.
Scripts to configure the client can be found here.
Others
- Cryptcat: a simple Unix utility which reads and writes data across network connections, using TCP or UDP protocol while encrypting the data being transmitted.
- ncat: a feature-packed networking utility which reads and writes data across networks from the command line. Ncat was written for the Nmap Project and is the culmination of the currently splintered family of Netcat incarnations. It is designed to be a reliable back-end tool to instantly provide network connectivity to other applications and users.
- proxychains: redirects the traffic of an application without proxy support.
- ptunnel: This is an application that allows you to reliably tunnel TCP connections to a remote host using ICMP echo request and reply packets, commonly known as ping requests and replies
Web Backdoors
Weevely
This is a stealth PHP web shell that simulates a telnet-like connection. The weevely modules ecosystem provides a working shell interface even with no shell command execution, replacing the standard shell commands (e.g. the file editors, cd and ls, SQL cli and dump, compression utilities, port scanners, etc.) with the weevely modules.
Example scenario: generating backdoor crypted code:
weevely -g -o <file path> -p password
With this we generate a PHP shell in the intended file path.
After this, type 'ls' in your terminal, to see the created file.
The next step is to get this file in the intended webserver - which is considered hacking, so this is not to be done without permission!
If you have the file in the webserver, to connect to it, use the command:
weevely http://weburl/weevely.php password
And now you have access to the webserver with weevely module.
Documentation and Reporting
The Documentation & Reporting menu has tools that allow us to collect the information during our security assessment and generate a human readable report from them.
MagicTree
This is a penetration tester productivity tool. It is designed to allow easy and straightforward data consolidation, querying, external command execution and report generation. All the data is stored in a tree structure, and it is designed to do the most cumbersome and boring part of penetration testing - data management and reporting.
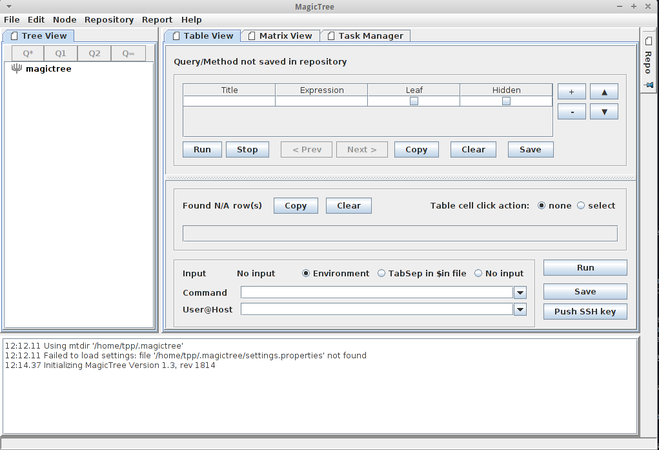
To test it out, choose the Node menu and then autocreate. When prompted, enter the target’s IP and click 'ok'.
Under the "table view" tab, you will see the 'Command' box. We are going to use this command:
nmap -v -A -out $results.xml $host
The '-v' option enables verbose output. The -A option enables version detection among other things. The '-out $results.xml' puts the output in the 'results.xml' file. And $host is used instead of the IP address, since we have already told MagicTree the IP of the intended target. This command works for the 'Environment' option. This, for example, works for 'TabSep':
nmap -v -A -i $in -o results.xml $host
Next, push the "Q*" button under ‘tree view’, then hit run for it to run the nmap commands.
Under the ‘task manager’ tab, once the scan is complete, you’ll see your .xml file pop up under ‘Output files’. Hit the ‘import’ button and MagicTree will automatically generate the node structure based on the results of nmap.
Social Engineering
This type of testing is based on a nontechnical intrusion method, mainly on human interaction. It is the ability to manipulate the person and obtain his/her access credentials or the information that can introduce us to such parameters.
Programs that can be used for this in Backbox are:
Thpot: This is a tiny honeypot to set up simple and fake services.
settoolkit: This (also known as Social-Engineer Toolkit) is designed to perform attacks against human interaction.
Reverse Engineering
The tools in this menu are used for reversing the system by analyzing its structure from both hardware and software perspective.
- Flasm: This is a command-line assembler/disassembler of Flash ActionScript bytecode. Flasm disassembles your entire swf including all the timelines and events. looking at disassembly, you learn how the flash compiler works. you can also do some optimization on the disassembled code by hand or adjust the code as you wish. flasm can then re-assemble the bytecode into a new swf.
Example command:
flasm -d examplefile.swf
This disassembles the example file to your terminal.
- Ghex: This is a simple binary GUI hex editor.
- Nasm: This is a network wide assembler tool.
- binwalk: Binwalk is a tool for searching a given binary image for embedded files and executable code. Specifically, it is designed for identifying files and code embedded inside of firmware images. Binwalk uses the libmagic library, so it is compatible with magic signatures created for the Unix file utility. Binwalk also includes a custom magic signature file which contains improved signatures for files that are commonly found in firmware images such as compressed/archived files, firmware headers, Linux kernels, bootloaders, filesystems, etc.
- radare2: Radare project started as a forensics tool, a scriptable commandline hexadecimal editor able to open disk files. I can now also analyze binaries, disassembe code, debug programs, attaching to remote gdb servers etc.
- Dissy: This is a graphical frontend to the objdump disassembler.
Wireless Analysis
These tools are dedicated for analyzing wireless devices and their protocols.
Buetooth
- btscanner: a tool designed specifically to extract as much information as possible from a bluetooth device without the requirement to pair.
- hcidump: reads raw HCI data coming from and going to a Bluetooth device which can be specified with the option -i, default is the first avail-able one) and prints to screen commands, events and data in a human-readable form. Optionally, the dump can be written to a file rather than parsed, and the dump file can be parsed in a subsequent moment.
- obexftp: this tool is used to access files on mobile equipment, i.e. cell phones. With obexftpd you can transfer files between any computers using IrDA, Bluetooth and TCP/IP .
- ussp-push: This program allows you to send objects using the OBEX PUSH protocol. The OBEX PUSH protocol is used to transfer files to a mobile device, generally via Bluetooth or IrDA. The protocol does not allow any other action than sending and generally requires less strict authentication, which is why it is sometimes preferred to the OBEX FTP protocol (which allows full filesystem access and is provided by the obexftp package).
WiFi
Cracking
- Aircrack-ng: This is a network software suite consisting of a detector, packet sniffer, WEP and WPA/WPA2-PSK cracker and analysis tool for 802.11 wireless LANs.
- Pyrit: This is an application GPGPU-driven WPA/WPA2-PSK key cracker.
- Reaver: This is an application to perform brute-force attacks against Wi-Fi Protected Setup (WPS)
- Wifte: This is an automated wireless auditing tool.
Scanning
- Kismet: This is an 802.11 layer2 wireless network identifer and passive data package collector
- Wash: a tool to find WPS enabled routers in your area.
Other Useful Features
Stress Testing
- Siege: an http load testing and benchmarking utility. It was designed to let web developers measure their code under duress, to see how it will stand up to load on the internet. Siege supports basic authentication, cookies, HTTP, HTTPS and FTP protocols. It lets its user hit a server with a configurable number of simulated clients. Those clients place the server "under siege."
- SlowHttpTest: A tool to test for slow HTTP DoS vulnerabilities.
Automotive Analysis
- can-utils: provides a simple set of tools for working with CAN from the Linux command line.
Anonymous mode
This feature allows the use of Tor as an integrated feature, so the users are guaranteed anonymity when they surf the web.
To achieve this, push the blue button on the upper left corner, search 'tor' and then choose 'tor start' (or use the terminal command 'sudo service tor start'). After this, start the anonymous application, located at anonymous > anonymous start (or run terminal command 'anonymous start'). When this is done, you need to configure (with admin privileges) your /etc/tor/torrc file and add the following to it:
VirtualAddrNetwork 10.192.0.0/10
AutomapHostsOnResolve 1
TransPort 9040
DNSPort 53
After this, restart the tor service:
sudo service tor restart
Then start the anonymous application again. In the opened terminal window, the application will let you know that it has stopped the service network-manager, killed certain processes to prevent leaks and changed your MAC address (anonymous cannot change the MAC address in a virtual machine). Then it will ask weather the local hostname should be changed and if traffic should be transparently routed through tor. After this, you can check your settings with the command:
anonymous status
You can check weather your tor service is operable by going to check.torproject.org. You can also check weather your IP address has changed by going to whatismyipaddress website.
RAM wiping
BackBox also offers it's users the option to wipe the computer's RAM at shutdown/reboot. Simply search for 'RAM Wiping' on the services menu and turn it on. Pulling the PC's cord usually does the trick, but this feature makes extra sure that no data can be recovered.
Forensic Analysis
Forensic analysis is the act of carrying out an investigation to obtain evidence from devices. It is a structured examination that aims to rebuild the user's history in a computer device or a server system. Some of the tools used for this in BackBox are:
- Dcfldd: This is an enhanced version of GNU dd with features useful for forensics and security
- Ddrescue: This is a data recovery tool that copies and attempts to recover data from one fle or block device (hard disc, CD-ROM, and so on) onto another.
- Guymager: This is a fast and most user-friendly forensic imager, based on libewf and libguytools.
- DFF: This (also known as Digital Forensics Framework) is a digital data collector for forensic purposes.
- Foremost: This is a console application that helps you to recover files based on their headers, footers, and internal data structures.
- Photorec: This is a file carver data recovery software tool explicitly focused on image recovery from digital cameras (CompactFlash, Memory Stick, Secure Digital, SmartMedia, Microdrive, MMC, USB flash drives, and so on), hard disks, and CD-ROMs.
- Scalpel: This is a carver tool designed to recover deleted data from the system.
- Testdisk: This is a free data recovery utility.
- Steghide: This is a steganography program that is able to hide data in the image and audio files.
- Vinetto: This examines the Thumbs.db fles for forensic purposes.
Malware Analysis
Malware analysis is the process of determining the purpose and functionality of a given malware sample such as a virus, worm, or Trojan horse. This process is a necessary step to be able to develop effective detection techniques for malicious code.
In BackBox, there are three main tools for this:
- Pyew: a (command line) python tool to analyse malware. It does have support for hexadecimal viewing, disassembly (Intel 16, 32 and 64 bits), PE and ELF file formats (it performs code analysis and let you write scripts using an API to perform many types of analysis), follows direct call/jmp instructions in the interactive command line, displays function names and string data references; supports OLE2 format, PDF format and more. It also supports plugins to add more features to the tool.
- Yara: a tool aimed at (but not limited to) helping malware researchers to identify and classify malware samples. With YARA you can create descriptions of malware families (or whatever you want to describe) based on textual or binary patterns. Each description, a.k.a rule, consists of a set of strings and a boolean expression which determine its logic.
- Volatility Framework - Volatile memory extraction utility framework - a completely open ollection of tools, implemented in Python under the GNU General Public License, for the extraction of digital artifacts from volatile memory (RAM) samples. The extraction techniques are performed completely independent of the system being investigated but offer visibilty into the runtime state of the system. The framework is intended to introduce people to the techniques and complexities associated with extracting digital artifacts from volatile memory samples and provide a platform for further work into this exciting area of research.
Mobile Analysis
Some of the tools for mobile security assessment in BackBox Linux are:
adb - Android Debug Bridge - a versatile command-line tool that lets you communicate with a device (an emulator or a connected Android device). The adb command facilitates a variety of device actions, such as installing and debugging apps, and it provides access to a Unix shell that you can use to run a variety of commands on a device.
apktool - A tool for reverse engineering 3rd party, closed, binary Android apps. It can decode resources to nearly original form and rebuild them after making some modifications. It also makes working with an app easier because of the project like file structure and automation of some repetitive tasks like building apk, etc.
iPBA - iPhone Backup Decoder and Analyzer - This software allows the user to browse through the content of an iPhone/iPad backup made by iTunes (or other software able to perform iOS devices' backup). The software is packed with all the routines needed to understand and show the content of files found.
VoIP Analysis
For this feature, BackBox has a tool called sipcrack. This is a set of utilities to perform sniffng and cracking of SIP protocols.
Summary
As seen above, BackBox has many tools that can be used for security purposes. Learning and writing about it gave me a good overview of what is needed to become a good cybersecurity specialist, especially in terms of what tools can be used.
References
BackBox Script for Anonymous Internet Navigation
Using tshark to watch and inspect network-traffic
Tshark tutorial and filter examples
Zenmap: A GUI Frontend For Nmap Network Scanning Tool
INSTALLATION INSTRUCTIONS FOR OPENVAS-MANAGER
OWASP Zed Attack Proxy Project
Using the MSFconsole Interface
Getting Started with Armitage and the Metasploit Framework
LFI/RFI testing and Exploiting with fimap
Password cracking with John the Ripper on Linux
Using XHydra to hack router password
Harvest other users credentials
[scapy]
International Journal of Advanced Research in Computer Science and Software Engineering