Python+OpenCV+Windows: Difference between revisions
From ICO wiki
Jump to navigationJump to search
No edit summary |
No edit summary |
||
| Line 1: | Line 1: | ||
[[Category:Robootika]] | |||
'''What do you need?''' | '''What do you need?''' | ||
----- | ----- | ||
| Line 67: | Line 69: | ||
*For example in my case it is: | *For example in my case it is: | ||
<source lang="python">cascPath = "face.xml"</source> | <source lang="python">cascPath = "face.xml"</source> | ||
Revision as of 19:31, 12 February 2016
What do you need?
- Python 2.7 (I recommend THIS) => because it has many packages preinstalled.
- OpenCV 2.4.11 (You can get this from here)
- Windows (tested on Windows10, probably works elsewhere)
What do I do now?
- Install all the .EXE files ( this version of python takes long time compared to the original one, make some coffee meanwhile)
- Navigate to these folders -> opencv\build\python\2.7(select your OS folder ( x64 for 64bit, x86 for 32bit)) & WinPython-64bit-2.7.10.3\python-2.7.10.amd64
- CTRL + C (or COPY) the file called cv2.pyd
- Paste the file into folders DLLs and Lib\site-packages
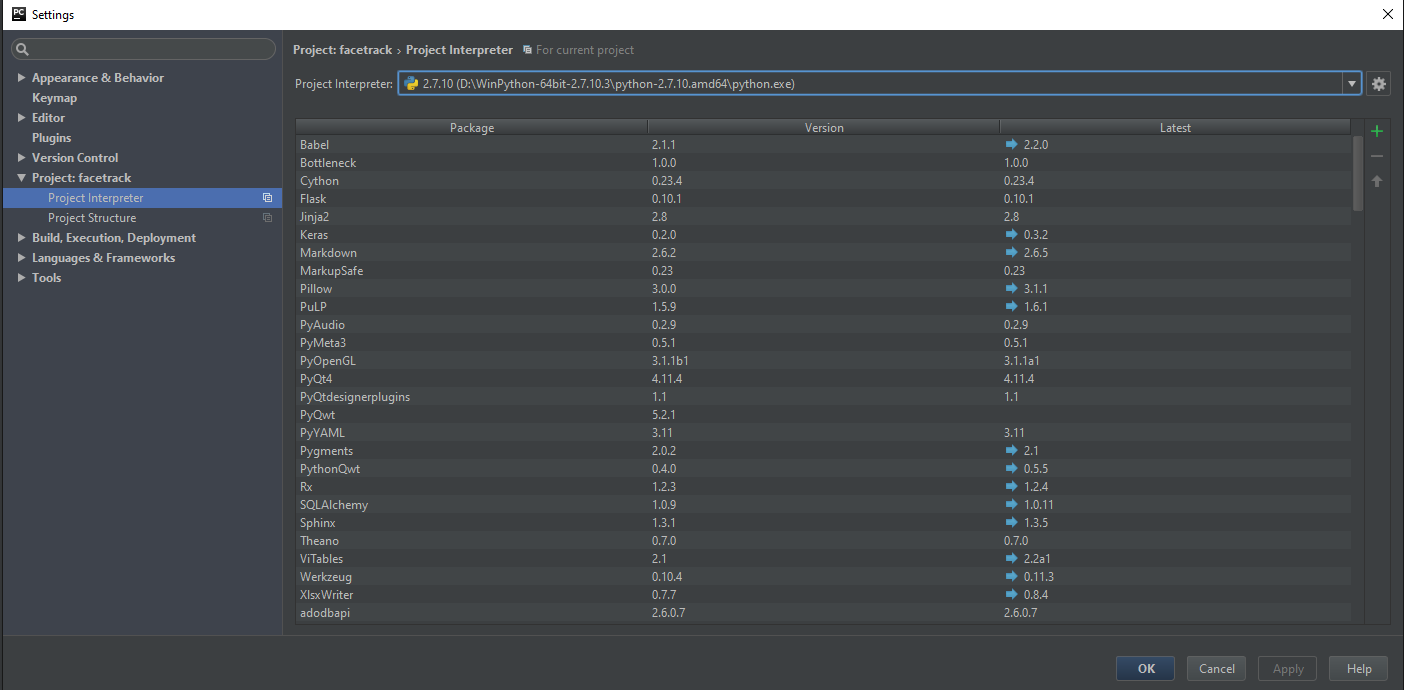
How do I set up PyCharm to use my new Interpreter?
- Open PyCharm and create new project
- Select File->Settings->Project->Project Interpreter-> GEAR ICON -> Add Local -> Navigate to Winpython\python\python.exe and select it
How do test if everything works?
- Copy following code:
import cv2
import sys

cascPath = sys.argv[1]
faceCascade = cv2.CascadeClassifier(cascPath)

video_capture = cv2.VideoCapture(0)

while True:
    # Capture frame-by-frame
    ret, frame = video_capture.read()

    gray = cv2.cvtColor(frame, cv2.COLOR_BGR2GRAY)

    faces = faceCascade.detectMultiScale(
        gray,
        scaleFactor=1.1,
        minNeighbors=5,
        minSize=(30, 30),
        flags=cv2.cv.CV_HAAR_SCALE_IMAGE
    )

    # Draw a rectangle around the faces
    for (x, y, w, h) in faces:
        cv2.rectangle(frame, (x, y), (x+w, y+h), (0, 255, 0), 2)

    # Display the resulting frame
    cv2.imshow('Video', frame)

    if cv2.waitKey(1) & 0xFF == ord('q'):
        break

# When everything is done, release the capture
video_capture.release()
cv2.destroyAllWindows()
- Now head to the site HERE
- Copy this into the same folder of your new project
- Change this line of your code to direct towards XML file
cascPath = LinkToFile.xml
- For example in my case it is:
cascPath = "face.xml"
